<?xml version="1.0" encoding="utf-8"?><feed xmlns="http://www.w3.org/2005/Atom" ><generator uri="https://jekyllrb.com/" version="4.3.1">Jekyll</generator><link href="https://m10k.eu/feed.xml" rel="self" type="application/atom+xml" /><link href="https://m10k.eu/" rel="alternate" type="text/html" /><updated>2025-09-03T02:45:55+02:00</updated><id>https://m10k.eu/feed.xml</id><title type="html">m10k</title><subtitle>Software, minimalism, and other things</subtitle><entry><title type="html">How Korean input methods work</title><link href="https://m10k.eu/2025/03/08/hangul-utf8.html" rel="alternate" type="text/html" title="How Korean input methods work" /><published>2025-03-08T14:02:00+01:00</published><updated>2025-03-08T14:02:00+01:00</updated><id>https://m10k.eu/2025/03/08/hangul-utf8</id><content type="html" xml:base="https://m10k.eu/2025/03/08/hangul-utf8.html"><![CDATA[<p>My current side project is an input method for Japanese and Korean,
and to add support for Korean, I needed to dig a little deeper into
how hangul are encoded in UTF-8. This post summarizes what I have
learned, and how my input method handles Hangul.</p>

<h2 id="a-quick-introduction-into-the-korean-writing-system">A quick introduction into the Korean writing system</h2>

<p>The letters that are used to write Korean are called <em>hangul</em>, and by
extension of that, the hangul may also mean <em>Korean script</em>. Each hangul
represents one syllable, which typically has between one and three
sounds that are pronounced in succession. The start sound of a syllable
is a consonant and is called <ruby class="ruby_null">초성<rp>(</rp><rt>cho-seong</rt><rp>)</rp></ruby>. The middle sound, <ruby class="ruby_null">중성<rp>(</rp><rt>jung-seong</rt><rp>)</rp></ruby>, is a vowel, and the end sound,
<ruby class="ruby_null">종성<rp>(</rp><rt>jong-seong</rt><rp>)</rp></ruby>, is another
consonant. Both the start sound and the end sound may be omitted, but
a syllable always has at least a vowel.</p>

<p>There are 19 consonants:</p>

<table>
  <thead>
    <tr>
      <th>ㅂ</th>
      <th>ㅃ</th>
      <th>ㅈ</th>
      <th>ㅉ</th>
      <th>ㄷ</th>
      <th>ㄸ</th>
      <th>ㄱ</th>
      <th>ㄲ</th>
      <th>ㅅ</th>
      <th>ㅆ</th>
      <th>ㅁ</th>
      <th>ㄴ</th>
      <th>ㅇ</th>
      <th>ㄹ</th>
      <th>ㅎ</th>
      <th>ㅋ</th>
      <th>ㅌ</th>
      <th>ㅊ</th>
      <th>ㅍ</th>
    </tr>
  </thead>
  <tbody>
    <tr>
      <td>b</td>
      <td>bb</td>
      <td>j</td>
      <td>jj</td>
      <td>d</td>
      <td>dd</td>
      <td>g</td>
      <td>gg</td>
      <td>s</td>
      <td>ss</td>
      <td>m</td>
      <td>n</td>
      <td>ng</td>
      <td>r</td>
      <td>h</td>
      <td>k</td>
      <td>t</td>
      <td>ch</td>
      <td>p</td>
    </tr>
  </tbody>
</table>

<p>And 21 vowels:</p>

<table>
  <thead>
    <tr>
      <th>ㅏ</th>
      <th>ㅐ</th>
      <th>ㅑ</th>
      <th>ㅒ</th>
      <th>ㅓ</th>
      <th>ㅔ</th>
      <th>ㅕ</th>
      <th>ㅖ</th>
      <th>ㅗ</th>
      <th>ㅘ</th>
      <th>ㅙ</th>
      <th>ㅚ</th>
      <th>ㅛ</th>
      <th>ㅜ</th>
      <th>ㅝ</th>
      <th>ㅞ</th>
      <th>ㅟ</th>
      <th>ㅠ</th>
      <th>ㅡ</th>
      <th>ㅢ</th>
      <th>ㅣ</th>
    </tr>
  </thead>
  <tbody>
    <tr>
      <td>a</td>
      <td>ae</td>
      <td>ya</td>
      <td>yae</td>
      <td>eo</td>
      <td>e</td>
      <td>yeo</td>
      <td>ye</td>
      <td>o</td>
      <td>wa</td>
      <td>wae</td>
      <td>wi</td>
      <td>yo</td>
      <td>u</td>
      <td>wo</td>
      <td>we</td>
      <td>wi</td>
      <td>yu</td>
      <td>eu</td>
      <td>ui</td>
      <td>i</td>
    </tr>
  </tbody>
</table>

<p>(<strong>Note</strong>: Compound consonants and vowels like ㅃ and ㅢ are officially not
considered separate, but it makes the following explanation easier.)</p>

<p>The consonants and vowels are collectively called <ruby class="ruby_null">자모<rp>(</rp><rt>jamo</rt><rp>)</rp></ruby>. The word Hangul (which should technically be
Hang<strong>eu</strong>l) would be ㅎㅏㄴㄱㅡㄹ, but that is not how Korean is written.
Jamo are not individual letters like the Roman letters that are used in
European languages, but rather they are combined to make proper hangul.
The first two jamo, ㅎ and ㅏ, both have a vertical shape, and thus they
are combined from left to right into 하. When jamo have a horizontal shape,
they are combined vertically: ㄱ and ㅡ become 그. When we add an end sound
(also called <ruby class="ruby_null">받침<rp>(</rp><rt>patchim</rt><rp>)</rp></ruby>),
we always add it at the bottom. Thus, hangeul is written 한글.</p>

<p>Jamo are not always stuffed from top to bottom and left to right, though.
Some of the vowels in the table above are actually two vowels, such as ㅝ,
which is a combination of ㅜ and ㅓ. Compound vowels do not have a neat
rectangular shape, so if we wrote them under or next to a consonant, we
would get some awkward dead space in between the jamo. To avoid that, we
make the consonant smaller, and write the compound vowel around the
consonant so that it is enclosed from the bottom right. In terms of writing
order, the first vowel is added under the consonant and the second vowel is
added on the right side of both of them. For example, ㅇ, ㅜ, and ㅓ are
combined into 워. As a side note, when ㅇ is used as consonant, it is not
pronounced “ng”, but it is silent: 워 is pronounced “wo”. This hangul is
already pretty crowded, but we can still add a final consonant. By adding a
ㄴ, we get the name of Korean currency, <ruby class="ruby_null">원<rp>(</rp><rt>won</rt><rp>)</rp></ruby>.
There are tens of thousands of different hangul, but all of them have one
of the following six shapes. Hangul where the end sound has two consonants,
like 없, are considered the same shape as 한.</p>

<p><img src="/assets/2025-03-08/hangul-shapes.png" alt="hangul shapes" /></p>

<h2 id="from-king-sejong-to-thompson-and-pike">From King Sejong to Thompson and Pike</h2>

<p>The Korean keyboard layout maps each jamo to a key. It is the job of the
input method to combine the jamo into hangul as the user types, deciding
how they should be combined, if they can be combined at all. As we have seen
above, ㅜ and ㅓ can be combined into ㅝ, but there are some combinations
like ㅜ and ㅒ or anything that starts with ㅔ that are not possible.
My input method treats Korean inputs as a string of jamo, so when the user
types 한글, the input is treated internally as ㅎㅏㄴㄱㅡㄹ. Dictionary
lookups and other operations all use the input in this shape. The input is
only converted into proper hangul when it is output as UTF-8. So let us now
have a look at how a string of jamo is parsed into a codepoint and then
converted to UTF-8.</p>

<h3 id="how-hangul-are-arranged-in-unicode">How Hangul are arranged in Unicode</h3>

<p>Ideally, we would like each hangul to be a bit pattern of three times five
bits, allowing us to bitwise-or the patterns for the start, middle, and end
sounds. Unfortunately, that is not how Unicode works at all.
In Unicode, each character is assigned a number, called a <em>codepoint</em>. The
first hangul syllable, 가, is codepoint 44032; the last syllable, 힣, is
codepoint 55203. The usual notation for Unicode codepoints is <code class="language-plaintext highlighter-rouge">U+x</code> where
<code class="language-plaintext highlighter-rouge">x</code> is the codepoint written in hexadecimal. So 가 is <code class="language-plaintext highlighter-rouge">U+AC00</code> and 힣 is
<code class="language-plaintext highlighter-rouge">U+D7A3</code>.
When I browsed through all Hangul codepoints in gucharmap, trying to find a
pattern, I noticed that the codepoints are arranged in groups of 588 hangul
that all begin with the same consonant. The first 588 codepoints all begin
with ㄱ, the next 588 codepoints begin with ㄲ, and so on. Comparing the
groups, I noticed that the groups are subdivided in sub-groups of 28
codepoints that all have the same middle sound. The first sub-group in the
ㄱ-group are all 28 hangul that start with 가: 가, 각, 갂, 갃, and so on.
The next sub-group are the 28 hangul that start with 개: 개, 객, 갞, 갟, and
so forth. The order of the end sounds is the same in each of the sub-groups.
That means that we can use the following formula to determine the Unicode
codepoint of a hangul, where <code class="language-plaintext highlighter-rouge">x</code> is the start sound,<code class="language-plaintext highlighter-rouge">y</code> the middle sound,
and <code class="language-plaintext highlighter-rouge">z</code> the end sound.</p>

<div class="language-plaintext highlighter-rouge"><div class="highlight"><pre class="highlight"><code>codepoint = 0xAC00 + 588x + 28y + z
</code></pre></div></div>

<p>The possible values for the consonants and vowels are shown in the following
two tables. An empty cell means that the jamo does not occur in that position
in a proper hangul (at least as far as Unicode is concerned).</p>

<table>
  <thead>
    <tr>
      <th> </th>
      <th>ㄱ</th>
      <th>ㄲ</th>
      <th>ㄴ</th>
      <th>ㄷ</th>
      <th>ㄸ</th>
      <th>ㄹ</th>
      <th>ㅁ</th>
      <th>ㅂ</th>
      <th>ㅃ</th>
      <th>ㅅ</th>
      <th>ㅆ</th>
      <th>ㅇ</th>
      <th>ㅈ</th>
      <th>ㅉ</th>
      <th>ㅊ</th>
      <th>ㅋ</th>
      <th>ㅌ</th>
      <th>ㅍ</th>
      <th>ㅎ</th>
      <th> </th>
      <th>ㄳ</th>
      <th>ㄵ</th>
      <th>ㄶ</th>
      <th>ㄺ</th>
      <th>ㄻ</th>
      <th>ㄼ</th>
      <th>ㄽ</th>
      <th>ㄾ</th>
      <th>ㄿ</th>
      <th>ㅀ</th>
      <th>ㅄ</th>
    </tr>
  </thead>
  <tbody>
    <tr>
      <td>x</td>
      <td>0</td>
      <td>1</td>
      <td>2</td>
      <td>3</td>
      <td>4</td>
      <td>5</td>
      <td>6</td>
      <td>7</td>
      <td>8</td>
      <td>9</td>
      <td>10</td>
      <td>11</td>
      <td>12</td>
      <td>13</td>
      <td>14</td>
      <td>15</td>
      <td>16</td>
      <td>17</td>
      <td>18</td>
      <td> </td>
      <td> </td>
      <td> </td>
      <td> </td>
      <td> </td>
      <td> </td>
      <td> </td>
      <td> </td>
      <td> </td>
      <td> </td>
      <td> </td>
      <td> </td>
    </tr>
    <tr>
      <td>z</td>
      <td>1</td>
      <td>2</td>
      <td>4</td>
      <td>7</td>
      <td> </td>
      <td>8</td>
      <td>16</td>
      <td>17</td>
      <td> </td>
      <td>19</td>
      <td>20</td>
      <td>21</td>
      <td>22</td>
      <td> </td>
      <td>23</td>
      <td>24</td>
      <td>25</td>
      <td>26</td>
      <td>27</td>
      <td>0</td>
      <td>3</td>
      <td>5</td>
      <td>6</td>
      <td>9</td>
      <td>10</td>
      <td>11</td>
      <td>12</td>
      <td>13</td>
      <td>14</td>
      <td>15</td>
      <td>18</td>
    </tr>
  </tbody>
</table>

<table>
  <thead>
    <tr>
      <th> </th>
      <th>ㅏ</th>
      <th>ㅐ</th>
      <th>ㅑ</th>
      <th>ㅒ</th>
      <th>ㅓ</th>
      <th>ㅔ</th>
      <th>ㅕ</th>
      <th>ㅖ</th>
      <th>ㅗ</th>
      <th>ㅘ</th>
      <th>ㅙ</th>
      <th>ㅚ</th>
      <th>ㅛ</th>
      <th>ㅜ</th>
      <th>ㅝ</th>
      <th>ㅞ</th>
      <th>ㅟ</th>
      <th>ㅠ</th>
      <th>ㅡ</th>
      <th>ㅢ</th>
      <th>ㅣ</th>
    </tr>
  </thead>
  <tbody>
    <tr>
      <td>y</td>
      <td>0</td>
      <td>1</td>
      <td>2</td>
      <td>3</td>
      <td>4</td>
      <td>5</td>
      <td>6</td>
      <td>7</td>
      <td>8</td>
      <td>9</td>
      <td>10</td>
      <td>11</td>
      <td>12</td>
      <td>13</td>
      <td>14</td>
      <td>15</td>
      <td>16</td>
      <td>17</td>
      <td>18</td>
      <td>19</td>
      <td>20</td>
    </tr>
  </tbody>
</table>

<p>Now, let’s say we want to find out the codepoint for 분. From the tables,
we know that <code class="language-plaintext highlighter-rouge">x = 7</code>, <code class="language-plaintext highlighter-rouge">y = 13</code>, and <code class="language-plaintext highlighter-rouge">z = 4</code>, and if we plug these values
into the formula, we get <code class="language-plaintext highlighter-rouge">codepoint = 0xAC00 + 588 * 7 + 28 * 13 + 4 =
0xBD84</code>. A look at gucharmap confirms that U+BD84 really is 분.</p>

<p><img src="/assets/2025-03-08/bun-gucharmap.png" alt="bun in gucharmap" /></p>

<p>This brings us to the next problem. How do we assemble the jamo that the
user entered into proper hangul?</p>

<h2 id="combining-jamo-into-hangul-codepoints">Combining jamo into hangul codepoints</h2>

<p>On the Korean keyboard layout, each jamo corresponds to one key. So if a
user presses the six keys <code class="language-plaintext highlighter-rouge">ㅎㅏㄴㄱㅡㄹ</code>, the input method combines that
into the two hangul <code class="language-plaintext highlighter-rouge">한글</code> and sends it to the application. If the user
enters a combination that cannot be converted into proper hangul, such as
<code class="language-plaintext highlighter-rouge">ㅋㅋㅋ</code>, it is sent to the application as it is.</p>

<p>My input method solves this problem with a simple automaton. The task of
the automaton is to parse a string of jamo into values for <code class="language-plaintext highlighter-rouge">x</code>, <code class="language-plaintext highlighter-rouge">y</code>, and
<code class="language-plaintext highlighter-rouge">z</code>. It starts in the state <code class="language-plaintext highlighter-rouge">X</code>, in which it expects a valid start
sound (that is, a consonant). If the first jamo in the input is a
consonant, the automaton looks up the value for <code class="language-plaintext highlighter-rouge">x</code> in the lookup table
<code class="language-plaintext highlighter-rouge">xmap</code> shown below, and transitions into the <code class="language-plaintext highlighter-rouge">Y</code> state. If the jamo is
not a consonant, the automaton aborts because a proper hangul has to
start with a consonant.</p>

<figure class="highlight"><pre><code class="language-c" data-lang="c"><span class="k">static</span> <span class="k">const</span> <span class="kt">int</span> <span class="n">xmap</span><span class="p">[]</span> <span class="o">=</span> <span class="p">{</span>
        <span class="p">[</span><span class="n">CHAR_KR_G</span><span class="p">]</span>  <span class="o">=</span> <span class="mi">0</span><span class="p">,</span>   <span class="cm">/* ㄱ  */</span>
        <span class="p">[</span><span class="n">CHAR_KR_GG</span><span class="p">]</span> <span class="o">=</span> <span class="mi">1</span><span class="p">,</span>   <span class="cm">/* ㄲ  */</span>
        <span class="p">[</span><span class="n">CHAR_KR_N</span><span class="p">]</span>  <span class="o">=</span> <span class="mi">2</span><span class="p">,</span>   <span class="cm">/* ㄴ  */</span>
        <span class="p">[</span><span class="n">CHAR_KR_D</span><span class="p">]</span>  <span class="o">=</span> <span class="mi">3</span><span class="p">,</span>   <span class="cm">/* ... */</span>
        <span class="p">[</span><span class="n">CHAR_KR_DD</span><span class="p">]</span> <span class="o">=</span> <span class="mi">4</span><span class="p">,</span>
        <span class="p">[</span><span class="n">CHAR_KR_R</span><span class="p">]</span>  <span class="o">=</span> <span class="mi">5</span><span class="p">,</span>
        <span class="p">[</span><span class="n">CHAR_KR_M</span><span class="p">]</span>  <span class="o">=</span> <span class="mi">6</span><span class="p">,</span>
        <span class="p">[</span><span class="n">CHAR_KR_B</span><span class="p">]</span>  <span class="o">=</span> <span class="mi">7</span><span class="p">,</span>
        <span class="p">[</span><span class="n">CHAR_KR_BB</span><span class="p">]</span> <span class="o">=</span> <span class="mi">8</span><span class="p">,</span>
        <span class="p">[</span><span class="n">CHAR_KR_S</span><span class="p">]</span>  <span class="o">=</span> <span class="mi">9</span><span class="p">,</span>
        <span class="p">[</span><span class="n">CHAR_KR_SS</span><span class="p">]</span> <span class="o">=</span> <span class="mi">10</span><span class="p">,</span>
        <span class="p">[</span><span class="n">CHAR_KR_NG</span><span class="p">]</span> <span class="o">=</span> <span class="mi">11</span><span class="p">,</span>
        <span class="p">[</span><span class="n">CHAR_KR_J</span><span class="p">]</span>  <span class="o">=</span> <span class="mi">12</span><span class="p">,</span>
        <span class="p">[</span><span class="n">CHAR_KR_JJ</span><span class="p">]</span> <span class="o">=</span> <span class="mi">13</span><span class="p">,</span>
        <span class="p">[</span><span class="n">CHAR_KR_Z</span><span class="p">]</span>  <span class="o">=</span> <span class="mi">14</span><span class="p">,</span>
        <span class="p">[</span><span class="n">CHAR_KR_K</span><span class="p">]</span>  <span class="o">=</span> <span class="mi">15</span><span class="p">,</span>
        <span class="p">[</span><span class="n">CHAR_KR_T</span><span class="p">]</span>  <span class="o">=</span> <span class="mi">16</span><span class="p">,</span>
        <span class="p">[</span><span class="n">CHAR_KR_P</span><span class="p">]</span>  <span class="o">=</span> <span class="mi">17</span><span class="p">,</span>
        <span class="p">[</span><span class="n">CHAR_KR_H</span><span class="p">]</span>  <span class="o">=</span> <span class="mi">18</span>
<span class="p">};</span></code></pre></figure>

<p>In the <code class="language-plaintext highlighter-rouge">Y</code> state, things get a bit more tricky because the automaton also
needs to deal with compound vowels such as ㅝ. If the next jamo is a vowel,
the automaton first determines the value of <code class="language-plaintext highlighter-rouge">y</code> using the lookup table
<code class="language-plaintext highlighter-rouge">ymap</code>. This table has gaps after ㅗ, ㅜ, and ㅡ because the y-values that
follow these vowels are compound vowels. If the automaton is in the <code class="language-plaintext highlighter-rouge">Y</code>
state and the next jamo is one of these three vowels, it will transition to
one of the <code class="language-plaintext highlighter-rouge">Yㅗ</code>, <code class="language-plaintext highlighter-rouge">Yㅜ</code>, and <code class="language-plaintext highlighter-rouge">Yㅡ</code> states. If the next jamo is a vowel that
cannot be the start a compound vowel (for example, ㅑ or ㅐ), the automaton
transitions into the <code class="language-plaintext highlighter-rouge">Z</code> state. Otherwise, if the next jamo is not a vowel
at all, the input is not a proper hangul and the automaton aborts.</p>

<figure class="highlight"><pre><code class="language-c" data-lang="c"><span class="k">static</span> <span class="k">const</span> <span class="kt">int</span> <span class="n">ymap</span><span class="p">[]</span> <span class="o">=</span> <span class="p">{</span>
        <span class="p">[</span><span class="n">CHAR_KR_A</span><span class="p">]</span>   <span class="o">=</span> <span class="mi">0</span><span class="p">,</span>
        <span class="p">[</span><span class="n">CHAR_KR_AE</span><span class="p">]</span>  <span class="o">=</span> <span class="mi">1</span><span class="p">,</span>
        <span class="p">[</span><span class="n">CHAR_KR_YA</span><span class="p">]</span>  <span class="o">=</span> <span class="mi">2</span><span class="p">,</span>
        <span class="p">[</span><span class="n">CHAR_KR_YAE</span><span class="p">]</span> <span class="o">=</span> <span class="mi">3</span><span class="p">,</span>
        <span class="p">[</span><span class="n">CHAR_KR_EO</span><span class="p">]</span>  <span class="o">=</span> <span class="mi">4</span><span class="p">,</span>
        <span class="p">[</span><span class="n">CHAR_KR_E</span><span class="p">]</span>   <span class="o">=</span> <span class="mi">5</span><span class="p">,</span>
        <span class="p">[</span><span class="n">CHAR_KR_YEO</span><span class="p">]</span> <span class="o">=</span> <span class="mi">6</span><span class="p">,</span>
        <span class="p">[</span><span class="n">CHAR_KR_YE</span><span class="p">]</span>  <span class="o">=</span> <span class="mi">7</span><span class="p">,</span>
        <span class="p">[</span><span class="n">CHAR_KR_O</span><span class="p">]</span>   <span class="o">=</span> <span class="mi">8</span><span class="p">,</span>  <span class="cm">/* ㅗ */</span>
        <span class="p">[</span><span class="n">CHAR_KR_YO</span><span class="p">]</span>  <span class="o">=</span> <span class="mi">12</span><span class="p">,</span>
        <span class="p">[</span><span class="n">CHAR_KR_U</span><span class="p">]</span>   <span class="o">=</span> <span class="mi">13</span><span class="p">,</span> <span class="cm">/* ㅜ */</span>
        <span class="p">[</span><span class="n">CHAR_KR_YU</span><span class="p">]</span>  <span class="o">=</span> <span class="mi">17</span><span class="p">,</span>
        <span class="p">[</span><span class="n">CHAR_KR_EU</span><span class="p">]</span>  <span class="o">=</span> <span class="mi">18</span><span class="p">,</span> <span class="cm">/* ㅡ */</span>
        <span class="p">[</span><span class="n">CHAR_KR_I</span><span class="p">]</span>   <span class="o">=</span> <span class="mi">20</span>
<span class="p">};</span></code></pre></figure>

<p>If the automaton has come this far, it already has a proper hangul with a
consonant and a vowel. Thus, if the following input cannot be added to the
current hangul, it is assumed to be the start of the next hangul, and the
current hangul is complete. That means, if the automaton is in any of the
<code class="language-plaintext highlighter-rouge">Yㅗ</code>, <code class="language-plaintext highlighter-rouge">Yㅜ</code>, and <code class="language-plaintext highlighter-rouge">Yㅡ</code> states, and it finds a vowel that can be used to
complete the compound, it will add it to the y-value. Otherwise, it will
not touch the input, so that it can be examined again in the next state.
The next state is going to be <code class="language-plaintext highlighter-rouge">Z</code>, regardless of the input.</p>

<p>Finally, in the <code class="language-plaintext highlighter-rouge">Z</code> state, the automaton will attempt to parse the end
sound. This state is somewhat similar to the <code class="language-plaintext highlighter-rouge">Y</code> state in that the end
sound may be a compound of two consonant jamo. If the next jamo is not a
consonant, the automaton is done and the current hangul does not have an
end sound.
If the next jamo in the input is a consonant, we have to deal with a
special case before we can add the jamo to the current hangul: if the
user entered something like <code class="language-plaintext highlighter-rouge">ㄱㅏㄷㅏ</code> it should be assembled into <code class="language-plaintext highlighter-rouge">가다</code>,
not <code class="language-plaintext highlighter-rouge">갇ㅏ</code>, because a proper hangul cannot start with ㅏ. Thus, when the
automaton is parsing the end sound and the next jamo is a consonant, it
must first check if the consonant could also be the start of a new hangul,
and only use it as end sound if it is not. The pragmatic solution is to
recursively call the parser function (the automaton) to determine if the
following input can be assembled into a proper hangul, and this is also
what my input method does. It may be more elegant to have the parser look
ahead and check if the jamo is followed by a vowel, in which case it is
the start of a new hangul, but the recursive solution is easier to
understand and implement.
So if the next jamo is not the start of a new hangul, it is part of the
end sound of the current hangul, and the automaton uses it to look up <code class="language-plaintext highlighter-rouge">z</code>
from the lookup table <code class="language-plaintext highlighter-rouge">zmap</code>, shown below.</p>

<figure class="highlight"><pre><code class="language-c" data-lang="c"><span class="k">static</span> <span class="k">const</span> <span class="kt">int</span> <span class="n">zmap</span><span class="p">[]</span> <span class="o">=</span> <span class="p">{</span>
        <span class="p">[</span><span class="n">CHAR_KR_G</span><span class="p">]</span>  <span class="o">=</span> <span class="mi">1</span><span class="p">,</span>
        <span class="p">[</span><span class="n">CHAR_KR_GG</span><span class="p">]</span> <span class="o">=</span> <span class="mi">2</span><span class="p">,</span>
        <span class="p">[</span><span class="n">CHAR_KR_N</span><span class="p">]</span>  <span class="o">=</span> <span class="mi">4</span><span class="p">,</span>
        <span class="p">[</span><span class="n">CHAR_KR_D</span><span class="p">]</span>  <span class="o">=</span> <span class="mi">7</span><span class="p">,</span>
        <span class="p">[</span><span class="n">CHAR_KR_R</span><span class="p">]</span>  <span class="o">=</span> <span class="mi">8</span><span class="p">,</span>
        <span class="p">[</span><span class="n">CHAR_KR_M</span><span class="p">]</span>  <span class="o">=</span> <span class="mi">16</span><span class="p">,</span>
        <span class="p">[</span><span class="n">CHAR_KR_B</span><span class="p">]</span>  <span class="o">=</span> <span class="mi">17</span><span class="p">,</span>
        <span class="p">[</span><span class="n">CHAR_KR_S</span><span class="p">]</span>  <span class="o">=</span> <span class="mi">19</span><span class="p">,</span>
        <span class="p">[</span><span class="n">CHAR_KR_SS</span><span class="p">]</span> <span class="o">=</span> <span class="mi">20</span><span class="p">,</span>
        <span class="p">[</span><span class="n">CHAR_KR_NG</span><span class="p">]</span> <span class="o">=</span> <span class="mi">21</span><span class="p">,</span>
        <span class="p">[</span><span class="n">CHAR_KR_J</span><span class="p">]</span>  <span class="o">=</span> <span class="mi">22</span><span class="p">,</span>
        <span class="p">[</span><span class="n">CHAR_KR_Z</span><span class="p">]</span>  <span class="o">=</span> <span class="mi">23</span><span class="p">,</span>
        <span class="p">[</span><span class="n">CHAR_KR_K</span><span class="p">]</span>  <span class="o">=</span> <span class="mi">24</span><span class="p">,</span>
        <span class="p">[</span><span class="n">CHAR_KR_T</span><span class="p">]</span>  <span class="o">=</span> <span class="mi">25</span><span class="p">,</span>
        <span class="p">[</span><span class="n">CHAR_KR_P</span><span class="p">]</span>  <span class="o">=</span> <span class="mi">26</span><span class="p">,</span>
        <span class="p">[</span><span class="n">CHAR_KR_H</span><span class="p">]</span>  <span class="o">=</span> <span class="mi">27</span>
<span class="p">};</span></code></pre></figure>

<p>If the jamo is a consonant that cannot be the start of a compound, the
automaton is done and the result is returned to the caller. If the jamo
may be the start of a compound (ㄱ, ㄴ, ㄹ, or ㅂ), the automaton switches
to one of the <code class="language-plaintext highlighter-rouge">Zㄱ</code>, <code class="language-plaintext highlighter-rouge">Zㄴ</code>, <code class="language-plaintext highlighter-rouge">Zㄹ</code> and <code class="language-plaintext highlighter-rouge">Zㅂ</code> states, where it will parse
the second consonant of the compound, if there is one. Again, the automaton
needs to consider the special case that the next consonant may also be the
start of another hangul, in which case it is not added to the end sound.
Either way, the parsing is complete and the result can be returned to the
caller.
The graph for this automaton, excluding the recursive part, looks something
like the following figure (the notation may not be completely correct).</p>

<p><img src="/assets/2025-03-08/hangul-automaton.png" alt="hangul-automaton" /></p>

<h2 id="converting-hangul-codepoints-to-utf-8">Converting hangul codepoints to UTF-8</h2>

<p>I have covered the conversion from jamo to Unicode codepoints, but that
is not enough to actually display hangul. The application talking to the
input method expects a UTF-8 encoded string, so we have to encode the
codepoint before we send it to the application. Codepoints in UTF-8
can have any length between one and four bytes. ASCII characters are one
byte in UTF-8, and stuff like emoji are typically four bytes. Hangul and
other CJK characters have exactly three bytes, so we do not have to deal
with any of the variable byte lengths here. All we need to know is the
pattern how to encode codepoints between <code class="language-plaintext highlighter-rouge">U+0800</code> and <code class="language-plaintext highlighter-rouge">U+FFFF</code> as UTF-8:</p>

<div class="language-plaintext highlighter-rouge"><div class="highlight"><pre class="highlight"><code>U+wxyz = 1110wwww 10xxxxyy 10yyzzzz
</code></pre></div></div>

<p>The <code class="language-plaintext highlighter-rouge">U+...</code> part on the left is the codepoint in hexadecimal notation as
explained above. On the right is the binary UTF-8 encoding. One digit in
hexadecimal represents four bits (a nibble), so each hexadecimal digit on
the left becomes four binary digits on the right. Thus, all we have to do
here is shift, mask, and combine the bits from the codepoint into their
UTF-8 form. Even in C, this can be done in less than 20 lines of code,
depending on how little error handling one feels comfortable with.</p>

<figure class="highlight"><pre><code class="language-c" data-lang="c"><span class="cp">#define FIRST_HANGUL 0xAC00
#define LAST_HANGUL  0xD7A3
</span>
<span class="kt">int</span> <span class="nf">hangul_to_utf8</span><span class="p">(</span><span class="k">const</span> <span class="kt">uint32_t</span> <span class="n">codepoint</span><span class="p">,</span> <span class="kt">char</span> <span class="o">*</span><span class="n">dst</span><span class="p">,</span> <span class="k">const</span> <span class="kt">size_t</span> <span class="n">dst_size</span><span class="p">)</span>
<span class="p">{</span>
        <span class="k">if</span> <span class="p">(</span><span class="o">!</span><span class="n">dst</span><span class="p">)</span> <span class="p">{</span>
                <span class="k">return</span> <span class="o">-</span><span class="n">EINVAL</span><span class="p">;</span>
        <span class="p">}</span>

        <span class="k">if</span> <span class="p">(</span><span class="n">codepoint</span> <span class="o">&lt;</span> <span class="n">FIRST_HANGUL</span> <span class="o">||</span> <span class="n">codepoint</span> <span class="o">&gt;</span> <span class="n">LAST_HANGUL</span><span class="p">)</span> <span class="p">{</span>
                <span class="k">return</span> <span class="o">-</span><span class="n">EDOM</span><span class="p">;</span>
        <span class="p">}</span>

        <span class="k">if</span> <span class="p">(</span><span class="n">dst_size</span> <span class="o">&lt;</span> <span class="mi">3</span><span class="p">)</span> <span class="p">{</span>
                <span class="k">return</span> <span class="o">-</span><span class="n">EMSGSIZE</span><span class="p">;</span>
        <span class="p">}</span>

        <span class="n">dst</span><span class="p">[</span><span class="mi">0</span><span class="p">]</span> <span class="o">=</span> <span class="mh">0xE0</span> <span class="o">|</span> <span class="p">((</span><span class="n">codepoint</span> <span class="o">&gt;&gt;</span> <span class="mi">12</span><span class="p">)</span> <span class="o">&amp;</span> <span class="mh">0x0f</span><span class="p">);</span>
        <span class="n">dst</span><span class="p">[</span><span class="mi">1</span><span class="p">]</span> <span class="o">=</span> <span class="mh">0x80</span> <span class="o">|</span> <span class="p">((</span><span class="n">codepoint</span> <span class="o">&gt;&gt;</span>  <span class="mi">6</span><span class="p">)</span> <span class="o">&amp;</span> <span class="mh">0x3f</span><span class="p">);</span>
        <span class="n">dst</span><span class="p">[</span><span class="mi">2</span><span class="p">]</span> <span class="o">=</span> <span class="mh">0x80</span> <span class="o">|</span> <span class="p">(</span> <span class="n">codepoint</span>        <span class="o">&amp;</span> <span class="mh">0x3f</span><span class="p">);</span>

        <span class="k">return</span> <span class="mi">3</span><span class="p">;</span>
<span class="p">}</span></code></pre></figure>

<p>That may not seem like much, but this is all one needs to know to write a simple
input method for Korean. If one wants to get fancy and support Hanja (Chinese
characters) it does get a little more complicated though. Maybe I will cover that
in another post.</p>]]></content><author><name></name></author><category term="languages" /><category term="input" /><category term="korean" /><summary type="html"><![CDATA[My current side project is an input method for Japanese and Korean, and to add support for Korean, I needed to dig a little deeper into how hangul are encoded in UTF-8. This post summarizes what I have learned, and how my input method handles Hangul.]]></summary></entry><entry><title type="html">Porting AlmaLinux to RISC-V</title><link href="https://m10k.eu/2023/10/13/almalinux-riscv.html" rel="alternate" type="text/html" title="Porting AlmaLinux to RISC-V" /><published>2023-10-13T12:15:22+02:00</published><updated>2023-10-13T12:15:22+02:00</updated><id>https://m10k.eu/2023/10/13/almalinux-riscv</id><content type="html" xml:base="https://m10k.eu/2023/10/13/almalinux-riscv.html"><![CDATA[<p>Until a couple of weeks ago I assumed that RISC-V was still an experimental architecture
that one would have to customize in VHDL or Verilog and use on an FPGA. So when Debian
announced official support for the new architecture, I decided to have a closer look. It
turns out there are several Raspberry Pi-class boards with RISC-V processors that run some
flavor of Linux, and not surprisingly most vendors offer a Debian-based image for their
boards.</p>

<p>While there are Fedora images for some boards, none of the Red Hat-based distributions
have support for RISC-V yet, so I got an idea for an ambitious project: make AlmaLinux the
first distribution in the Red Hat family that has proper support – whatever that means –
for RISC-V. I used to work on MIRACLE LINUX before <a href="https://almalinux.org/blog/cybertrust-joins-almalinux">my employer joined AlmaLinux</a>,
so I have a rough idea how much work is involved in building the packages. I had never
ported an entire distribution to a new CPU architecture though, so I was not sure if this
is possible at all, and this is why I actually wanted to keep this below the radar. Despite
that, I somehow happened to mention this project in a 1:1 with my manager, who immediately
liked the idea and got me funding for a board. And this is how the ball started rolling.</p>

<h2 id="clearing-the-port">Clearing the port</h2>

<p>Since most available RISC-V boards offer performance that is comparable to a Raspberry Pi,
packages like GCC take several hours, and an entire distribution will probably take weeks
to build. Getting faster boards is currently out of question, so I will have to scale
horizontally, building packages on multiple boards in parallel. Luckily, the
<a href="https://github.com/m10k/foundry">build system that I wrote to build Debian packages</a> is
very good at scaling horizontally, so I spent some days adding support for RPM builds and
a simple build scheduler, and got the build system to the point where it can rebuild an
entire RPM-based distribution (modularity packages are the usual exception).</p>

<p>The starting point for the AlmaLinux port is a Fedora build root, since that is the only
RPM-based distribution that had RISC-V packages at the time of writing. Fedora 34 is the
closest to AlmaLinux 9, so this would be ideal for the initial build root, but there are
no Fedora 34 packages for RISC-V. There are packages for Fedora 29 and Fedora 33 though,
so I decided to start with AlmaLinux 8, which is based on RHEL8 (the latter is based on
Fedora 29). To build AlmaLinux 9, I will first have to port Fedora 34, which <em>should</em> be
possible with a Fedora 33 build root, but is very likely more work than a simple rebuild.
Either way, I will write a more technical follow-up once I have some tangible results.</p>]]></content><author><name></name></author><category term="almalinux" /><category term="riscv" /><category term="foundry" /><summary type="html"><![CDATA[Until a couple of weeks ago I assumed that RISC-V was still an experimental architecture that one would have to customize in VHDL or Verilog and use on an FPGA. So when Debian announced official support for the new architecture, I decided to have a closer look. It turns out there are several Raspberry Pi-class boards with RISC-V processors that run some flavor of Linux, and not surprisingly most vendors offer a Debian-based image for their boards.]]></summary></entry><entry><title type="html">Writing a recursive descent parser in Bash</title><link href="https://m10k.eu/2023/07/29/pkgex-parser.html" rel="alternate" type="text/html" title="Writing a recursive descent parser in Bash" /><published>2023-07-29T07:44:27+02:00</published><updated>2023-07-29T07:44:27+02:00</updated><id>https://m10k.eu/2023/07/29/pkgex-parser</id><content type="html" xml:base="https://m10k.eu/2023/07/29/pkgex-parser.html"><![CDATA[<p>Two years ago, I was tasked to write a program that generates RPM package
repositories from a large pool of packages. The pool is a set of directories that
contain all packages that were ever built for a given Miracle Linux release, and
the program would be used to pick specific packages from the pool and generate
repositories for yum and dnf. The existing program had hard-coded rules for
package selection that made it require frequent repairs, and it didn’t play nice
with modularity packages. Since the new solution should be an improvement over
the old one, I decided to separate the rules from the code, and for this I needed
a small domain-specific language. I had already written a lot of absurd things in
Bash at the time, so naturally I had to see if a parser could be another of those
things.</p>

<h2 id="making-up-a-language">Making up a language</h2>

<p>I didn’t know what kind of criteria would be used for the package selection, but I
wanted to give the user as much freedom as possible. An RPM package’s properties
can be queried using query tags, so I decided that the language must allow easy
access to these tags. The following is what I came up with.</p>

<div class="language-plaintext highlighter-rouge"><div class="highlight"><pre class="highlight"><code>BaseOS : name == "kernel"    &amp;&amp;
         version == "5.6.10" &amp;&amp;
         release &gt;= "1.el9"  &amp;&amp;
         release &lt;= "2.el9"  &amp;&amp;
         arch == "amd64";
BaseOS : name =~ "^miraclelinux-";
AppStream : modularitylabel.module == "nginx" &amp;&amp;
            modularitylabel.stream == "1.14" &amp;&amp;
            buildtime &lt; 1690001217;
</code></pre></div></div>

<p>The left-hand side of a rule (that is, the part on the left of the colon) is the
name of the destination repository while the right-hand side is a logical expression
that defines criteria for the packages to be added. The property names used on the
right-hand side are the query tags for <code class="language-plaintext highlighter-rouge">rpm --queryformat</code>, so this language allows
the user to filter RPM packages in all kinds of ways. In the case of the
<code class="language-plaintext highlighter-rouge">modularitylabel</code> tag, it goes one step further: the information behind this tag has
four components that one doesn’t usually compare all at once, so I wanted to allow
users to query the individual components of this tag.</p>

<p>The first rule in the example tells the program to search for all packages with name
<code class="language-plaintext highlighter-rouge">kernel</code> and version <code class="language-plaintext highlighter-rouge">5.6.10</code> and a release that is between <code class="language-plaintext highlighter-rouge">1.el9</code> and <code class="language-plaintext highlighter-rouge">2.el9</code>
(inclusive) that were built for the <code class="language-plaintext highlighter-rouge">amd64</code> architecture. The <em>newest</em> package that
meets these criteria will be added to the BaseOS repository.</p>

<p>The <code class="language-plaintext highlighter-rouge">=~</code> operator used in the second rule means <em>regular expression match</em>. This rule
selects all packages whose name starts with <code class="language-plaintext highlighter-rouge">miraclelinux-</code>. Since this will match
multiple packages (miraclelinux-release, miraclelinux-logos, etc), this will cause
the newest version of each of the matched packages to be added to the BaseOS repository.
The rule does not specify the architecture either, so a package will be added multiple
times if it is available for multiple architectures.</p>

<p>The last rule selects all packages from the modularity stream <code class="language-plaintext highlighter-rouge">nginx:1.14</code> that were
built before 13:46:57 on July 22, 2023, Japanese Standard Time.</p>

<h2 id="grammar-of-the-language">Grammar of the language</h2>

<p>The first step in any compiler or interpreter is the lexer (or tokenizer), which
turns an input into a stream of tokens. Tokens are similar to words in natural
languages, in that they can be used to form statements. When we study a foreign
language, we try to understand which words are the subject, object, verb, etc of
a sentence. That’s essentially what a parser does.</p>

<p>To write a correct lexer for the language, I first needed to define what valid tokens
of the language look like. The easiest way to do that is by looking at the grammar of
a language, so I determined the grammar for the example file above. I’m not going to
explain how exactly I did that (in short, I drew a lot of inspiration from the C
grammar), but here is the result.</p>

<div class="language-plaintext highlighter-rouge"><div class="highlight"><pre class="highlight"><code>rule-list = rule
          | rule-list rule

rule = identifier ':' logical-OR-pkgex ';'

logical-OR-pkgex = logical-AND-pkgex
                 | logical-OR-pkgex '||' logical-AND-pkgex

logical-AND-pkgex = primary-pkgex
                  | logical-AND-pkgex '||' primary-pkgex

primary-pkgex = literal operator identifier
              | '(' logical-OR-pkgex ')'

operator = '&gt;' | '&gt;=' | '&lt;' | '&lt;=' | '==' | '!=' | '=~'

identifier = string | literal
</code></pre></div></div>

<p>A string is a double-quoted sequence of characters just like in C, and a literal is
something like a variable name in C, but with <code class="language-plaintext highlighter-rouge">.</code> allowed as part of the name. Version
numbers like <code class="language-plaintext highlighter-rouge">1.2.3</code> are also literals.</p>

<p>The lexer should identify all terminals in the language, which are all symbols that
never appear on the left-hand side of any grammar rule (grammar rules are also called
<em>productions</em>). In the grammar above, the terminals are strings, literals, and
everything in single-quotes.</p>

<h2 id="writing-the-lexer">Writing the lexer</h2>

<p>Shell does not have classes or structs, and passing data from a function to its
caller in variables is very awkward and should be avoided if at all possible. Really,
the only practicable way to pass data back to the caller is via standard output. It is
nevertheless possible to write a very elegant lexer: with a set of recursive functions
that read an input character by character and write the recognized tokens to standard
output.</p>

<p>The <code class="language-plaintext highlighter-rouge">tokenize()</code> function is the entry point and forwards the input to one of the more
specific tokenizer functions. The specific tokenizer functions expect two arguments,
the portion of the input that was already processed and not written to stdout yet, and
the portion of the input that has not been processed yet. The tokenizer function then
looks at the next character of the input and decides whether to print a token to
standard output and what tokenizer function to call next. Formally speaking, the
tokenizer is a state machine and each tokenizer function represents one state.</p>

<figure class="highlight"><pre><code class="language-bash" data-lang="bash">tokenize<span class="o">()</span> <span class="o">{</span>
	<span class="nb">local </span><span class="nv">input</span><span class="o">=</span><span class="s2">"</span><span class="nv">$1</span><span class="s2">"</span>

	<span class="k">case</span> <span class="s2">"</span><span class="k">${</span><span class="nv">input</span>:0:1<span class="k">}</span><span class="s2">"</span> <span class="k">in</span>
		<span class="s1">'&lt;'</span><span class="p">|</span><span class="s1">'&gt;'</span><span class="p">|</span><span class="s1">'!'</span><span class="p">)</span>
			tokenize_cmp_op <span class="s2">"</span><span class="k">${</span><span class="nv">input</span>:0:1<span class="k">}</span><span class="s2">"</span> <span class="s2">"</span><span class="k">${</span><span class="nv">input</span>:1<span class="k">}</span><span class="s2">"</span>
			<span class="p">;;</span>

		<span class="s1">'='</span><span class="p">)</span>
			tokenize_eq_op <span class="s2">"</span><span class="k">${</span><span class="nv">input</span>:0:1<span class="k">}</span><span class="s2">"</span> <span class="s2">"</span><span class="k">${</span><span class="nv">input</span>:1<span class="k">}</span><span class="s2">"</span>
			<span class="p">;;</span>

		<span class="c"># ...</span>
	<span class="k">esac</span>
	<span class="k">return</span> <span class="s2">"</span><span class="nv">$?</span><span class="s2">"</span>
<span class="o">}</span>

tokenize_cmp_op<span class="o">()</span> <span class="o">{</span>
	<span class="nb">local read</span><span class="o">=</span><span class="s2">"</span><span class="nv">$1</span><span class="s2">"</span>
	<span class="nb">local </span><span class="nv">input</span><span class="o">=</span><span class="s2">"</span><span class="nv">$2</span><span class="s2">"</span>

	<span class="k">if</span> <span class="o">[[</span> <span class="s2">"</span><span class="k">${</span><span class="nv">input</span>:0:1<span class="k">}</span><span class="s2">"</span> <span class="o">==</span> <span class="s2">"="</span> <span class="o">]]</span><span class="p">;</span> <span class="k">then
		</span><span class="nb">echo</span> <span class="s2">"RELOP:</span><span class="nv">$read</span><span class="k">${</span><span class="nv">input</span>:0:1<span class="k">}</span><span class="s2">"</span>
		tokenize <span class="s2">"</span><span class="k">${</span><span class="nv">input</span>:1<span class="k">}</span><span class="s2">"</span>
	<span class="k">else
		</span><span class="nb">echo</span> <span class="s2">"RELOP:</span><span class="nv">$read</span><span class="s2">"</span>
		tokenize <span class="s2">"</span><span class="nv">$input</span><span class="s2">"</span>
	<span class="k">fi

	return</span> <span class="s2">"</span><span class="nv">$?</span><span class="s2">"</span>
<span class="o">}</span>

tokenize_eq_op<span class="o">()</span> <span class="o">{</span>
	<span class="nb">local read</span><span class="o">=</span><span class="s2">"</span><span class="nv">$1</span><span class="s2">"</span>
	<span class="nb">local </span><span class="nv">input</span><span class="o">=</span><span class="s2">"</span><span class="nv">$2</span><span class="s2">"</span>

	<span class="k">case</span> <span class="s2">"</span><span class="k">${</span><span class="nv">input</span>:0:1<span class="k">}</span><span class="s2">"</span> <span class="k">in</span>
		<span class="s1">'='</span><span class="p">|</span><span class="s1">'~'</span><span class="p">)</span>
			<span class="nb">echo</span> <span class="s2">"RELOP:</span><span class="nv">$read</span><span class="k">${</span><span class="nv">input</span>:0:1<span class="k">}</span><span class="s2">"</span>
			tokenize <span class="s2">"</span><span class="k">${</span><span class="nv">input</span>:1<span class="k">}</span><span class="s2">"</span>
			<span class="p">;;</span>

		<span class="k">*</span><span class="p">)</span>
			<span class="nb">echo</span> <span class="s2">"RELOP:</span><span class="nv">$read</span><span class="s2">"</span>
			tokenize <span class="s2">"</span><span class="nv">$input</span><span class="s2">"</span>
			<span class="p">;;</span>
	<span class="k">esac</span>

	<span class="k">return</span> <span class="s2">"</span><span class="nv">$?</span><span class="s2">"</span>
<span class="o">}</span></code></pre></figure>

<p>The drawback of this approach is that the depth of the recursion grows with the size
of the input, but – speed aside – this worked fine with all inputs that I threw at
the script. I’m not including the entire tokenizer in this post, but you can find it
on <a href="https://github.com/m10k/pkgex">Github</a>.</p>

<h2 id="from-tokens-to-trees">From tokens to trees</h2>

<p>
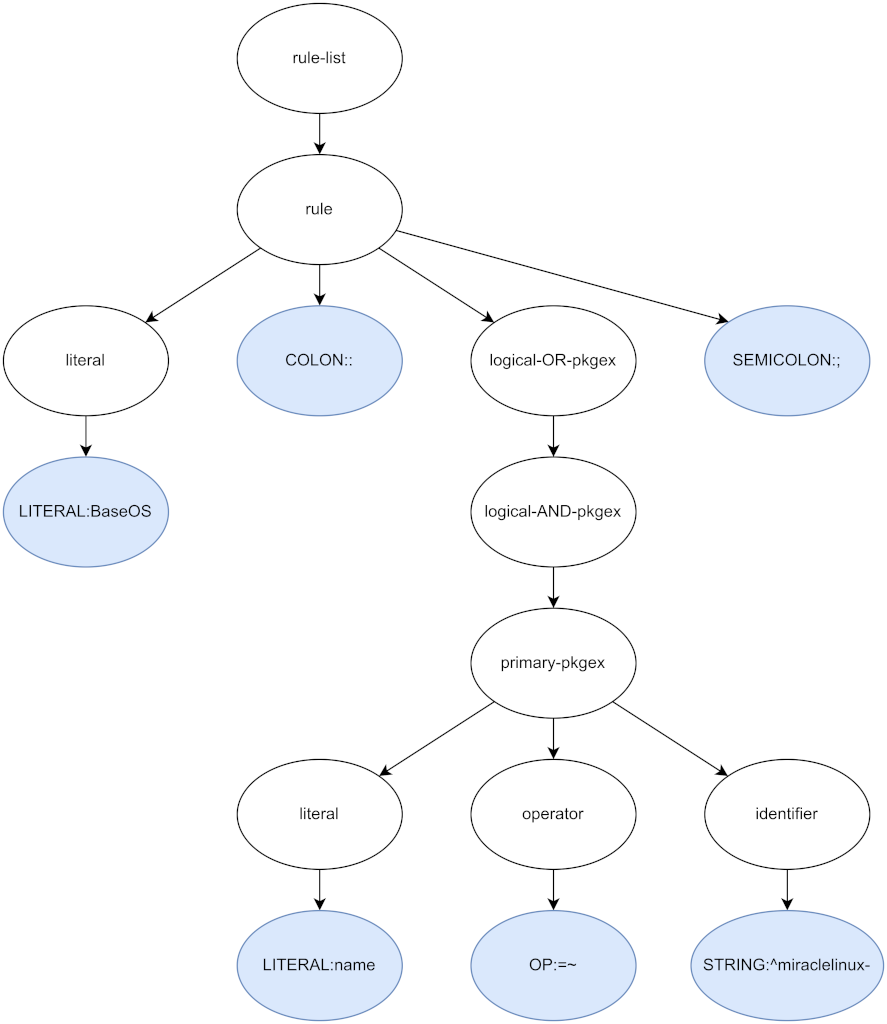
To see how we can use the grammar from earlier to turn a stream of tokens into a parse
tree, it’s helpful to have a look at a simple rule and the tokens that the lexer returns
when reading it. This will be a little theoretical, but I will try not to make it too
boring. Let’s assume we have a file with only the simplest of the three rules from above.</p>

<div class="language-plaintext highlighter-rouge"><div class="highlight"><pre class="highlight"><code>BaseOS : name =~ "^miraclelinux-";
</code></pre></div></div>

<p>There are six tokens in this input, namely the following.</p>

<div class="language-plaintext highlighter-rouge"><div class="highlight"><pre class="highlight"><code>LITERAL:BaseOS
COLON::
LITERAL:name
RELOP:=~
STRING:^miraclelinux-
SEMICOLON:;
</code></pre></div></div>

<p>The first production in the grammar of our language is for <code class="language-plaintext highlighter-rouge">rule-list</code>, so this is
where the parser will start. It will then attempt to derive the right side of the
production from the tokens in the token stream. For every production that it
successfully parses, it will generate a node and add it to the parse tree. In this
example, the parser would start with a <code class="language-plaintext highlighter-rouge">rule-list</code>, then derive a <code class="language-plaintext highlighter-rouge">list</code>, which in
turn contains an <code class="language-plaintext highlighter-rouge">identifier</code>, a colon token, a <code class="language-plaintext highlighter-rouge">logical-OR-pkgex</code>, and a semicolon
token. From the <code class="language-plaintext highlighter-rouge">logical-OR-regex</code> production it would derive a <code class="language-plaintext highlighter-rouge">logical-AND-pkgex</code>,
and from this one it reaches the production for <code class="language-plaintext highlighter-rouge">primary-pkgex</code>, which can be
produced with the tokens <code class="language-plaintext highlighter-rouge">name</code>, <code class="language-plaintext highlighter-rouge">=~</code>, and <code class="language-plaintext highlighter-rouge">^miraclelinux-</code> that are next in the
token stream. When the parser returns to <code class="language-plaintext highlighter-rouge">rule-list</code>, there are no more tokens in
the stream, and since the production it parsed does not need more tokens, it is done.
The parse tree that the parser generates in this way looks like the following.</p>

<p><img src="/assets/2023-07-29-pkgex-parser/parsetree.png" alt="pkgex-parsetree.drawio.png" /></p>

<p>Because the parser recursively descends the productions of the grammar, it is
called a recursive descent parser. It uses a grammar to anticipate the structure of
the input, making it a <em>syntax-directed parser</em>. Parsers like this are typically
implemented with a set of functions, each of which parses one symbol of the grammar.</p>

<p>Let’s have a look at one of the simple cases, <code class="language-plaintext highlighter-rouge">parse_string()</code>. This function expects
the next token in the token stream to be a string (the token stream is passed
in the arguments). If this expectation is met, the function emits a node for the token
to stdout, otherwise it returns an error.</p>

<figure class="highlight"><pre><code class="language-bash" data-lang="bash">parse_string<span class="o">()</span> <span class="o">{</span>
	<span class="nb">local </span><span class="nv">token</span><span class="o">=</span><span class="s2">"</span><span class="nv">$1</span><span class="s2">"</span>

	<span class="k">if</span> <span class="o">[[</span> <span class="s2">"</span><span class="k">${</span><span class="nv">token</span><span class="p">%%</span>:<span class="p">*</span><span class="k">}</span><span class="s2">"</span> <span class="o">!=</span> <span class="s2">"STRING"</span> <span class="o">]]</span><span class="p">;</span> <span class="k">then
		return </span>1
	<span class="k">fi

	</span>node_new 1 <span class="s2">"STRING"</span> <span class="s2">"s:</span><span class="k">${</span><span class="nv">token</span><span class="p">#*</span>:<span class="k">}</span><span class="s2">"</span>
	<span class="k">return</span> <span class="s2">"</span><span class="nv">$?</span><span class="s2">"</span>
<span class="o">}</span></code></pre></figure>

<p>The call to <code class="language-plaintext highlighter-rouge">node_new()</code> is what generates the actual node. It creates a JSON object
with three properties <code class="language-plaintext highlighter-rouge">num_tokens</code>, <code class="language-plaintext highlighter-rouge">type</code>, and <code class="language-plaintext highlighter-rouge">data</code>, and writes it to standard
output.</p>

<p>The first parser function that is slightly more complicated is <code class="language-plaintext highlighter-rouge">parse_primary_pkgex()</code>,
which implements the following productions.</p>

<div class="language-plaintext highlighter-rouge"><div class="highlight"><pre class="highlight"><code>primary-pkgex = literal operator identifier
              | '(' logical-OR-pkgex ')'
</code></pre></div></div>

<p>Because primary package expressions can take two different shapes, the function has
to decide which one to parse. The second shape always starts with an open parenthesis,
so a look at the next token is enough to decide how to continue. The next token, as
well as the concept of looking at it to make parser decisions is called <em>lookahead</em>.</p>

<p>When a decision has been made, all that <code class="language-plaintext highlighter-rouge">parse_primary_pkgex()</code> has to do is call the
parser functions for the symbols that the productions expect, and generate a node for
the result – or return an error.</p>

<figure class="highlight"><pre><code class="language-bash" data-lang="bash">parse_primary_pkgex<span class="o">()</span> <span class="o">{</span>
	<span class="nb">local </span><span class="nv">tokens</span><span class="o">=(</span><span class="s2">"</span><span class="nv">$@</span><span class="s2">"</span><span class="o">)</span>

	<span class="nb">local</span> <span class="nt">-i</span> tokens_used
	<span class="nb">local </span>data

	<span class="k">if</span> <span class="o">[[</span> <span class="s2">"</span><span class="k">${</span><span class="nv">tokens</span><span class="p">[0]</span><span class="k">}</span><span class="s2">"</span> <span class="o">==</span> <span class="s2">"LPAREN:("</span> <span class="o">]]</span><span class="p">;</span> <span class="k">then</span>
		<span class="c"># primary-pkgex = '(' logical-OR-pkgex ')'</span>

		<span class="nb">local </span>lparen
		<span class="nb">local </span>pkgex
		<span class="nb">local </span>rparen

		<span class="nv">lparen</span><span class="o">=</span><span class="s2">"</span><span class="k">${</span><span class="nv">tokens</span><span class="p">[0]</span><span class="k">}</span><span class="s2">"</span>
		<span class="nv">tokens_used</span><span class="o">=</span>1

		<span class="k">if</span> <span class="o">!</span> <span class="nv">pkgex</span><span class="o">=</span><span class="si">$(</span>parse_logical_or_pkgex <span class="s2">"</span><span class="k">${</span><span class="nv">tokens</span><span class="p">[@]</span>:<span class="nv">$tokens_used</span><span class="k">}</span><span class="s2">"</span><span class="si">)</span><span class="p">;</span> <span class="k">then
			</span>log_error <span class="s2">"Expected logical-OR-pkgex near </span><span class="se">\"</span><span class="k">${</span><span class="nv">tokens</span><span class="p">[*]</span>:<span class="nv">$tokens_used</span>:1<span class="k">}</span><span class="se">\"</span><span class="s2">"</span>
			<span class="k">return </span>1
		<span class="k">fi</span>

		<span class="o">((</span> tokens_used +<span class="o">=</span> <span class="si">$(</span>node_get_num_tokens <span class="s2">"</span><span class="nv">$pkgex</span><span class="s2">"</span><span class="si">)</span> <span class="o">))</span>
		<span class="nv">rparen</span><span class="o">=</span><span class="s2">"</span><span class="k">${</span><span class="nv">tokens</span><span class="p">[</span><span class="nv">$tokens_used</span><span class="p">]</span><span class="k">}</span><span class="s2">"</span>

		<span class="k">if</span> <span class="o">[[</span> <span class="s2">"</span><span class="nv">$rparen</span><span class="s2">"</span> <span class="o">!=</span> <span class="s2">"RPAREN:)"</span> <span class="o">]]</span><span class="p">;</span> <span class="k">then
			</span>log_error <span class="s2">"Expected ')', found </span><span class="se">\"</span><span class="nv">$rparen</span><span class="se">\"</span><span class="s2">"</span>
			<span class="k">return </span>1
		<span class="k">fi

		</span><span class="nv">data</span><span class="o">=</span><span class="si">$(</span>json_object <span class="s2">"lparen"</span> <span class="s2">"</span><span class="nv">$lparen</span><span class="s2">"</span> <span class="se">\</span>
		                   <span class="s2">"child"</span>  <span class="s2">"</span><span class="nv">$pkgex</span><span class="s2">"</span>  <span class="se">\</span>
		                   <span class="s2">"rparen"</span> <span class="s2">"</span><span class="nv">$rparen</span><span class="s2">"</span><span class="si">)</span>
		<span class="o">((</span> tokens_used++ <span class="o">))</span>
	<span class="k">else</span>
		<span class="c"># primary-pkgex = property operator identifier</span>

		<span class="nb">local </span>property
		<span class="nb">local </span>operator
		<span class="nb">local </span>identifier

		<span class="k">if</span> <span class="o">!</span> <span class="nv">property</span><span class="o">=</span><span class="si">$(</span>parse_literal <span class="s2">"</span><span class="k">${</span><span class="nv">tokens</span><span class="p">[@]</span><span class="k">}</span><span class="s2">"</span><span class="si">)</span><span class="p">;</span> <span class="k">then
			</span>log_error <span class="s2">"Expected literal, found </span><span class="se">\"</span><span class="k">${</span><span class="nv">tokens</span><span class="p">[0]</span><span class="k">}</span><span class="se">\"</span><span class="s2">"</span>
			<span class="k">return </span>1
		<span class="k">fi

		</span><span class="nv">tokens_used</span><span class="o">=</span>1
		<span class="k">if</span> <span class="o">!</span> <span class="nv">operator</span><span class="o">=</span><span class="si">$(</span>parse_operator <span class="s2">"</span><span class="k">${</span><span class="nv">tokens</span><span class="p">[</span><span class="nv">$tokens_used</span><span class="p">]</span><span class="k">}</span><span class="s2">"</span><span class="si">)</span><span class="p">;</span> <span class="k">then
			</span>log_error <span class="s2">"Expected operator, found </span><span class="se">\"</span><span class="k">${</span><span class="nv">tokens</span><span class="p">[</span><span class="nv">$tokens_used</span><span class="p">]</span><span class="k">}</span><span class="se">\"</span><span class="s2">"</span>
			<span class="k">return </span>1
		<span class="k">fi</span>
		<span class="o">((</span> tokens_used++ <span class="o">))</span>

		<span class="k">if</span> <span class="o">!</span> <span class="nv">identifier</span><span class="o">=</span><span class="si">$(</span>parse_identifier <span class="s2">"</span><span class="k">${</span><span class="nv">tokens</span><span class="p">[</span><span class="nv">$tokens_used</span><span class="p">]</span><span class="k">}</span><span class="s2">"</span><span class="si">)</span><span class="p">;</span> <span class="k">then
			</span>log_error <span class="s2">"Expected identifier, found </span><span class="se">\"</span><span class="k">${</span><span class="nv">tokens</span><span class="p">[</span><span class="nv">$tokens_used</span><span class="p">]</span><span class="k">}</span><span class="se">\"</span><span class="s2">"</span>
			<span class="k">return </span>1
		<span class="k">fi</span>
		<span class="o">((</span> tokens_used++ <span class="o">))</span>

		<span class="nv">data</span><span class="o">=</span><span class="si">$(</span>json_object <span class="s2">"property"</span>   <span class="s2">"</span><span class="nv">$property</span><span class="s2">"</span>  <span class="se">\</span>
		                   <span class="s2">"operator"</span>   <span class="s2">"</span><span class="nv">$operator</span><span class="s2">"</span>  <span class="se">\</span>
		                   <span class="s2">"identifier"</span> <span class="s2">"</span><span class="nv">$identifier</span><span class="s2">"</span><span class="si">)</span>
	<span class="k">fi

	</span>node_new <span class="s2">"</span><span class="nv">$tokens_used</span><span class="s2">"</span> <span class="s2">"primary-pkgex"</span> <span class="s2">"</span><span class="nv">$data</span><span class="s2">"</span>
<span class="o">}</span></code></pre></figure>

<p>Primary package expressions are not recursive (at least not in the way
<code class="language-plaintext highlighter-rouge">logical-OR-pkgex</code> grammars are), so while the function is somewhat lengthy, it
doesn’t have any complicated logic.</p>

<h2 id="dealing-with-left-recursion">Dealing with left-recursion</h2>

<p>This brings us to <code class="language-plaintext highlighter-rouge">parse_logical_or_pkgex()</code>, which parses package expressions with
a logical or conjunction. Let’s have another look at the grammar.</p>

<div class="language-plaintext highlighter-rouge"><div class="highlight"><pre class="highlight"><code>logical-OR-pkgex = logical-AND-pkgex
                 | logical-OR-pkgex '||' logical-AND-pkgex
</code></pre></div></div>

<p>The production to derive a <code class="language-plaintext highlighter-rouge">logical-AND-pkgex</code> is as simple as could be, but it’s the
second production that will give us a headache if we try to implement it with pure
recursion. Because the production derives itself as the left-most non-terminal, it is
said to be left-recursive. Left-recursive grammars cannot be parsed with a purely
recursive algorithm.</p>

<p>This is one of those cases, where the iterative appoach is much simpler anyway: we
start by parsing a <code class="language-plaintext highlighter-rouge">logical-AND-pkgex</code> and, as long as it is followed by a logical or
operator, we loop to parse more. Because the grammar is left-recursive, we have to
construct the parse tree in reverse order, creating a new node during each iteration
and nesting the node from the previous iteration into the new one. Even though this is
arguably more complicated than the parser for <code class="language-plaintext highlighter-rouge">primary-pkgex</code> grammars, it is much
shorter, and I would even dare to say it is much more readable. The other left-recursive
grammars can be parsed with exactly the same approach, so I won’t bother discussing the
rest of the code here. You can find the code on Github.</p>

<figure class="highlight"><pre><code class="language-bash" data-lang="bash">parse_logical_or_pkgex<span class="o">()</span> <span class="o">{</span>
	<span class="nb">local </span><span class="nv">tokens</span><span class="o">=(</span><span class="s2">"</span><span class="nv">$@</span><span class="s2">"</span><span class="o">)</span>

	<span class="nb">local</span> <span class="nt">-i</span> used_tokens
	<span class="nb">local </span>logical_or_pkgex

	<span class="nv">used_tokens</span><span class="o">=</span>0
	<span class="nv">logical_and_pkgex</span><span class="o">=</span><span class="s2">""</span>

	<span class="k">while </span><span class="nb">true</span><span class="p">;</span> <span class="k">do
		</span><span class="nb">local </span>logical_and_pkgex
		<span class="nb">local </span>operator
		<span class="nb">local </span>data

		<span class="k">if</span> <span class="o">!</span> <span class="nv">logical_and_pkgex</span><span class="o">=</span><span class="si">$(</span>parse_logical_and_pkgex <span class="s2">"</span><span class="k">${</span><span class="nv">tokens</span><span class="p">[@]</span>:<span class="nv">$used_tokens</span><span class="k">}</span><span class="s2">"</span><span class="si">)</span><span class="p">;</span> <span class="k">then
			</span>log_error <span class="s2">"Expected logical-AND-pkgex near </span><span class="se">\"</span><span class="k">${</span><span class="nv">tokens</span><span class="p">[</span><span class="nv">$used_tokens</span><span class="p">]</span><span class="k">}</span><span class="se">\"</span><span class="s2">"</span>
			<span class="k">return </span>1
		<span class="k">fi</span>

		<span class="o">((</span> used_tokens +<span class="o">=</span> <span class="si">$(</span>node_get_num_tokens <span class="s2">"</span><span class="nv">$logical_and_pkgex</span><span class="s2">"</span><span class="si">)</span> <span class="o">))</span>
		<span class="nv">operator</span><span class="o">=</span><span class="s2">"</span><span class="k">${</span><span class="nv">tokens</span><span class="p">[</span><span class="nv">$used_tokens</span><span class="p">]</span><span class="k">}</span><span class="s2">"</span>

		<span class="nv">data</span><span class="o">=</span><span class="si">$(</span>json_object <span class="s2">"right_child"</span> <span class="s2">"</span><span class="nv">$logical_and_pkgex</span><span class="s2">"</span> <span class="se">\</span>
		                   <span class="s2">"operator"</span>    <span class="s2">"</span><span class="nv">$operator</span><span class="s2">"</span>          <span class="se">\</span>
		                   <span class="s2">"left_child"</span>  <span class="s2">"</span><span class="nv">$logical_or_pkgex</span><span class="s2">"</span><span class="si">)</span>

		<span class="nv">logical_or_pkgex</span><span class="o">=</span><span class="si">$(</span>node_new <span class="s2">"</span><span class="nv">$used_tokens</span><span class="s2">"</span> <span class="s2">"logical_or_pkgex"</span> <span class="s2">"</span><span class="nv">$data</span><span class="s2">"</span><span class="si">)</span>

		<span class="k">if</span> <span class="o">[[</span> <span class="s2">"</span><span class="nv">$operator</span><span class="s2">"</span> <span class="o">!=</span> <span class="s2">"OR:||"</span> <span class="o">]]</span><span class="p">;</span> <span class="k">then
			</span><span class="nb">break
		</span><span class="k">fi</span>

		<span class="o">((</span> ++used_tokens <span class="o">))</span>
	<span class="k">done

	</span><span class="nb">echo</span> <span class="s2">"</span><span class="nv">$logical_or_pkgex</span><span class="s2">"</span>
	<span class="k">return </span>0
<span class="o">}</span></code></pre></figure>

<p>By the way, if the production were right-recursive, we would not have to construct the
parse tree in reverse order. As a result, the expression would be evaluated from right
to left. As a rule of thumb, expressions like <code class="language-plaintext highlighter-rouge">a || b || c</code> that are evaluated from
left to right have left-recursive productions, and expressions like <code class="language-plaintext highlighter-rouge">a = b = c</code> that
are evaluated right-to-left have right-recursive productions.</p>

<h2 id="trial-run">Trial run</h2>

<p>Now that lexer and parser are done, they can be pieced together with a short script like
the following. It expects the path of an input file in the first argument, reads the
contents, tokenizes them, parses the token stream, and writes the resulting parse tree
to standard output. I omitted a lot of error handling for the sake of brevity. If you’re
coding along, don’t forget to check return values and validate user inputs. :-)</p>

<figure class="highlight"><pre><code class="language-bash" data-lang="bash"><span class="c">#!/bin/bash</span>

main<span class="o">()</span> <span class="o">{</span>
    <span class="nb">local </span><span class="nv">input_file</span><span class="o">=</span><span class="s2">"</span><span class="nv">$1</span><span class="s2">"</span>

    <span class="nb">local </span>input
    <span class="nb">local </span>tokens

    <span class="k">if</span> <span class="o">!</span> <span class="nv">input</span><span class="o">=</span><span class="si">$(</span>&lt;<span class="s2">"</span><span class="nv">$input_file</span><span class="s2">"</span><span class="si">)</span><span class="p">;</span> <span class="k">then
        </span><span class="nb">echo</span> <span class="s2">"Could not read </span><span class="nv">$input_file</span><span class="s2">"</span> 1&gt;&amp;2
        <span class="k">return </span>1
    <span class="k">fi

    </span>readarray <span class="nt">-t</span> tokens &lt; &lt;<span class="o">(</span>tokenize <span class="s2">"</span><span class="nv">$input</span><span class="s2">"</span><span class="o">)</span>
    parse <span class="s2">"</span><span class="k">${</span><span class="nv">tokens</span><span class="p">[@]</span><span class="k">}</span><span class="s2">"</span>
<span class="o">}</span>

<span class="o">{</span>
    main <span class="s2">"</span><span class="nv">$@</span><span class="s2">"</span>
    <span class="nb">exit</span> <span class="s2">"</span><span class="nv">$?</span><span class="s2">"</span>
<span class="o">}</span></code></pre></figure>

<p>Now we can pass the example file from the top to our parser and we’ll get a minimized
JSON object that we’ll pipe through <code class="language-plaintext highlighter-rouge">jq</code> to pretty-print it.</p>

<div class="language-plaintext highlighter-rouge"><div class="highlight"><pre class="highlight"><code>$ ./parser.sh example.pkgex | jq '.'
{
  "num_tokens": 42,
  "type": "rule_list",
  "data": {
    "rule": {
      "num_tokens": 14,
      "type": "rule",
      "data": {
        "repository": {
          "num_tokens": 1,
          "type": "LITERAL",
          "data": "AppStream"
        },
        "colon": "COLON::",
        "pkgex": {
          "num_tokens": 11,
          "type": "logical_or_pkgex",
          "data": {
            "right_child": {
              "num_tokens": 11,
              "type": "logical_and_pkgex",
[...]
</code></pre></div></div>

<p>Pretty neat, right? That’s how you write a recursive descent parser in Bash. And
I bet it isn’t nearly as bad or unreadable as you expected. :-)</p>

<p>Nevertheless, it’s hard to overstate how slow it is, and that is why I ended up
rewriting it in Python. The script that evaluates parse trees is even slower, but
it might still make an interesting read. That’s for another time, though.</p>

<h2 id="code-on-github">Code on Github</h2>

<p>You can find the code in the following repository. Note that it depends on
<a href="https://github.com/m10k/toolbox">toolbox</a> for the modularization.</p>

<ul>
  <li><a href="https://github.com/m10k/pkgex">https://github.com/m10k/pkgex</a></li>
</ul>]]></content><author><name></name></author><category term="bash" /><category term="compiler" /><summary type="html"><![CDATA[Two years ago, I was tasked to write a program that generates RPM package repositories from a large pool of packages. The pool is a set of directories that contain all packages that were ever built for a given Miracle Linux release, and the program would be used to pick specific packages from the pool and generate repositories for yum and dnf. The existing program had hard-coded rules for package selection that made it require frequent repairs, and it didn’t play nice with modularity packages. Since the new solution should be an improvement over the old one, I decided to separate the rules from the code, and for this I needed a small domain-specific language. I had already written a lot of absurd things in Bash at the time, so naturally I had to see if a parser could be another of those things.]]></summary></entry><entry><title type="html">The Request-Reply Pattern with Bash</title><link href="https://m10k.eu/2023/07/08/toolbox-request-reply.html" rel="alternate" type="text/html" title="The Request-Reply Pattern with Bash" /><published>2023-07-08T10:05:09+02:00</published><updated>2023-07-08T10:05:09+02:00</updated><id>https://m10k.eu/2023/07/08/toolbox-request-reply</id><content type="html" xml:base="https://m10k.eu/2023/07/08/toolbox-request-reply.html"><![CDATA[<p>In the previous <a href="/2023/05/06/toolbox-messaging.html">two</a>
<a href="/2023/05/27/toolbox-pubsub.html">articles</a>, I explained how scripts
can communicate with point-to-point and publish-subscribe messaging. There are
different ways how the two mechanisms can be used, so this time we’re going to
have a look at the <a href="https://www.enterpriseintegrationpatterns.com/patterns/messaging/RequestReply.html">Request-Reply Pattern</a>. In this pattern, there are two parties. The
first one, the requestor, sends a request to the replier, which sends a response
back to the requestor, as shown in the following figure. If this reminds you of
client-server communication, you got the idea.</p>

<p><img src="/assets/2023-06-25-toolbox-request-reply/abstract.png" alt="abstract.png" /></p>

<p>The request-reply pattern can be implemented with point-to-point channels and
publish-subscribe channels. Point-to-point channels make a lot of sense if there
is only one replier (or multiple repliers that are competing consumers). Using the
notation from the Enterprise Integration Patterns book, this simple communication
looks something like below.</p>

<p><img src="/assets/2023-06-25-toolbox-request-reply/p2p-request-reply.png" alt="p2p-request-reply.png" /></p>

<p>Let’s now use this pattern with point-to-point channels to implement a naive
key-value store where the requestor uses messages to set and get data from the
replier.</p>

<h2 id="message-format">Message format</h2>

<p>There are two operations that a requestor may perform: it can either set a value in
the store, or retrieve a value from the store. When setting a value, it has to tell
the replier the name and the value of the field. When retrieving a value, the name
of the field is all that is needed.</p>

<p>In the first case, the requestor sends a <em>SetRequest</em>, which has the following format.</p>

<figure class="highlight"><pre><code class="language-json" data-lang="json"><span class="p">{</span><span class="w">
  </span><span class="nl">"type"</span><span class="p">:</span><span class="w"> </span><span class="s2">"SetRequest"</span><span class="p">,</span><span class="w">
  </span><span class="nl">"name"</span><span class="p">:</span><span class="w"> </span><span class="s2">"name-of-the-field"</span><span class="p">,</span><span class="w">
  </span><span class="nl">"value"</span><span class="p">:</span><span class="w"> </span><span class="s2">"value-of-the-field"</span><span class="w">
</span><span class="p">}</span></code></pre></figure>

<p>The second case, it uses a <em>GetRequest</em>, which is essentially the same, minus the
<code class="language-plaintext highlighter-rouge">value</code> field.</p>

<figure class="highlight"><pre><code class="language-json" data-lang="json"><span class="p">{</span><span class="w">
  </span><span class="nl">"type"</span><span class="p">:</span><span class="w"> </span><span class="s2">"GetRequest"</span><span class="p">,</span><span class="w">
  </span><span class="nl">"name"</span><span class="p">:</span><span class="w"> </span><span class="s2">"name-of-the-field"</span><span class="w">
</span><span class="p">}</span></code></pre></figure>

<p>When the replier receives a GetRequest, it reads the value from the backing storage
and sends a <em>GetResponse</em> to the requestor. The response has the following format.</p>

<figure class="highlight"><pre><code class="language-json" data-lang="json"><span class="p">{</span><span class="w">
  </span><span class="nl">"type"</span><span class="p">:</span><span class="w"> </span><span class="s2">"GetResponse"</span><span class="p">,</span><span class="w">
  </span><span class="nl">"name"</span><span class="p">:</span><span class="w"> </span><span class="s2">"name-of-the-field"</span><span class="p">,</span><span class="w">
  </span><span class="nl">"status"</span><span class="p">:</span><span class="w"> </span><span class="err">return-code</span><span class="w">
  </span><span class="nl">"value"</span><span class="p">:</span><span class="w"> </span><span class="s2">"value-of-the-field"</span><span class="w">
</span><span class="p">}</span></code></pre></figure>

<p>The value of the field <code class="language-plaintext highlighter-rouge">status</code> will be set to <code class="language-plaintext highlighter-rouge">0</code> if the request was successful,
otherwise it will be set to some non-zero value. In the latter case, there is no
value that can be sent back to the requestor, and the replier may omit the <code class="language-plaintext highlighter-rouge">value</code>
field from the response.</p>

<p>When the replier receives a SetRequest, it sets the value in the backing storage and
returns a message like the following, indicating if the operation was successful. Again,
the status will be <code class="language-plaintext highlighter-rouge">0</code> upon success or non-zero otherwise.</p>

<figure class="highlight"><pre><code class="language-json" data-lang="json"><span class="p">{</span><span class="w">
  </span><span class="nl">"type"</span><span class="p">:</span><span class="w"> </span><span class="s2">"SetResponse"</span><span class="p">,</span><span class="w">
  </span><span class="nl">"name"</span><span class="p">:</span><span class="w"> </span><span class="s2">"name-of-the-field"</span><span class="p">,</span><span class="w">
  </span><span class="nl">"status"</span><span class="p">:</span><span class="w"> </span><span class="err">return-code</span><span class="w">
</span><span class="p">}</span></code></pre></figure>

<h2 id="the-replier">The replier</h2>

<p>To send requests to the key-value store, requestors need to know the address of the
replier. Thus, we decide that the replier must listen on the address <code class="language-plaintext highlighter-rouge">pub/kvs</code>. That
means that the replier must look something like the following.</p>

<figure class="highlight"><pre><code class="language-bash" data-lang="bash"><span class="c">#!/bin/bash</span>

main<span class="o">()</span> <span class="o">{</span>
    <span class="nb">local </span>endpoint

    <span class="k">if</span> <span class="o">!</span> <span class="nv">endpoint</span><span class="o">=</span><span class="si">$(</span>ipc_endpoint_open <span class="s2">"pub/kvs"</span><span class="si">)</span><span class="p">;</span> <span class="k">then
        </span>log_error <span class="s2">"Could not open endpoint"</span>
        <span class="k">return </span>1
    <span class="k">fi

    while </span><span class="nb">true</span><span class="p">;</span> <span class="k">do
        </span><span class="nb">local </span>msg

        <span class="k">if </span><span class="nv">msg</span><span class="o">=</span><span class="si">$(</span>ipc_endpoint_recv <span class="s2">"</span><span class="nv">$endpoint</span><span class="s2">"</span><span class="si">)</span><span class="p">;</span> <span class="k">then
            </span>handle_message <span class="s2">"</span><span class="nv">$endpoint</span><span class="s2">"</span> <span class="s2">"</span><span class="nv">$msg</span><span class="s2">"</span>
        <span class="k">fi
    done</span>
<span class="o">}</span>

<span class="o">{</span>
    <span class="k">if</span> <span class="o">!</span> <span class="nb">.</span> toolbox.sh <span class="o">||</span>
       <span class="o">!</span> include <span class="s2">"log"</span> <span class="s2">"json"</span> <span class="s2">"conf"</span> <span class="s2">"uipc"</span><span class="p">;</span> <span class="k">then
        </span><span class="nb">exit </span>1
    <span class="k">fi

    </span>main <span class="s2">"</span><span class="nv">$@</span><span class="s2">"</span>
    <span class="nb">exit</span> <span class="s2">"</span><span class="nv">$?</span><span class="s2">"</span>
<span class="o">}</span></code></pre></figure>

<p>The replier opens a public endpoint and immediately enters a loop, forever receiving
messages and passing them to <code class="language-plaintext highlighter-rouge">handle_message()</code>. The latter function reads the payload
and the sender’s address from the message. It then passes the payload to
<code class="language-plaintext highlighter-rouge">handle_request()</code>, which generates the response that is sent back to the sender with
<code class="language-plaintext highlighter-rouge">ipc_endpoint_send()</code>.</p>

<figure class="highlight"><pre><code class="language-bash" data-lang="bash">handle_message<span class="o">()</span> <span class="o">{</span>
    <span class="nb">local </span><span class="nv">endpoint</span><span class="o">=</span><span class="s2">"</span><span class="nv">$1</span><span class="s2">"</span>
    <span class="nb">local </span><span class="nv">msg</span><span class="o">=</span><span class="s2">"</span><span class="nv">$2</span><span class="s2">"</span>

    <span class="nb">local </span>data
    <span class="nb">local </span>sender
    <span class="nb">local </span>response

    <span class="k">if</span> <span class="o">!</span> <span class="nv">data</span><span class="o">=</span><span class="si">$(</span>ipc_msg_get_data <span class="s2">"</span><span class="nv">$msg</span><span class="s2">"</span><span class="si">)</span> <span class="o">||</span>
       <span class="o">!</span> <span class="nv">sender</span><span class="o">=</span><span class="si">$(</span>ipc_msg_get_source <span class="s2">"</span><span class="nv">$msg</span><span class="s2">"</span><span class="si">)</span><span class="p">;</span> <span class="k">then
        </span>log_error <span class="s2">"Could not read message"</span>
        <span class="k">return </span>1
    <span class="k">fi

    if </span><span class="nv">response</span><span class="o">=</span><span class="si">$(</span>handle_request <span class="s2">"</span><span class="nv">$data</span><span class="s2">"</span><span class="si">)</span><span class="p">;</span> <span class="k">then
        </span>ipc_endpoint_send <span class="s2">"</span><span class="nv">$endpoint</span><span class="s2">"</span> <span class="s2">"</span><span class="nv">$sender</span><span class="s2">"</span> <span class="s2">"</span><span class="nv">$response</span><span class="s2">"</span>
    <span class="k">fi</span>
<span class="o">}</span></code></pre></figure>

<p>The <code class="language-plaintext highlighter-rouge">handle_request()</code> function uses <code class="language-plaintext highlighter-rouge">json_object_get()</code> to read the request type from
the message data and then passes it on to the function that is responsible for the
request (so, either <code class="language-plaintext highlighter-rouge">handle_get_request()</code> or <code class="language-plaintext highlighter-rouge">handle_set_request()</code>).</p>

<figure class="highlight"><pre><code class="language-bash" data-lang="bash">handle_request<span class="o">()</span> <span class="o">{</span>
    <span class="nb">local </span><span class="nv">request</span><span class="o">=</span><span class="s2">"</span><span class="nv">$1</span><span class="s2">"</span>

    <span class="nb">local</span> <span class="nt">-A</span> request_handler
    <span class="nb">local </span>request_type

    request_handler[<span class="s2">"GetRequest"</span><span class="o">]=</span>handle_get_request
    request_handler[<span class="s2">"SetRequest"</span><span class="o">]=</span>handle_set_request

    <span class="k">if </span><span class="nv">request_type</span><span class="o">=</span><span class="si">$(</span>json_object_get <span class="s2">"</span><span class="nv">$request</span><span class="s2">"</span> <span class="s2">"type"</span><span class="si">)</span><span class="p">;</span> <span class="k">then
        </span><span class="nb">local </span>handler

        <span class="nv">handler</span><span class="o">=</span><span class="s2">"</span><span class="k">${</span><span class="nv">request_handler</span><span class="p">[</span><span class="nv">$request_type</span><span class="p">]</span><span class="k">}</span><span class="s2">"</span>

        <span class="k">if</span> <span class="o">[[</span> <span class="nt">-n</span> <span class="s2">"</span><span class="nv">$handler</span><span class="s2">"</span> <span class="o">]]</span><span class="p">;</span> <span class="k">then</span>
            <span class="s2">"</span><span class="nv">$handler</span><span class="s2">"</span> <span class="s2">"</span><span class="nv">$request</span><span class="s2">"</span>
            <span class="k">return</span> <span class="s2">"</span><span class="nv">$?</span><span class="s2">"</span>
        <span class="k">else
            </span>log_warn <span class="s2">"Received message with invalid type </span><span class="se">\"</span><span class="nv">$request_type</span><span class="se">\"</span><span class="s2">"</span>
        <span class="k">fi
    fi

    return </span>1
<span class="o">}</span></code></pre></figure>

<p>GetRequests are handled by <code class="language-plaintext highlighter-rouge">handle_get_request()</code>, which will retrieve the field name
from the request and attempt to query its value from the key-value store. To make the
code as simple as possible, we’ll use the <code class="language-plaintext highlighter-rouge">conf</code> module to simulate the key-value store.
The <code class="language-plaintext highlighter-rouge">conf_get()</code> function retrieves a value from the backing storage (in this case, a
plaintext configuration file). We use the return code and the data that we got from
<code class="language-plaintext highlighter-rouge">conf_get()</code> to create a GetResponse and write it to standard output.</p>

<figure class="highlight"><pre><code class="language-bash" data-lang="bash">handle_get_request<span class="o">()</span> <span class="o">{</span>
    <span class="nb">local </span><span class="nv">request</span><span class="o">=</span><span class="s2">"</span><span class="nv">$1</span><span class="s2">"</span>

    <span class="nb">local </span>name
    <span class="nb">local </span>value
    <span class="nb">local</span> <span class="nt">-i</span> status

    <span class="k">if</span> <span class="o">!</span> <span class="nv">name</span><span class="o">=</span><span class="si">$(</span>json_object_get <span class="s2">"</span><span class="nv">$request</span><span class="s2">"</span> <span class="s2">"name"</span><span class="si">)</span><span class="p">;</span> <span class="k">then
        return </span>1
    <span class="k">fi

    </span><span class="nv">value</span><span class="o">=</span><span class="si">$(</span>conf_get <span class="s2">"</span><span class="nv">$name</span><span class="s2">"</span><span class="si">)</span>
    <span class="nv">status</span><span class="o">=</span><span class="s2">"</span><span class="nv">$?</span><span class="s2">"</span>

    json_object <span class="s2">"type"</span>   <span class="s2">"GetResponse"</span> <span class="se">\</span>
                <span class="s2">"name"</span>   <span class="s2">"</span><span class="nv">$name</span><span class="s2">"</span>       <span class="se">\</span>
                <span class="s2">"status"</span> <span class="s2">"</span><span class="nv">$status</span><span class="s2">"</span>     <span class="se">\</span>
                <span class="s2">"value"</span>  <span class="s2">"</span><span class="nv">$value</span><span class="s2">"</span>
<span class="o">}</span></code></pre></figure>

<p>Similarly, the <code class="language-plaintext highlighter-rouge">handle_set_request()</code> function fetches the field name and value from
the request message and calls <code class="language-plaintext highlighter-rouge">conf_set()</code> to store the value in the backing storage.
Like <code class="language-plaintext highlighter-rouge">conf_get()</code>, <code class="language-plaintext highlighter-rouge">conf_set()</code> returns zero upon success, and a non-zero value on
failure, so we can use it’s return value for the <code class="language-plaintext highlighter-rouge">status</code> field in the response
message.</p>

<figure class="highlight"><pre><code class="language-bash" data-lang="bash">handle_set_request<span class="o">()</span> <span class="o">{</span>
    <span class="nb">local </span><span class="nv">request</span><span class="o">=</span><span class="s2">"</span><span class="nv">$1</span><span class="s2">"</span>

    <span class="nb">local </span>name
    <span class="nb">local </span>value
    <span class="nb">local</span> <span class="nt">-i</span> status

    <span class="k">if</span> <span class="o">!</span> <span class="nv">name</span><span class="o">=</span><span class="si">$(</span>json_object_get <span class="s2">"</span><span class="nv">$request</span><span class="s2">"</span> <span class="s2">"name"</span><span class="si">)</span> <span class="o">||</span>
       <span class="o">!</span> <span class="nv">value</span><span class="o">=</span><span class="si">$(</span>json_object_get <span class="s2">"</span><span class="nv">$request</span><span class="s2">"</span> <span class="s2">"value"</span><span class="si">)</span><span class="p">;</span> <span class="k">then
        return </span>1
    <span class="k">fi

    </span>conf_set <span class="s2">"</span><span class="nv">$name</span><span class="s2">"</span> <span class="s2">"</span><span class="nv">$value</span><span class="s2">"</span>
    <span class="nv">status</span><span class="o">=</span><span class="s2">"</span><span class="nv">$?</span><span class="s2">"</span>

    json_object <span class="s2">"type"</span>   <span class="s2">"SetResponse"</span> <span class="se">\</span>
                <span class="s2">"name"</span>   <span class="s2">"</span><span class="nv">$name</span><span class="s2">"</span>       <span class="se">\</span>
                <span class="s2">"status"</span> <span class="s2">"</span><span class="nv">$status</span><span class="s2">"</span>
<span class="o">}</span></code></pre></figure>

<p>This is all we need for the replier. We will save it as <em>replier.sh</em> and make it
executable with <code class="language-plaintext highlighter-rouge">chmod u+x replier.sh</code>. Admittedly, the error handling could be
improved (I will cover this in a different post) but there shouldn’t be any major
issues with this implementation.</p>

<h2 id="the-requestor">The requestor</h2>

<p>Let’s look at the client side now. The requestor sends either a GetRequest or a
SetRequest with the necessary data to the replier. For the sake of simplicity, we
will use synchronous communication, meaning that the requestor will wait until it
receives a response from the replier.</p>

<p>The parameters of the request (get or set, field name, and field value) will be
passed to the requestor on the command line. The command line is parsed using the
<code class="language-plaintext highlighter-rouge">opt</code> module, but I will skip the explanation here.</p>

<figure class="highlight"><pre><code class="language-bash" data-lang="bash"><span class="c">#!/bin/bash</span>

main<span class="o">()</span> <span class="o">{</span>
    <span class="nb">local </span>request
    <span class="nb">local </span>value
    <span class="nb">local </span>name

    opt_add_arg <span class="s2">"R"</span> <span class="s2">"request"</span> <span class="s2">"v"</span>  <span class="s2">"get"</span> <span class="s2">"The request type"</span>    <span class="s1">'^(get|set)$'</span>
    opt_add_arg <span class="s2">"V"</span> <span class="s2">"value"</span>   <span class="s2">"v"</span>  <span class="s2">""</span>    <span class="s2">"The value to be set"</span>
    opt_add_arg <span class="s2">"N"</span> <span class="s2">"name"</span>    <span class="s2">"rv"</span> <span class="s2">""</span>    <span class="s2">"The field name"</span>

    <span class="k">if</span> <span class="o">!</span> opt_parse <span class="s2">"</span><span class="nv">$@</span><span class="s2">"</span><span class="p">;</span> <span class="k">then
        return </span>1
    <span class="k">fi

    </span><span class="nv">request</span><span class="o">=</span><span class="si">$(</span>opt_get <span class="s2">"request"</span><span class="si">)</span>
    <span class="nv">value</span><span class="o">=</span><span class="si">$(</span>opt_get <span class="s2">"value"</span><span class="si">)</span>
    <span class="nv">name</span><span class="o">=</span><span class="si">$(</span>opt_get <span class="s2">"name"</span><span class="si">)</span>

    perform_request <span class="s2">"</span><span class="nv">$request</span><span class="s2">"</span> <span class="s2">"</span><span class="nv">$name</span><span class="s2">"</span> <span class="s2">"</span><span class="nv">$value</span><span class="s2">"</span>
<span class="o">}</span>

<span class="o">{</span>
    <span class="k">if</span> <span class="o">!</span> <span class="nb">.</span> toolbox.sh <span class="o">||</span>
       <span class="o">!</span> include <span class="s2">"log"</span> <span class="s2">"opt"</span> <span class="s2">"json"</span> <span class="s2">"uipc"</span><span class="p">;</span> <span class="k">then
        </span><span class="nb">exit </span>1
    <span class="k">fi

    </span>main <span class="s2">"</span><span class="nv">$@</span><span class="s2">"</span>
    <span class="nb">exit</span> <span class="s2">"</span><span class="nv">$?</span><span class="s2">"</span>
<span class="o">}</span></code></pre></figure>

<p>The <code class="language-plaintext highlighter-rouge">main()</code> function is pretty much boilerplate code for reading the command line.
The <code class="language-plaintext highlighter-rouge">perform_request()</code> function is where things get interesting. We first open an
anonymous endpoint and then call a handler to perform the action that the user
requested.</p>

<figure class="highlight"><pre><code class="language-bash" data-lang="bash">perform_request<span class="o">()</span> <span class="o">{</span>
    <span class="nb">local </span><span class="nv">request</span><span class="o">=</span><span class="s2">"</span><span class="nv">$1</span><span class="s2">"</span>
    <span class="nb">local </span><span class="nv">name</span><span class="o">=</span><span class="s2">"</span><span class="nv">$2</span><span class="s2">"</span>
    <span class="nb">local </span><span class="nv">value</span><span class="o">=</span><span class="s2">"</span><span class="nv">$3</span><span class="s2">"</span>

    <span class="nb">local </span>endpoint
    <span class="nb">local</span> <span class="nt">-A</span> handler
    <span class="nb">local</span> <span class="nt">-i</span> result

    handler[<span class="s2">"get"</span><span class="o">]=</span>perform_get_request
    handler[<span class="s2">"set"</span><span class="o">]=</span>perform_set_request

    <span class="k">if</span> <span class="o">!</span> <span class="nv">endpoint</span><span class="o">=</span><span class="si">$(</span>ipc_endpoint_open<span class="si">)</span><span class="p">;</span> <span class="k">then
        </span>log_error <span class="s2">"Could not open IPC endpoint"</span>
        <span class="k">return </span>1
    <span class="k">fi</span>

    <span class="s2">"</span><span class="k">${</span><span class="nv">handler</span><span class="p">[</span><span class="nv">$request</span><span class="p">]</span><span class="k">}</span><span class="s2">"</span> <span class="s2">"</span><span class="nv">$endpoint</span><span class="s2">"</span> <span class="s2">"</span><span class="nv">$name</span><span class="s2">"</span> <span class="s2">"</span><span class="nv">$value</span><span class="s2">"</span>
    <span class="nv">result</span><span class="o">=</span><span class="s2">"</span><span class="nv">$?</span><span class="s2">"</span>

    ipc_endpoint_close <span class="s2">"</span><span class="nv">$endpoint</span><span class="s2">"</span>
    <span class="k">return</span> <span class="s2">"</span><span class="nv">$result</span><span class="s2">"</span>
<span class="o">}</span></code></pre></figure>

<p>The <code class="language-plaintext highlighter-rouge">perform_get_request()</code> function reads data from the key-value store. It uses
<code class="language-plaintext highlighter-rouge">send_and_recv()</code> to send a message to the key-value store and wait for the
response. If successful, it will check the status in the message, extract the value
that was read from the key-value store, and then print it to standard output. If any
of these steps fail, it will return an error.</p>

<figure class="highlight"><pre><code class="language-bash" data-lang="bash">perform_get_request<span class="o">()</span> <span class="o">{</span>
    <span class="nb">local </span><span class="nv">endpoint</span><span class="o">=</span><span class="s2">"</span><span class="nv">$1</span><span class="s2">"</span>
    <span class="nb">local </span><span class="nv">name</span><span class="o">=</span><span class="s2">"</span><span class="nv">$2</span><span class="s2">"</span>

    <span class="nb">local </span>request
    <span class="nb">local </span>response
    <span class="nb">local </span>data
    <span class="nb">local</span> <span class="nt">-i</span> status
    <span class="nb">local </span>value

    <span class="nv">request</span><span class="o">=</span><span class="si">$(</span>json_object <span class="s2">"type"</span> <span class="s2">"GetRequest"</span> <span class="se">\</span>
                          <span class="s2">"name"</span> <span class="s2">"</span><span class="nv">$name</span><span class="s2">"</span><span class="si">)</span>

    <span class="k">if</span> <span class="o">!</span> <span class="nv">response</span><span class="o">=</span><span class="si">$(</span>send_and_recv <span class="s2">"</span><span class="nv">$endpoint</span><span class="s2">"</span> <span class="s2">"</span><span class="nv">$request</span><span class="s2">"</span><span class="si">)</span> <span class="o">||</span>
       <span class="o">!</span> <span class="nv">data</span><span class="o">=</span><span class="si">$(</span>ipc_msg_get_data <span class="s2">"</span><span class="nv">$response</span><span class="s2">"</span><span class="si">)</span> <span class="o">||</span>
       <span class="o">!</span> <span class="nv">status</span><span class="o">=</span><span class="si">$(</span>json_object_get <span class="s2">"</span><span class="nv">$data</span><span class="s2">"</span> <span class="s2">"status"</span><span class="si">)</span> <span class="o">||</span>
       <span class="o">((</span> status <span class="o">!=</span> 0 <span class="o">))</span> <span class="o">||</span>
       <span class="o">!</span> <span class="nv">value</span><span class="o">=</span><span class="si">$(</span>json_object_get <span class="s2">"</span><span class="nv">$data</span><span class="s2">"</span> <span class="s2">"value"</span><span class="si">)</span><span class="p">;</span> <span class="k">then
        return </span>1
    <span class="k">fi

    </span><span class="nb">printf</span> <span class="s1">'%s\n'</span> <span class="s2">"</span><span class="nv">$value</span><span class="s2">"</span>
<span class="o">}</span></code></pre></figure>

<p>The <code class="language-plaintext highlighter-rouge">perform_set_request()</code> function works similar. It will send a SetRequest to the
key value store and wait for its response. Once received, it will attempt to parse
the response and return the status to the caller.</p>

<figure class="highlight"><pre><code class="language-bash" data-lang="bash">perform_set_request<span class="o">()</span> <span class="o">{</span>
    <span class="nb">local </span><span class="nv">endpoint</span><span class="o">=</span><span class="s2">"</span><span class="nv">$1</span><span class="s2">"</span>
    <span class="nb">local </span><span class="nv">name</span><span class="o">=</span><span class="s2">"</span><span class="nv">$2</span><span class="s2">"</span>
    <span class="nb">local </span><span class="nv">value</span><span class="o">=</span><span class="s2">"</span><span class="nv">$3</span><span class="s2">"</span>

    <span class="nb">local </span>request
    <span class="nb">local </span>response
    <span class="nb">local </span>data
    <span class="nb">local</span> <span class="nt">-i</span> status

    <span class="nv">request</span><span class="o">=</span><span class="si">$(</span>json_object <span class="s2">"type"</span>  <span class="s2">"SetRequest"</span> <span class="se">\</span>
                          <span class="s2">"name"</span>  <span class="s2">"</span><span class="nv">$name</span><span class="s2">"</span>      <span class="se">\</span>
                          <span class="s2">"value"</span> <span class="s2">"</span><span class="nv">$value</span><span class="s2">"</span><span class="si">)</span>

    <span class="k">if</span> <span class="o">!</span> <span class="nv">response</span><span class="o">=</span><span class="si">$(</span>send_and_recv <span class="s2">"</span><span class="nv">$endpoint</span><span class="s2">"</span> <span class="s2">"</span><span class="nv">$request</span><span class="s2">"</span><span class="si">)</span> <span class="o">||</span>
       <span class="o">!</span> <span class="nv">data</span><span class="o">=</span><span class="si">$(</span>ipc_msg_get_data <span class="s2">"</span><span class="nv">$response</span><span class="s2">"</span><span class="si">)</span> <span class="o">||</span>
       <span class="o">!</span> <span class="nv">status</span><span class="o">=</span><span class="si">$(</span>json_object_get <span class="s2">"</span><span class="nv">$data</span><span class="s2">"</span> <span class="s2">"status"</span><span class="si">)</span><span class="p">;</span> <span class="k">then
        return </span>1
    <span class="k">fi

    return</span> <span class="s2">"</span><span class="nv">$status</span><span class="s2">"</span>
<span class="o">}</span></code></pre></figure>

<p>Finally, the <code class="language-plaintext highlighter-rouge">send_and_recv()</code> function is exactly what it name says. A call to
<code class="language-plaintext highlighter-rouge">ipc_endpoint_send()</code>, followed by a call to <code class="language-plaintext highlighter-rouge">ipc_endpoint_recv()</code>.</p>

<figure class="highlight"><pre><code class="language-bash" data-lang="bash">send_and_recv<span class="o">()</span> <span class="o">{</span>
    <span class="nb">local </span><span class="nv">endpoint</span><span class="o">=</span><span class="s2">"</span><span class="nv">$1</span><span class="s2">"</span>
    <span class="nb">local </span><span class="nv">message</span><span class="o">=</span><span class="s2">"</span><span class="nv">$2</span><span class="s2">"</span>

    <span class="k">if</span> <span class="o">!</span> ipc_endpoint_send <span class="s2">"</span><span class="nv">$endpoint</span><span class="s2">"</span> <span class="s2">"pub/kvs"</span> <span class="s2">"</span><span class="nv">$message</span><span class="s2">"</span><span class="p">;</span> <span class="k">then
        return </span>1
    <span class="k">fi

    </span>ipc_endpoint_recv <span class="s2">"</span><span class="nv">$endpoint</span><span class="s2">"</span>
<span class="o">}</span></code></pre></figure>

<p>That’s all we need for the requestor, so we save it as <em>requestor.sh</em> and make it
executable.</p>

<h2 id="test-flight">Test flight</h2>

<p>It’s now time to see if everything works, so we first start the replier with the
following command.</p>

<figure class="highlight"><pre><code class="language-bash" data-lang="bash"><span class="nv">$ </span>./replier.sh</code></pre></figure>

<p>The key-value store will initially be empty, so querying it <em>should</em> result in an
error. The default behavior of the requestor is to send a GetRequest, so we attempt
to query a non-existent value and print the requestor’s return value.</p>

<figure class="highlight"><pre><code class="language-bash" data-lang="bash"><span class="nv">$ </span>./requestor.sh <span class="nt">-N</span> foo<span class="p">;</span> <span class="nb">echo</span> <span class="s2">"</span><span class="nv">$?</span><span class="s2">"</span>
1</code></pre></figure>

<p>The requestor didn’t write any data to standard output, and its return value is
<code class="language-plaintext highlighter-rouge">1</code>, indicating an error. The error case is handled correctly.
We want to test the successful case next, so we tell the requestor to set a value
in the store and make it read back the value from the store.</p>

<figure class="highlight"><pre><code class="language-bash" data-lang="bash"><span class="nv">$ </span>./requestor.sh <span class="nt">-R</span> <span class="nb">set</span> <span class="nt">-N</span> foo <span class="nt">-V</span> <span class="s2">"Hello world"</span><span class="p">;</span> <span class="nb">echo</span> <span class="s2">"</span><span class="nv">$?</span><span class="s2">"</span>
0
<span class="nv">$ </span>./requestor.sh <span class="nt">-R</span> get <span class="nt">-N</span> foo<span class="p">;</span> <span class="nb">echo</span> <span class="s2">"</span><span class="nv">$?</span><span class="s2">"</span>
Hello world
0</code></pre></figure>

<p>The requestor signalled success in both cases, and printed the expected data to
standard output. Our key-value store works! Admittedly, it is kind of slow, but
you didn’t expect a high-performance shell script, did you?</p>

<h2 id="parallelizing-the-replier">Parallelizing the replier</h2>

<p>Let’s pretend that we integrated our key-value store with another system and the
poor thing needs to handle thousands of requests per minute now. Obviously, one
bash process will not be able to keep up, and so we do what any indisputably sane
person would do: throw processes at the problem until it goes away.</p>

<p>The easiest way to do that is to change the architecture so that there are multiple
repliers that implement the <a href="https://www.enterpriseintegrationpatterns.com/patterns/messaging/CompetingConsumers.html">Competing Consumers</a> pattern. The EIP notation changes only
very slightly.</p>

<p><img src="/assets/2023-06-25-toolbox-request-reply/pubsub-compcons.png" alt="pubsub-compcons.png" /></p>

<p>The code, on the other hand, doesn’t change at all. Because the replier is using an
endpoint with a public address, the same endpoint can be opened and used by multiple
processes, and messages will be load-balanced over all running processes. What is
problematic about the code, though, is that the conf module is not “thread safe”.
Simultaneous accesses to the backing store might cause issues, but we will ignore that
for now, because that is not really what this post is about. A thorough implementation
should not take the same shortcut.</p>

<h2 id="request-reply-with-publish-subscribe-messaging">Request-Reply with Publish-Subscribe Messaging</h2>

<p>There is nothing functionally wrong with the message architecture we created above, but
it is somewhat inflexible. Let’s say we want to add a process to the architecture that
collects statistics about requests. The process should log the request types, the field
names in the requests, and the time of the requests. In our current architecture, each
request message is received by only one replier process, so we would either have to modify
the replier side to collect statistics directly or forward messages to a process that
collects statistics. In other words, we cannot add functionality to the system without
changing the existing architecture, existing components, or both. Let’s see what a better,
more flexible architecture looks like.</p>

<p>The main problem with the above architecture is that messages are received by only one
process and there is no easy way to make another process receive messages. This is the
drawback of point-to-point communication, and thus sending requests via publish-subscribe
instead of point-to-point is the easy way out. Of course, changing to publish-subscribe
alone is not enough, because it would lead to the following situation.</p>

<p><img src="/assets/2023-06-25-toolbox-request-reply/pubsub-stats.png" alt="pubsub-stats.png" /></p>

<p>In the above architecture, the requestor sends its request to the pub-sub topic that
the repliers are subscribed to. Because each of the repliers will receive a request,
each replier will respond to the request, and the requestor will receive multiple
responses for a single request. To avoid duplicate responses, all repliers need to
share a single endpoint that is subscribed to the topic. This way we can ensure that
each request is received by only one replier. The statistics component will use a
separate endpoint to subscribe to the topic, making sure that it receives a copy of
each request. This can be seen in the next diagram.</p>

<p><img src="/assets/2023-06-25-toolbox-request-reply/pubsub-compcons-stats.png" alt="pubsub-compcons-stats.png" /></p>

<p>Or, if we use the proper notation for competing consumers, we get the following,
simpler diagram.</p>

<p><img src="/assets/2023-06-25-toolbox-request-reply/pubsub-request-reply.png" alt="pubsub-request-reply.png" /></p>

<p>The migration to publish-subscribe messaging may seem like a big change, but
because most functions handle both kinds of messages, we barely have to change
the code at all. On the replier side, all we have to do is subscribe the endpoint
to the <code class="language-plaintext highlighter-rouge">requests</code> topic with a call to <code class="language-plaintext highlighter-rouge">ipc_endpoint_subscribe()</code>.</p>

<figure class="highlight"><pre><code class="language-bash" data-lang="bash">main<span class="o">()</span> <span class="o">{</span>
    <span class="nb">local </span>endpoint

    <span class="k">if</span> <span class="o">!</span> <span class="nv">endpoint</span><span class="o">=</span><span class="si">$(</span>ipc_endpoint_open <span class="s2">"pub/kvs"</span><span class="si">)</span><span class="p">;</span> <span class="k">then
        </span>log_error <span class="s2">"Could not open endpoint"</span>
        <span class="k">return </span>1
    <span class="k">fi

    if</span> <span class="o">!</span> ipc_endpoint_subscribe <span class="s2">"</span><span class="nv">$endpoint</span><span class="s2">"</span> <span class="s2">"requests"</span><span class="p">;</span> <span class="k">then
        </span>log_error <span class="s2">"Could not subscribe to topic </span><span class="se">\"</span><span class="s2">requests</span><span class="se">\"</span><span class="s2">"</span>
        <span class="k">return </span>1
    <span class="k">fi

    while </span><span class="nb">true</span><span class="p">;</span> <span class="k">do
        </span><span class="nb">local </span>msg

        <span class="k">if </span><span class="nv">msg</span><span class="o">=</span><span class="si">$(</span>ipc_endpoint_recv <span class="s2">"</span><span class="nv">$endpoint</span><span class="s2">"</span><span class="si">)</span><span class="p">;</span> <span class="k">then
            </span>handle_message <span class="s2">"</span><span class="nv">$endpoint</span><span class="s2">"</span> <span class="s2">"</span><span class="nv">$msg</span><span class="s2">"</span>
        <span class="k">fi
    done</span>
<span class="o">}</span></code></pre></figure>

<p>We do not remove the address from the call to <code class="language-plaintext highlighter-rouge">ipc_endpoint_open()</code> because we need
to make sure that all repliers use the same endpoint, making them competing consumers.
This has the nice side-effect that the new replier will be able to handle requests that
were sent via pub-sub as well as those from point-to-point messages. Hence, old
requestors will not stop working all of a sudden.</p>

<p>The change that is necessary to make requestors send requests with pub-sub messaging
is even smaller than the change we needed on the replier-side. All we have to do is
change the <code class="language-plaintext highlighter-rouge">send_and_recv()</code> function to use <code class="language-plaintext highlighter-rouge">ipc_endpoint_publish()</code> instead of
<code class="language-plaintext highlighter-rouge">ipc_endpoint_send()</code>, and that is it.</p>

<figure class="highlight"><pre><code class="language-bash" data-lang="bash">send_and_recv<span class="o">()</span> <span class="o">{</span>
    <span class="nb">local </span><span class="nv">endpoint</span><span class="o">=</span><span class="s2">"</span><span class="nv">$1</span><span class="s2">"</span>
    <span class="nb">local </span><span class="nv">message</span><span class="o">=</span><span class="s2">"</span><span class="nv">$2</span><span class="s2">"</span>

    <span class="k">if</span> <span class="o">!</span> ipc_endpoint_publish <span class="s2">"</span><span class="nv">$endpoint</span><span class="s2">"</span> <span class="s2">"requests"</span> <span class="s2">"</span><span class="nv">$message</span><span class="s2">"</span><span class="p">;</span> <span class="k">then
        return </span>1
    <span class="k">fi

    </span>ipc_endpoint_recv <span class="s2">"</span><span class="nv">$endpoint</span><span class="s2">"</span>
<span class="o">}</span></code></pre></figure>

<p>Meanwhile, the new statistics component does nothing but subscribe to the <code class="language-plaintext highlighter-rouge">requests</code>
topic, process received messages, and write the results to standard output. I will
skip the explanation of the code since it doesn’t do anything that wasn’t already in
the requestor and replier implementations. But you can see it below.</p>

<figure class="highlight"><pre><code class="language-bash" data-lang="bash"><span class="c">#!/bin/bash</span>

collect_stats<span class="o">()</span> <span class="o">{</span>
	<span class="nb">local </span><span class="nv">msg</span><span class="o">=</span><span class="s2">"</span><span class="nv">$1</span><span class="s2">"</span>

	<span class="nb">local </span>data
	<span class="nb">local </span>request_type
	<span class="nb">local </span>name
	<span class="nb">local </span>timestamp

	<span class="nv">timestamp</span><span class="o">=</span><span class="si">$(</span>ipc_msg_get_timestamp <span class="s2">"</span><span class="nv">$msg</span><span class="s2">"</span><span class="si">)</span>
	<span class="nv">data</span><span class="o">=</span><span class="si">$(</span>ipc_msg_get_data <span class="s2">"</span><span class="nv">$msg</span><span class="s2">"</span><span class="si">)</span>
	<span class="nv">request_type</span><span class="o">=</span><span class="si">$(</span>json_object_get <span class="s2">"</span><span class="nv">$data</span><span class="s2">"</span> <span class="s2">"type"</span><span class="si">)</span>
	<span class="nv">name</span><span class="o">=</span><span class="si">$(</span>json_object_get <span class="s2">"</span><span class="nv">$data</span><span class="s2">"</span> <span class="s2">"name"</span><span class="si">)</span>

	<span class="nb">printf</span> <span class="s1">'%s %s %s\n'</span> <span class="s2">"</span><span class="nv">$timestamp</span><span class="s2">"</span> <span class="s2">"</span><span class="nv">$request_type</span><span class="s2">"</span> <span class="s2">"</span><span class="nv">$name</span><span class="s2">"</span>
<span class="o">}</span>

process_requests<span class="o">()</span> <span class="o">{</span>
	<span class="nb">local </span><span class="nv">endpoint</span><span class="o">=</span><span class="s2">"</span><span class="nv">$1</span><span class="s2">"</span>

	<span class="k">while </span><span class="nb">true</span><span class="p">;</span> <span class="k">do
		</span><span class="nb">local </span>msg
		<span class="nb">local </span>data

		<span class="k">if </span><span class="nv">msg</span><span class="o">=</span><span class="si">$(</span>ipc_endpoint_recv <span class="s2">"</span><span class="nv">$endpoint</span><span class="s2">"</span><span class="si">)</span><span class="p">;</span> <span class="k">then
			</span>collect_stats <span class="s2">"</span><span class="nv">$msg</span><span class="s2">"</span>
		<span class="k">fi
	done</span>
<span class="o">}</span>

main<span class="o">()</span> <span class="o">{</span>
	<span class="nb">local </span>endpoint

	<span class="k">if</span> <span class="o">!</span> opt_parse <span class="s2">"</span><span class="nv">$@</span><span class="s2">"</span><span class="p">;</span> <span class="k">then
		return </span>1
	<span class="k">fi

	if</span> <span class="o">!</span> <span class="nv">endpoint</span><span class="o">=</span><span class="si">$(</span>ipc_endpoint_open<span class="si">)</span><span class="p">;</span> <span class="k">then
		</span>log_error <span class="s2">"Could not open IPC endpoint"</span>
		<span class="k">return </span>1
	<span class="k">fi

	if </span>ipc_endpoint_subscribe <span class="s2">"</span><span class="nv">$endpoint</span><span class="s2">"</span> <span class="s2">"requests"</span><span class="p">;</span> <span class="k">then
		</span>process_requests <span class="s2">"</span><span class="nv">$endpoint</span><span class="s2">"</span>
	<span class="k">fi

	</span>ipc_endpoint_close <span class="s2">"</span><span class="nv">$endpoint</span><span class="s2">"</span>
	<span class="k">return </span>0
<span class="o">}</span>

<span class="o">{</span>
	<span class="k">if</span> <span class="o">!</span> <span class="nb">.</span> toolbox.sh <span class="o">||</span>
	   <span class="o">!</span> include <span class="s2">"log"</span> <span class="s2">"opt"</span> <span class="s2">"uipc"</span> <span class="s2">"json"</span><span class="p">;</span> <span class="k">then
		</span><span class="nb">exit </span>1
	<span class="k">fi

	</span>main <span class="s2">"</span><span class="nv">$@</span><span class="s2">"</span>
	<span class="nb">exit</span> <span class="s2">"</span><span class="nv">$?</span><span class="s2">"</span>
<span class="o">}</span></code></pre></figure>

<p>Thanks to the new architecture we can add new components into the system
without having to modify or reconfigure the existing system. Aside from
making the architecture more flexible, it also makes our lives a great
deal easier when it comes to debugging, because all we have to do is
create an endpoint and subscribe it to the relevant topics (or the
wildcard topic <code class="language-plaintext highlighter-rouge">*</code>) to see what’s going on inside the system.</p>

<h2 id="a-word-about-synchronicity">A word about synchronicity</h2>

<p>The Request-Reply pattern can be used with point-to-point messages and
publish-subscribe messages, and it can even be used to combine the two.
In the above example, we implemented a requestor that synchronously
waits for a response from the replier, which might easily turn into a
bottleneck in larger systems. This pattern can also be used in an
asynchronous fashion, but because this is more effort to do in a Bash
script, I will leave it for another time.</p>]]></content><author><name></name></author><category term="toolbox" /><category term="messaging" /><category term="eip" /><summary type="html"><![CDATA[In the previous two articles, I explained how scripts can communicate with point-to-point and publish-subscribe messaging. There are different ways how the two mechanisms can be used, so this time we’re going to have a look at the Request-Reply Pattern. In this pattern, there are two parties. The first one, the requestor, sends a request to the replier, which sends a response back to the requestor, as shown in the following figure. If this reminds you of client-server communication, you got the idea.]]></summary></entry><entry><title type="html">Interfaces and inheritance in toolbox modules</title><link href="https://m10k.eu/2023/06/10/toolbox-interfaces.html" rel="alternate" type="text/html" title="Interfaces and inheritance in toolbox modules" /><published>2023-06-10T13:53:38+02:00</published><updated>2023-06-10T13:53:38+02:00</updated><id>https://m10k.eu/2023/06/10/toolbox-interfaces</id><content type="html" xml:base="https://m10k.eu/2023/06/10/toolbox-interfaces.html"><![CDATA[<p>When I first wrote <a href="https://github.com/m10k/toolbox">toolbox</a>, my goal was to remove
boilerplate code from my scripts and improve code-reuse. Because my scripts became
more robust and maintainable, I felt more comfortable writing long-running processes
like daemons in bash, which led to the development of the <em>ipc</em> module for
message-based communication. Because the module uses GPG for message signing, it can
be tricky to set up, so I added the <em>uipc</em> module, which does mostly the same thing,
but without message signing.</p>

<p>This put me in the situation where I had two modules in toolbox that did the same
thing and even had mostly the same functions, but that still could not be used
interchangeably because function names started with <code class="language-plaintext highlighter-rouge">ipc_</code> in the one module, and
with <code class="language-plaintext highlighter-rouge">uipc_</code> in the other, meaning that you could write your scripts to use one or
the other, but not both. In object-oriented programming, this could be easily
solved with inheritance or interfaces, both concepts that do not exist in Bash. So
I set out to write a small proof-of-concept that is now part of toolbox.</p>

<h2 id="declaring-and-implementing-interfaces">Declaring and implementing interfaces</h2>

<p>A module can use the <code class="language-plaintext highlighter-rouge">interface()</code> function to declare a set of functions that may
be provided (or overridden) by a module that is implementing the interface. Let’s
assume the following is the code of a module called <em>greeting</em>.</p>

<figure class="highlight"><pre><code class="language-bash" data-lang="bash"><span class="c"># Module "greeting"</span>
__init<span class="o">()</span> <span class="o">{</span>
    interface <span class="s2">"hello"</span> <span class="se">\</span>
              <span class="s2">"bye"</span>
<span class="o">}</span></code></pre></figure>

<p>When the module is loaded, it declares an interface with the two methods <code class="language-plaintext highlighter-rouge">hello</code>
and <code class="language-plaintext highlighter-rouge">bye</code>. The interface will be called <code class="language-plaintext highlighter-rouge">greeting</code>, since that is the name of the
module that declares it. And the two methods of the interface will thus be called
<code class="language-plaintext highlighter-rouge">greeting_hello()</code> and <code class="language-plaintext highlighter-rouge">greeting_bye()</code>.</p>

<p>What happens internally is that toolbox declares a
<a href="https://en.wikipedia.org/wiki/Virtual_method_table">vtable</a> (very simply said, a
table with function references) for the module, and creates the function stubs
<code class="language-plaintext highlighter-rouge">greeting_hello()</code> and <code class="language-plaintext highlighter-rouge">greeting_bye()</code>. When a function stub is called, it looks
at the vtable and calls whatever function is referenced there. By default, vtable
entries reference the function <code class="language-plaintext highlighter-rouge">method_not_implemented()</code>, which lets the caller
know that they called an unimplemented method.</p>

<p>A module that wants to implement an interface can do so with the <code class="language-plaintext highlighter-rouge">implements()</code>
function, which expects exactly one argument: the name of the interface. The
following snippet shows the module <em>german</em>, which implements <code class="language-plaintext highlighter-rouge">greeting</code>.</p>

<figure class="highlight"><pre><code class="language-bash" data-lang="bash"><span class="c"># Module "german"</span>
__init<span class="o">()</span> <span class="o">{</span>
    implements <span class="s2">"greeting"</span>
<span class="o">}</span>

german_hello<span class="o">()</span> <span class="o">{</span>
    <span class="nb">local </span><span class="nv">name</span><span class="o">=</span><span class="s2">"</span><span class="nv">$1</span><span class="s2">"</span>

    <span class="nb">echo</span> <span class="s2">"Hallo </span><span class="nv">$name</span><span class="s2">"</span>
<span class="o">}</span>

german_bye<span class="o">()</span> <span class="o">{</span>
    <span class="nb">local </span><span class="nv">name</span><span class="o">=</span><span class="s2">"</span><span class="nv">$1</span><span class="s2">"</span>

    <span class="nb">echo</span> <span class="s2">"Tschüss, </span><span class="nv">$name</span><span class="s2">"</span>
<span class="o">}</span></code></pre></figure>

<p>When the module <em>german</em> is initialized, toolbox checks if the module overrides any
of the interface’s methods. The <code class="language-plaintext highlighter-rouge">greeting</code> interface has the two methods <code class="language-plaintext highlighter-rouge">hello</code> and
<code class="language-plaintext highlighter-rouge">bye</code>, so toolbox checks if the functions <code class="language-plaintext highlighter-rouge">german_hello()</code> or <code class="language-plaintext highlighter-rouge">german_bye()</code> exist,
and updates the vtable accordingly.</p>

<p>To see why you would want something like this, let’s have a look at a script that
uses these modules.</p>

<p><strong>Note</strong>: The <em>opt</em> module used below is a command line parser.
The <code class="language-plaintext highlighter-rouge">opt_parse()</code> function parses the command line according to the options that
were declared with <code class="language-plaintext highlighter-rouge">opt_add_arg()</code>. The arguments to <code class="language-plaintext highlighter-rouge">opt_add_arg()</code> have the
following meaning (in order):</p>

<ol>
  <li>Short name of the option (e.g. <code class="language-plaintext highlighter-rouge">-f</code>)</li>
  <li>Long name of the option (e.g. <code class="language-plaintext highlighter-rouge">--foo</code>)</li>
  <li>Flags (<code class="language-plaintext highlighter-rouge">r</code> = required, <code class="language-plaintext highlighter-rouge">v</code> = option is followed by a value)</li>
  <li>Default value</li>
  <li>Description (for <code class="language-plaintext highlighter-rouge">--help</code>)</li>
</ol>

<figure class="highlight"><pre><code class="language-bash" data-lang="bash"><span class="c">#!/bin/bash</span>

main<span class="o">()</span> <span class="o">{</span>
    <span class="nb">local </span>lang
    <span class="nb">local </span>name

    opt_add_arg <span class="s2">"l"</span> <span class="s2">"lang"</span> <span class="s2">"v"</span>  <span class="s2">"german"</span> <span class="s2">"Language to use"</span>
    opt_add_arg <span class="s2">"n"</span> <span class="s2">"name"</span> <span class="s2">"rv"</span> <span class="s2">""</span>       <span class="s2">"Name of the user"</span>

    <span class="k">if</span> <span class="o">!</span> opt_parse <span class="s2">"</span><span class="nv">$@</span><span class="s2">"</span><span class="p">;</span> <span class="k">then
        return </span>1
    <span class="k">fi

    </span><span class="nv">lang</span><span class="o">=</span><span class="si">$(</span>opt_get <span class="s2">"lang"</span><span class="si">)</span>
    <span class="nv">name</span><span class="o">=</span><span class="si">$(</span>opt_get <span class="s2">"name"</span><span class="si">)</span>

    include <span class="s2">"</span><span class="nv">$lang</span><span class="s2">"</span>

    greeting_hello <span class="s2">"</span><span class="nv">$name</span><span class="s2">"</span>
<span class="o">}</span>

<span class="o">{</span>
    <span class="k">if</span> <span class="o">!</span> <span class="nb">.</span> toolbox.sh <span class="o">||</span>
       <span class="o">!</span> include <span class="s2">"opt"</span><span class="p">;</span> <span class="k">then
        </span><span class="nb">exit </span>1
    <span class="k">fi

    </span>main <span class="s2">"</span><span class="nv">$@</span><span class="s2">"</span>
    <span class="nb">exit</span> <span class="s2">"</span><span class="nv">$?</span><span class="s2">"</span>
<span class="o">}</span></code></pre></figure>

<p>Let’s assume this script is called <code class="language-plaintext highlighter-rouge">greet.sh</code> and the modules have been placed in
a directory called <code class="language-plaintext highlighter-rouge">include</code> next to it. When you now execute the script with</p>

<figure class="highlight"><pre><code class="language-bash" data-lang="bash"><span class="nv">$ </span>./greet.sh <span class="nt">--name</span> Peter</code></pre></figure>

<p>it will write the message <code class="language-plaintext highlighter-rouge">Hallo Peter</code> to standard output. This is because the
value of the <code class="language-plaintext highlighter-rouge">--lang</code> option defaults to <code class="language-plaintext highlighter-rouge">german</code>, causing the module <em>german</em> to
be included (which causes <em>greeting</em> to be included).</p>

<p>Now if you wanted to add another language, all you have to do is add a new module.
The following is the code of the module <em>japanese</em>.</p>

<figure class="highlight"><pre><code class="language-bash" data-lang="bash"><span class="c"># Module "japanese"</span>
__init<span class="o">()</span> <span class="o">{</span>
    implements <span class="s2">"greeting"</span>
<span class="o">}</span>

japanese_hello<span class="o">()</span> <span class="o">{</span>
    <span class="nb">local </span><span class="nv">name</span><span class="o">=</span><span class="s2">"</span><span class="nv">$1</span><span class="s2">"</span>

    <span class="nb">echo</span> <span class="s2">"</span><span class="nv">$name</span><span class="s2">さん、こんにちは"</span>
<span class="o">}</span>

japanese_bye<span class="o">()</span> <span class="o">{</span>
    <span class="nb">echo</span> <span class="s2">"じゃ、また"</span>
<span class="o">}</span></code></pre></figure>

<p>To use the new module, none of the other files need to be modified. You can
execute the script like</p>

<figure class="highlight"><pre><code class="language-bash" data-lang="bash"><span class="nv">$ </span>./greet.sh <span class="nt">--name</span> Peter <span class="nt">--lang</span> japanese</code></pre></figure>

<p>and it would greet you with the output <code class="language-plaintext highlighter-rouge">Peterさん、こんにちは</code>.</p>

<h2 id="extending-interfaces">Extending interfaces</h2>

<p>The example above declares a pure interface, which is an interface that does
not implement any methods itself. Let’s assume we wanted to modify the example,
so that it falls back to English if no language was specified.</p>

<p>The first thing we’d do is modify the <em>greeting</em> module so that it provides
functions for English like the following.</p>

<figure class="highlight"><pre><code class="language-bash" data-lang="bash"><span class="c"># Module "greeting"</span>
__init<span class="o">()</span> <span class="o">{</span>
    interface <span class="s2">"hello"</span> <span class="se">\</span>
              <span class="s2">"bye"</span>
<span class="o">}</span>

greeting_hello<span class="o">()</span> <span class="o">{</span>
    <span class="nb">local </span><span class="nv">name</span><span class="o">=</span><span class="s2">"</span><span class="nv">$1</span><span class="s2">"</span>

    <span class="nb">echo</span> <span class="s2">"Hello </span><span class="nv">$name</span><span class="s2">"</span>
<span class="o">}</span>

greeting_bye<span class="o">()</span> <span class="o">{</span>
    <span class="nb">local </span><span class="nv">name</span><span class="o">=</span><span class="s2">"</span><span class="nv">$1</span><span class="s2">"</span>

    <span class="nb">echo</span> <span class="s2">"Bye </span><span class="nv">$name</span><span class="s2">"</span>
<span class="o">}</span></code></pre></figure>

<p>What’s special about this case is that the module now has functions that collide
with the interface’s call stubs. When this happens, toolbox will first rename the
colliding functions, so the <code class="language-plaintext highlighter-rouge">greeting_hello()</code> above becomes <code class="language-plaintext highlighter-rouge">___greeting_hello()</code>,
and <code class="language-plaintext highlighter-rouge">greeting_bye()</code> becomes <code class="language-plaintext highlighter-rouge">___greeting_bye()</code>. It will then generate the call
stubs and initialize the vtable so that the entry for <code class="language-plaintext highlighter-rouge">hello</code> “points” to
<code class="language-plaintext highlighter-rouge">___greeting_hello()</code> and <code class="language-plaintext highlighter-rouge">bye</code> to <code class="language-plaintext highlighter-rouge">___greeting_bye()</code>. This way, the
interface-implements mechanism can be used to create modules that build on other
modules.</p>

<p>Since the <em>greeting</em> module now has a default behavior, we also need to change
<em>greet.sh</em> to account for that. This is as simple as changing the default language
to <code class="language-plaintext highlighter-rouge">greeting</code>, by changing the first option declaration like this.</p>

<figure class="highlight"><pre><code class="language-bash" data-lang="bash">    opt_add_arg <span class="s2">"l"</span> <span class="s2">"lang"</span> <span class="s2">"v"</span>  <span class="s2">"greeting"</span> <span class="s2">"Language to use"</span></code></pre></figure>

<p>This is not the best solution though, since the help text that is printed when
<code class="language-plaintext highlighter-rouge">opt_parse()</code> encounters <code class="language-plaintext highlighter-rouge">-h</code> or <code class="language-plaintext highlighter-rouge">--help</code> on the command line will say that the
default value for <code class="language-plaintext highlighter-rouge">--lang</code> is <em>greeting</em>. It would be nicer to include <code class="language-plaintext highlighter-rouge">greeting</code>
unconditionally and load one of the other modules only if <code class="language-plaintext highlighter-rouge">--lang</code> was passed on
the command line. There are many roads that lead to Rome.</p>

<h2 id="and">And?</h2>

<p>Because the uipc module could now inherit code from the ipc module, I was able to
remove about 80% of the former. What’s more, I could also modify
<a href="https://github.com/m10k/foundry">foundry</a> to support both IPC flavors with very
little code changes.</p>

<p>Of course, this mechanism can’t compare with its counterparts in other languages,
but it makes writing Bash scripts a lot more comfortable. I had concerns regarding
the stability of this mechanism, but since I have been using it for half a year now
and had literally zero problems with it, I merged it into stable and released
toolbox 0.3.6 today.</p>]]></content><author><name></name></author><category term="toolbox" /><category term="bash" /><summary type="html"><![CDATA[When I first wrote toolbox, my goal was to remove boilerplate code from my scripts and improve code-reuse. Because my scripts became more robust and maintainable, I felt more comfortable writing long-running processes like daemons in bash, which led to the development of the ipc module for message-based communication. Because the module uses GPG for message signing, it can be tricky to set up, so I added the uipc module, which does mostly the same thing, but without message signing.]]></summary></entry><entry><title type="html">Publish-Subscribe Messaging in Bash</title><link href="https://m10k.eu/2023/05/27/toolbox-pubsub.html" rel="alternate" type="text/html" title="Publish-Subscribe Messaging in Bash" /><published>2023-05-27T08:40:11+02:00</published><updated>2023-05-27T08:40:11+02:00</updated><id>https://m10k.eu/2023/05/27/toolbox-pubsub</id><content type="html" xml:base="https://m10k.eu/2023/05/27/toolbox-pubsub.html"><![CDATA[<p>In the <a href="/2023/05/06/toolbox-messaging.html">last article</a>, I have explained how to
implement the <em>Point-to-Point Channel</em> and <em>Competing Consumers</em> patterns with toolbox to
process messages in parallel. When employing the Competing Consumers pattern, every message
on the channel will be received by only one process. But what if we wanted to broadcast
messages so that each process receives a copy? This is where
<a href="https://www.enterpriseintegrationpatterns.com/patterns/messaging/PublishSubscribeChannel.html">Publish-Subscribe Channels</a> enter the stage.</p>

<p>When a process sends a message to a publish-subscribe channel (or <em>topic</em>, as they are called
in toolbox), each of the processes that are subscribed to the channel will receive a copy of
the message. This means that receiving processes need to subscribe to a channel before
messages are being published (one could thus argue that this pattern should better be
called <em>Subscribe-Publish Messaging</em> instead). This pattern can be used when the messages
that are sent by a process are interesting for many processes, such as data from sensors or
other kinds of notifications. What makes this pattern extremely powerful is that you can add
new processes to a system without having to change the messaging architecture. All the new
process has to do is subscribe to the publish-subscribe channel. This allows you to build
very flexible and decoupled architectures.</p>

<h2 id="pub-sub-with-toolbox">Pub-Sub with toolbox</h2>

<p>Publish-subscribe messaging is so useful, I use it more than point-to-point messages. And
because it gets a lot of my attention, it is very straightforward to use with toolbox.</p>

<p>To publish messages, one first needs to open a new IPC endpoint. Then you can publish
messages using <code class="language-plaintext highlighter-rouge">ipc_endpoint_publish()</code>.</p>

<p><strong>Note</strong>: To use the <code class="language-plaintext highlighter-rouge">ipc_</code> family of functions, you need to include either the uipc or ipc
module. The latter uses GnuPG for message signing and verification, which makes it a bit more
complicated to use. If you don’t exchange messages with other users, or you just want to get
quick results, you should use the uipc module.</p>

<figure class="highlight"><pre><code class="language-bash" data-lang="bash"><span class="nb">.</span> toolbox.sh
include <span class="s2">"uipc"</span>

<span class="nv">ep</span><span class="o">=</span><span class="si">$(</span>ipc_endpoint_open<span class="si">)</span>
ipc_endpoint_publish <span class="s2">"</span><span class="nv">$ep</span><span class="s2">"</span> <span class="s2">"topic"</span> <span class="s2">"Hello"</span></code></pre></figure>

<p>A subscriber that loops forever, printing received messages isn’t much longer. Like the
publisher, it first needs an endpoint that is consequently subscribed to the topic with
<code class="language-plaintext highlighter-rouge">ipc_endpoint_subscribe()</code>. Pub-sub messages can be received like point-to-point messages,
using <code class="language-plaintext highlighter-rouge">ipc_endpoint_recv()</code>.</p>

<figure class="highlight"><pre><code class="language-bash" data-lang="bash"><span class="nb">.</span> toolbox.sh
include <span class="s2">"uipc"</span>
include <span class="s2">"log"</span>

<span class="nv">ep</span><span class="o">=</span><span class="si">$(</span>ipc_endpoint_open<span class="si">)</span>
ipc_endpoint_subscribe <span class="s2">"</span><span class="nv">$ep</span><span class="s2">"</span> <span class="s2">"topic"</span>

<span class="k">while </span><span class="nb">true</span><span class="p">;</span> <span class="k">do
    </span><span class="nv">msg</span><span class="o">=</span><span class="si">$(</span>ipc_endpoint_recv <span class="s2">"</span><span class="nv">$ep</span><span class="s2">"</span><span class="si">)</span>
    ipc_msg_get_data <span class="s2">"</span><span class="nv">$msg</span><span class="s2">"</span> | log_highlight <span class="s2">"Message"</span>
<span class="k">done</span></code></pre></figure>

<p>Another interesting thing about pub-sub messaging in toolbox is that it can be easily
combined with the <a href="https://www.enterpriseintegrationpatterns.com/patterns/messaging/CompetingConsumers.html">Competing Consumers</a> pattern. All one has to do is pass a name to
<code class="language-plaintext highlighter-rouge">ipc_endpoint_open()</code> to obtain a public endpoint that can be shared between processes.</p>

<p>As a real-life example, let’s have a look at <a href="https://github.com/m10k/foundry">foundry</a>. A
script called <em>watchbot</em> periodically checks a set of git repositories if they have changed.
When watchbot detects a change, it sends a message to the <code class="language-plaintext highlighter-rouge">commits</code> topic. Another script
called <em>buildbot</em> subscribes to this topic and waits for messages. Once it has received a
message, it builds Debian packages from the git repository that is mentioned in the message.
Buildbot builds packages only for the CPU architecture that it is running on, meaning that
one needs instances running on i386 and amd64 hosts if one wants to build packages for those
two architectures. If there is only one buildbot instance per architecture, this will work
well with naive pub-sub messaging. But what if there are a lot of packages waiting to be
built, and one lonely buildbot per architecture can’t catch up with the workload? If we use
naive pub-sub messaging and start multiple buildbots for the same architecture, they all will
receive any notifications from watchbot, meaning they all will build the same versions of the
same packages for the same architecture, leading to many duplicate package builds and no
performance gain whatsoever. We prevent this using the Competing Consumers pattern on top of
the pub-sub messaging. By having all buildbots for a particular architecture share the same
endpoint, we can make sure that only one buildbot on that endpoint will receive a
notification, thus avoiding duplicate package builds.</p>

<p><img src="/assets/pubsub-compcons.png" alt="pubsub-compcons" /></p>

<p>To implement this using toolbox, all we have to do is change the competing consumers example
from the last time so that the shared endpoint is subscribed to the topic that we’re
interested in, as shown below.</p>

<figure class="highlight"><pre><code class="language-bash" data-lang="bash"><span class="nb">.</span> toolbox.sh
include <span class="s2">"uipc"</span>

consumer<span class="o">()</span> <span class="o">{</span>
	<span class="nb">local </span><span class="nv">endpoint_name</span><span class="o">=</span><span class="s2">"</span><span class="nv">$1</span><span class="s2">"</span>
	<span class="nb">local </span><span class="nv">topic</span><span class="o">=</span><span class="s2">"</span><span class="nv">$2</span><span class="s2">"</span>

	<span class="nb">local </span>endpoint
	<span class="nb">local </span>message

	<span class="nv">endpoint</span><span class="o">=</span><span class="si">$(</span>ipc_endpoint_open <span class="s2">"</span><span class="nv">$endpoint_name</span><span class="s2">"</span><span class="si">)</span>
	ipc_endpoint_subscribe <span class="s2">"</span><span class="nv">$endpoint</span><span class="s2">"</span> <span class="s2">"</span><span class="nv">$topic</span><span class="s2">"</span>

	<span class="k">while </span><span class="nb">true</span><span class="p">;</span> <span class="k">do
		</span><span class="nv">message</span><span class="o">=</span><span class="si">$(</span>ipc_endpoint_recv <span class="s2">"</span><span class="nv">$endpoint</span><span class="s2">"</span><span class="si">)</span>
		handle_message <span class="s2">"</span><span class="nv">$message</span><span class="s2">"</span>
	<span class="k">done</span>
<span class="o">}</span>

<span class="nv">endpoint_name</span><span class="o">=</span><span class="s2">"foo"</span>
<span class="nv">topic</span><span class="o">=</span><span class="s2">"bar"</span>
<span class="nv">num_cpus</span><span class="o">=</span><span class="si">$(</span><span class="nb">nproc</span><span class="si">)</span>

<span class="k">for</span> <span class="o">((</span> i <span class="o">=</span> 0<span class="p">;</span> i &lt; num_cpus<span class="p">;</span> i++ <span class="o">))</span><span class="p">;</span> <span class="k">do</span>
	<span class="o">(</span> consumer <span class="s2">"</span><span class="nv">$endpoint_name</span><span class="s2">"</span> <span class="s2">"</span><span class="nv">$topic</span><span class="s2">"</span> <span class="o">)</span> &amp;
<span class="k">done
</span><span class="nb">wait</span></code></pre></figure>

<p>There is one catch, though. Because toolbox uses the filesystem to send and receive messages,
communication between processes on different machines only works if the machines share a
network filesystem, making toolbox better suited for smaller systems. But it’s not like
anyone would use Bash to implement large-scale geographically-distributed systems anyway,
right?</p>

<p>If I managed to pique your interest, don’t forget to have a look at <a href="https://github.com/m10k/foundry">foundry</a>, my proof-of-concept for messaging-based distributed systems in Bash.</p>]]></content><author><name></name></author><category term="toolbox" /><category term="messaging" /><category term="eip" /><summary type="html"><![CDATA[In the last article, I have explained how to implement the Point-to-Point Channel and Competing Consumers patterns with toolbox to process messages in parallel. When employing the Competing Consumers pattern, every message on the channel will be received by only one process. But what if we wanted to broadcast messages so that each process receives a copy? This is where Publish-Subscribe Channels enter the stage.]]></summary></entry><entry><title type="html">Messaging Patterns in Bash</title><link href="https://m10k.eu/2023/05/06/toolbox-messaging.html" rel="alternate" type="text/html" title="Messaging Patterns in Bash" /><published>2023-05-06T10:50:31+02:00</published><updated>2023-05-06T10:50:31+02:00</updated><id>https://m10k.eu/2023/05/06/toolbox-messaging</id><content type="html" xml:base="https://m10k.eu/2023/05/06/toolbox-messaging.html"><![CDATA[<p>Around the time when I was implementing queues in <a href="https://github.com/m10k/toolbox">toolbox</a>,
I was reading <em>Enterprise Integration Patterns</em>, a book about messaging patterns, written by
Gregor Hohpe (whom I worked with more than a decade ago) and Bobby Woolf. While reading the
book, I thought how awesome it would be if I could use my queues to implement messaging in
Bash — and that’s how I got inspired to write the uipc module. Because there is no documentation
but an <a href="https://github.com/m10k/toolbox/blob/unstable/docs/ipc.md">API reference</a>, I decided to
write a few articles about how the uipc module can be used to implement some of the messaging
patterns from the book.</p>

<h2 id="point-to-point-channels">Point-to-Point Channels</h2>

<p>The most basic communication that can be implemented with the uipc module is a direct
message transfer from the sender to the receiver. The sender places messages in a queue,
the channel, from where the receiver will pick them up. If there is more than one receiver,
the channel guarantees that the message is picked up by only one of the receivers. This is
what EIP calls a <a href="https://www.enterpriseintegrationpatterns.com/patterns/messaging/PointToPointChannel.html">Point-to-Point Channel</a>. This pattern is fairly easy to realize with
toolbox/uipc, although the terminology is somewhat different.</p>

<p>At first, the script needs to source toolbox and include the uipc module, which contains the
<code class="language-plaintext highlighter-rouge">ipc_*</code> functions (note that there is also a module called <em>ipc</em>, which is functionally
equivalent but uses GPG to sign and verify messages).</p>

<figure class="highlight"><pre><code class="language-bash" data-lang="bash"><span class="nb">.</span> toolbox.sh
include <span class="s2">"uipc"</span></code></pre></figure>

<p>To send messages, a process now needs to create an IPC endpoint like so:</p>

<figure class="highlight"><pre><code class="language-bash" data-lang="bash"><span class="nv">priv_ep</span><span class="o">=</span><span class="si">$(</span>ipc_endpoint_open<span class="si">)</span></code></pre></figure>

<p>This will open a private (or unnamed, or anonymous, or whatever you like to call it)
endpoint. Because the address of a private endpoint is random, it’s only useful if you are
the one who is initiating the communication.</p>

<p>If you want to receive messages from someone, you need an endpoint with an address that
other processes can refer to. Thus, you open your endpoint by passing an address to
<code class="language-plaintext highlighter-rouge">ipc_endpoint_open()</code> and you get a public endpoint.</p>

<figure class="highlight"><pre><code class="language-bash" data-lang="bash"><span class="nv">pub_ep</span><span class="o">=</span><span class="si">$(</span>ipc_endpoint_open <span class="s2">"foobar"</span><span class="si">)</span></code></pre></figure>

<p>A sender can now send messages to the public endpoint by passing its address to
<code class="language-plaintext highlighter-rouge">ipc_endpoint_send()</code>.</p>

<figure class="highlight"><pre><code class="language-bash" data-lang="bash">ipc_endpoint_send <span class="s2">"</span><span class="nv">$priv_ep</span><span class="s2">"</span> <span class="s2">"foobar"</span> <span class="s2">"Hello world"</span></code></pre></figure>

<p>This places the message in the queue of the public endpoint, where the receiving process
can pick it up with a call to <code class="language-plaintext highlighter-rouge">ipc_endpoint_recv()</code>. To put it short, a public endpoint
in toolbox/uipc is a Point-to-Point Channel.</p>

<p>The following is what a simple sender looks like (for the sake of brevity, I have omitted
any error handling).</p>

<figure class="highlight"><pre><code class="language-bash" data-lang="bash"><span class="nb">.</span> toolbox.sh
include <span class="s2">"uipc"</span>

<span class="nv">channel</span><span class="o">=</span><span class="s2">"foobar"</span>
<span class="nv">message</span><span class="o">=</span><span class="s2">"Hello world"</span>

<span class="nv">endpoint</span><span class="o">=</span><span class="si">$(</span>ipc_endpoint_open<span class="si">)</span>
ipc_endpoint_send <span class="s2">"</span><span class="nv">$endpoint</span><span class="s2">"</span> <span class="s2">"</span><span class="nv">$channel</span><span class="s2">"</span> <span class="s2">"</span><span class="nv">$message</span><span class="s2">"</span></code></pre></figure>

<p>And this is what the receiving end looks like.</p>

<figure class="highlight"><pre><code class="language-bash" data-lang="bash"><span class="nb">.</span> toolbox.sh
include <span class="s2">"uipc"</span>
include <span class="s2">"log"</span>

<span class="nv">channel</span><span class="o">=</span><span class="s2">"foobar"</span>
<span class="nv">endpoint</span><span class="o">=</span><span class="si">$(</span>ipc_endpoint_open <span class="s2">"</span><span class="nv">$channel</span><span class="s2">"</span><span class="si">)</span>

<span class="k">while </span><span class="nb">true</span><span class="p">;</span> <span class="k">do
    </span><span class="nv">message</span><span class="o">=</span><span class="si">$(</span>ipc_endpoint_recv <span class="s2">"</span><span class="nv">$endpoint</span><span class="s2">"</span><span class="si">)</span>
    ipc_msg_get_data <span class="s2">"</span><span class="nv">$message</span><span class="s2">"</span> | log_highlight <span class="s2">"Message"</span>
<span class="k">done</span></code></pre></figure>

<h2 id="competing-consumers">Competing Consumers</h2>

<p>Endpoints also support multiple receivers as described in the pattern. You can open the
same public endpoint from multiple processes, and every message is received by only one
of the processes. Because each message is received by only one of the processes, multiple
processes can listen on the same public endpoint to process requests in parallel. This is
yet another pattern, called <a href="https://www.enterpriseintegrationpatterns.com/patterns/messaging/CompetingConsumers.html">Competing Consumers</a>,
since the listening processes are competing to get the next message from the endpoint (or
channel).</p>

<p>The following is how you would implement the pattern with toolbox/uipc (again, without error
handling).</p>

<figure class="highlight"><pre><code class="language-bash" data-lang="bash"><span class="nb">.</span> toolbox.sh
include <span class="s2">"uipc"</span>

consumer<span class="o">()</span> <span class="o">{</span>
    <span class="nb">local </span><span class="nv">channel</span><span class="o">=</span><span class="s2">"</span><span class="nv">$1</span><span class="s2">"</span>

    <span class="nb">local </span>endpoint
    <span class="nb">local </span>message

    <span class="nv">endpoint</span><span class="o">=</span><span class="si">$(</span>ipc_endpoint_open <span class="s2">"</span><span class="nv">$channel</span><span class="s2">"</span><span class="si">)</span>

    <span class="k">while </span><span class="nb">true</span><span class="p">;</span> <span class="k">do
        </span><span class="nv">message</span><span class="o">=</span><span class="si">$(</span>ipc_endpoint_recv <span class="s2">"</span><span class="nv">$endpoint</span><span class="s2">"</span><span class="si">)</span>
        handle_message <span class="s2">"</span><span class="nv">$message</span><span class="s2">"</span>
    <span class="k">done</span>
<span class="o">}</span>

<span class="nv">channel</span><span class="o">=</span><span class="s2">"foobar"</span>
<span class="nv">num_cpus</span><span class="o">=</span><span class="si">$(</span><span class="nb">nproc</span><span class="si">)</span>

<span class="k">for</span> <span class="o">((</span> i <span class="o">=</span> 0<span class="p">;</span> i &lt; num_cpus<span class="p">;</span> i++ <span class="o">))</span><span class="p">;</span> <span class="k">do</span>
    <span class="o">(</span> consumer <span class="s2">"</span><span class="nv">$channel</span><span class="s2">"</span> <span class="o">)</span> &amp;
<span class="k">done
</span><span class="nb">wait</span></code></pre></figure>

<p>The above example will spawn one consumer child process per CPU and wait until all of them
have ended (which they never will). Of course, you could also have the parent process consume
messages from the endpoint and execute the script multiple times. Endpoints can be shared by
independent processes, so strictly speaking you could have multiple different scripts share
the same endpoint. I’m not sure if that’s something one would actually want to do, though.</p>]]></content><author><name></name></author><category term="toolbox" /><category term="messaging" /><category term="eip" /><summary type="html"><![CDATA[Around the time when I was implementing queues in toolbox, I was reading Enterprise Integration Patterns, a book about messaging patterns, written by Gregor Hohpe (whom I worked with more than a decade ago) and Bobby Woolf. While reading the book, I thought how awesome it would be if I could use my queues to implement messaging in Bash — and that’s how I got inspired to write the uipc module. Because there is no documentation but an API reference, I decided to write a few articles about how the uipc module can be used to implement some of the messaging patterns from the book.]]></summary></entry><entry><title type="html">Breaking the cycle</title><link href="https://m10k.eu/2023/05/04/blog-deploy.html" rel="alternate" type="text/html" title="Breaking the cycle" /><published>2023-05-04T05:45:57+02:00</published><updated>2023-05-04T05:45:57+02:00</updated><id>https://m10k.eu/2023/05/04/blog-deploy</id><content type="html" xml:base="https://m10k.eu/2023/05/04/blog-deploy.html"><![CDATA[<p>As I was adding the finishing touches to the last article of a series I have been writing for
the German monthly Linux-Magazin, I decided to write more stuff to put on here. Not
necessarily at the same pace or with the same depth, but we’ll see.</p>

<p>The first problem that I always face when I write content for my website is that I forget how
to deploy it. Not that it’s terribly complicated, I just forget where I need to push changes
to get them deployed, and what parts of the process are automated. This causes mental
resistance when I’m trying to write, causing me to write less and forget even more. To break
out of this cycle, I decided to document how my blog is deployed. Thus, the following is
mostly a memo for myself.</p>

<p>These days, many software-related blogs are static pages generated from markdown, and this one
is no exception. The markdown for my blog is kept in a git repository and the blog is
automatically re-built whenever the contents of the repository change. When I write new
articles, I don’t like to publish them before they’re completely done, but at the same time I
work best in iterations, improving things step by step. This is why the content repository has
two branches: stable and unstable. The unstable one is where I prepare new content. It’s
automatically deployed to <em>m10k.eu/unstable</em>, allowing me to check things
as I go. Once the content reaches a state where I can’t find anything obvious to improve, I
merge it into stable, triggering a deployment to <em>m10k.eu</em>.</p>

<p>The deployment is done by three scripts, one of which is borrowed from <a href="https://github.com/m10k/foundry">Foundry</a>: <em>watchbot</em> is a deamon that periodically polls git repositories and sends
a pub-sub message when it detected a change. This message is received by <em>blogbot</em>, which does
little more than trigger <em>blogdeploy</em>, which does the actual deploying.</p>

<p><img src="/assets/blogdeploy.png" alt="overview" /></p>

<p>Blogdeploy will clone the content repository, compile the static pages from the markdown, and
then copy the generated pages to the webroot. In case of an unstable deployment, it will set
the <code class="language-plaintext highlighter-rouge">baseurl</code> in the jekyll configuration to <code class="language-plaintext highlighter-rouge">/unstable</code>, but that is pretty much it.</p>

<p>So yeah, it’s really not complicated. I just completely forgot that I had the deployment
process automated. When I wrote the last blog post, I still had to deploy everything manually,
which was a huge pain.</p>

<p>For the curious, the sources are on Github: <a href="https://github.com/m10k/blogdeploy">https://github.com/m10k/blogdeploy</a></p>]]></content><author><name></name></author><category term="meta" /><category term="automation" /><summary type="html"><![CDATA[As I was adding the finishing touches to the last article of a series I have been writing for the German monthly Linux-Magazin, I decided to write more stuff to put on here. Not necessarily at the same pace or with the same depth, but we’ll see.]]></summary></entry><entry><title type="html">Setting up an IPsec IKEv2 VPN with EAP-TLS authentication</title><link href="https://m10k.eu/2022/07/29/ipsec-vpn.html" rel="alternate" type="text/html" title="Setting up an IPsec IKEv2 VPN with EAP-TLS authentication" /><published>2022-07-29T16:17:47+02:00</published><updated>2022-07-29T16:17:47+02:00</updated><id>https://m10k.eu/2022/07/29/ipsec-vpn</id><content type="html" xml:base="https://m10k.eu/2022/07/29/ipsec-vpn.html"><![CDATA[<p>I have a VPS that is hosting a mail server, CalDAV/CardDAV for calendar and contacts,
and some other daily necessities. Because I like to keep my attack surface small (and
having temporal wiggle space for deploying security updates), most of the services on
this VPS are only accessible from inside a VPN. Because the VPS is one of those
semi-virtualized ones where all VPSes share the host kernel, I can’t just go ahead and
load kernel modules as I see fit. Or in other words, I cannot use a VPN that needs more
than a TUN/TAP interface from the kernel, such as IPsec VPNs. So for a lack of other
options, I have been using OpenVPN for the past several years, and it has been working
okay-ish, except I never got it to work on my iPhone. Like on Android, there is no native
OpenVPN support on iOS, meaning you have to use an app for it, and I couldn’t for the life
of me figure out how to get it to connect to my server. Luckily, I got another VPS in the
meanwhile, and it allows me to load kernel modules, which means the IPsec VPN option is
back on the table – so I decided to have a closer look at strongswan one more time. In
the end, it took me several evenings to figure out a configuration that uses certificates
for mutual authentication and works reasonably well on Linux as well as iOS clients. This
post explains how I got it all to work.</p>

<h2 id="it-starts-with-the-pki">It starts with the PKI</h2>

<p>The main reason why it’s annoying to set up a VPN is that you need to set up a PKI (short
for <em>public key infrastructure</em>) and distribute keys and certificates to clients. In this
regard, IPsec isn’t any better or more convenient than OpenVPN, but I found <code class="language-plaintext highlighter-rouge">pki</code>, the
tool that comes with strongswan much easier to use than OpenVPN’s <code class="language-plaintext highlighter-rouge">easy-rsa</code> or <code class="language-plaintext highlighter-rouge">openssl</code>.
Also, it turns out that it is immensely helpful to take notes that allow you to recover
your memory when you need it. And to write scripts that reduce the amount of information
you need to remember in the first place. So first of all, we will create a few small
scripts for setting up a new CA, generating client and server certificates, and exporting
client certificates either as MobileConfig for iOS clients, or as a shell script that
configures strongswan on Debian-flavored Linux boxes.</p>

<h3 id="trusting-strangers">Trusting strangers</h3>

<p>But before we jump into the nitty-gritty, we need to talk about trust. Imagine someone
knocks at your door. You open it, and on the other side is a person you have never met
in your entire life. They say they are a police officer. You believe them, even though
they are a complete stranger. Why?
They are in a police uniform, so they have to be a police officer, right? Then you
remember your friend – who is certainly not a police officer – showing up to your
Halloween party in a uniform just like that. You decide to ask the person at the door
for their ID. It looks legitimate – not that you would know what a legitimate ID looks
like without asking Google – so you choose to put your doubts aside. Of course, the ID
might be fake or stolen, too, and to completely establish the authenticity of the officer,
you would have to go to or call the police and ask them to verify the information on the
ID. Luckily, there is usually no need to be paranoid like this.</p>

<p>In the analog world, we have a lot of implicit, circumstantial trust. When we buy
groceries, we assume that the person at the register is a legitimate store clerk because
<em>they are at the register</em>. When we go to a restaurant, we assume that the person that
just served us food is a legitimate waiter because we’re at a restaurant and they served
us food (maybe even the same food that we ordered). But even if they served us food that we
didn’t order, we wouldn’t assume that it was a malicious waiter trying to poison us. We
would assume they simply got our order wrong. Why? The risk of getting caught is fairly
high, while there is very little for them to gain. It <em>seems</em> very unlikely that the waiter
is plotting to harm us, so we implicitly trust them.</p>

<p>On the Internet, the odds are different. The way computers talk to each other is essentially
a world-wide game of Chinese whispers. The routers that are relaying messages between us and
Amazon might modify the content of our communication (by accident or on purpose), or the
person we think we’re communicating with might not be Amazon at all. Because it is relatively
easy to operate anonymously, attribution of crime is in most cases impossible (it usually
only becomes possible if a criminal reveals information that can be used to identify them,
for example when they try to convert their Bitcoin to traditional coins). Unlike in the
analog world, there is no voice or face that we can use to guess at the identity of our peer.
This is why on the Internet, everyone is a stranger and the <em>trust-by-default</em> mode that we
operate in in the analog world does not work. We have to distrust by default.</p>

<p>So how is it that we can shop on the Internet without worrying about all this? When we
connect to Amazon, our browser does not blindly believe the peer that they are Amazon, but
verifies it by checking their TLS certificate – the digital equivalent of an ID card (except
it’s not issued by a government). To establish the authenticity of the TLS certificate, the
browser checks whether it was issued by a trusted certificate authority – browsers ship with
a set of certificates of CAs that the browser’s developers deem trustworthy. Certificates are
generated and verified using mathematical operations that are very hard to reverse (that is,
break), making it safe to assume that websites with valid certificates are authentic.</p>

<h2 id="setting-up-a-certificate-authority">Setting up a certificate authority</h2>

<p>Coming back to the question why we need all of this, we need to issue certificates to the
server and the clients of the VPN so the clients can make sure they are talking to an
authentic server and the server can ensure that the clients are authentic clients. And to
issue certificates, we need to set up a certificate authority. Public key infrastructure,
or PKI, is the term that is used to refer to the CA and everything around it, such as
certificate distribution and revocation mechanisms.</p>

<h3 id="the-hardish-way">The hard(ish) way</h3>

<p>A certificate authority may sound like something really fancy, but in its essence it’s
nothing more than a key pair and a certificate. That means, in order to set up a CA, all
we have to do is create a new key pair and a self-signed certificate. Using the handy <code class="language-plaintext highlighter-rouge">pki</code>
tool that comes with strongswan (<code class="language-plaintext highlighter-rouge">apt-get install strongswan-pki</code>), this can be done with
two commands.</p>

<figure class="highlight"><pre><code class="language-bash" data-lang="bash">pki <span class="nt">--gen</span>                            <span class="se">\</span>
    <span class="nt">--type</span> rsa                       <span class="se">\</span>
    <span class="nt">--size</span> 4096                      <span class="se">\</span>
    <span class="nt">--outform</span> pem <span class="o">&gt;</span> /etc/ipsec.d/private/cakey.pem

pki <span class="nt">--self</span>                           <span class="se">\</span>
    <span class="nt">--ca</span>                             <span class="se">\</span>
    <span class="nt">--in</span> cakey.pem                   <span class="se">\</span>
    <span class="nt">--type</span> rsa                       <span class="se">\</span>
    <span class="nt">--lifetime</span> 3650                  <span class="se">\</span>
    <span class="nt">--dn</span> <span class="s2">"C=DE,O=m10k,CN=ca.m10k.de"</span> <span class="se">\</span>
    <span class="nt">--outform</span> pem <span class="o">&gt;</span> /etc/ipsec.d/cacerts/cacert.pem</code></pre></figure>

<p>Creating a certificate for a server is somewhat similar, except that we need to use
the CA’s key to sign the new certificate. Using <code class="language-plaintext highlighter-rouge">pki</code>, the process can be done in
two steps:</p>

<figure class="highlight"><pre><code class="language-bash" data-lang="bash">pki <span class="nt">--gen</span>              <span class="se">\</span>
    <span class="nt">--type</span> rsa         <span class="se">\</span>
    <span class="nt">--size</span> 4096        <span class="se">\</span>
    <span class="nt">--outform</span> pem      <span class="se">\</span>
    <span class="o">&gt;</span> serverkey.pem

pki <span class="nt">--pub</span>              <span class="se">\</span>
    <span class="nt">--outform</span> pem      <span class="se">\</span>
    <span class="nt">--in</span> serverkey.pem | pki <span class="nt">--issue</span>                                  <span class="se">\</span>
                             <span class="nt">--lifetime</span> 3650                          <span class="se">\</span>
                             <span class="nt">--cacert</span> /etc/ipsec.d/cacerts/cacert.pem <span class="se">\</span>
                             <span class="nt">--cakey</span> /etc/ipsec.d/private/cakey.pem   <span class="se">\</span>
                             <span class="nt">--dn</span> <span class="s2">"C=DE,O=m10k,CN=m10k.jp"</span>            <span class="se">\</span>
                             <span class="nt">--san</span> <span class="s2">"m10k.jp"</span>                          <span class="se">\</span>
                             <span class="nt">--flag</span> serverAuth                        <span class="se">\</span>
                             <span class="nt">--flag</span> ikeIntermediate                   <span class="se">\</span>
                             <span class="nt">--outform</span> pem <span class="o">&gt;</span> servercert.pem</code></pre></figure>

<p>We generate client certificates in the exact same way, except that we don’t need to
pass <code class="language-plaintext highlighter-rouge">--flag serverAuth</code> and <code class="language-plaintext highlighter-rouge">--flag ikeIntermediate</code> to <code class="language-plaintext highlighter-rouge">pki</code>.</p>

<figure class="highlight"><pre><code class="language-bash" data-lang="bash">pki <span class="nt">--gen</span>              <span class="se">\</span>
    <span class="nt">--type</span> rsa         <span class="se">\</span>
    <span class="nt">--size</span> 4096        <span class="se">\</span>
    <span class="nt">--outform</span> pem      <span class="se">\</span>
    <span class="o">&gt;</span> clientkey.pem

pki <span class="nt">--pub</span>              <span class="se">\</span>
    <span class="nt">--outform</span> pem      <span class="se">\</span>
    <span class="nt">--in</span> clientkey.pem | pki <span class="nt">--issue</span>                                  <span class="se">\</span>
                             <span class="nt">--lifetime</span> 3650                          <span class="se">\</span>
                             <span class="nt">--cacert</span> /etc/ipsec.d/cacerts/cacert.pem <span class="se">\</span>
                             <span class="nt">--cakey</span> /etc/ipsec.d/private/cakey.pem   <span class="se">\</span>
                             <span class="nt">--dn</span> <span class="s2">"C=JP,O=m10k,CN=apfelfon@m10k.jp"</span>   <span class="se">\</span>
                             <span class="nt">--san</span> <span class="s2">"apfelfon@m10k.jp"</span>                 <span class="se">\</span>
                             <span class="nt">--outform</span> pem <span class="o">&gt;</span> clientcert.pem</code></pre></figure>

<h3 id="the-easy-way">The easy way</h3>

<p>Executing <code class="language-plaintext highlighter-rouge">pki</code> and copying the generated keys/certificates manually isn’t terribly
complicated, but like all boring procedures there’s a good chance that we’ll make
mistakes - or forget the procedure if we have to repeat it a year from now. This is
why I wrote <a href="https://github.com/m10k/mkpki">a few scripts</a> that streamline the entire
process.
The script <code class="language-plaintext highlighter-rouge">mkca</code> can be used to set up a new certificate authority.</p>

<figure class="highlight"><pre><code class="language-bash" data-lang="bash">mkca <span class="nt">--root</span> /etc/ipsec.d      <span class="se">\</span>
     <span class="nt">--country</span> DE             <span class="se">\</span>
     <span class="nt">--organization</span> m10k      <span class="se">\</span>
     <span class="nt">--common-name</span> ca.m10k.de</code></pre></figure>

<p>To generate a key and certificate for a server, we’d use <code class="language-plaintext highlighter-rouge">mkcert</code>.</p>

<figure class="highlight"><pre><code class="language-bash" data-lang="bash">mkcert <span class="nt">--root</span> /etc/ipsec.d          <span class="se">\</span>
       <span class="nt">--country</span> DE                 <span class="se">\</span>
       <span class="nt">--organization</span> m10k          <span class="se">\</span>
       <span class="nt">--common-name</span> m10k.jp</code></pre></figure>

<p>If we pass the <code class="language-plaintext highlighter-rouge">--client</code> option to <code class="language-plaintext highlighter-rouge">mkcert</code>, we generate a key and certificate for
a VPN client.</p>

<figure class="highlight"><pre><code class="language-bash" data-lang="bash">mkcert <span class="nt">--root</span> /etc/ipsec.d          <span class="se">\</span>
       <span class="nt">--client</span>                     <span class="se">\</span>
       <span class="nt">--country</span> JP                 <span class="se">\</span>
       <span class="nt">--organization</span> m10k          <span class="se">\</span>
       <span class="nt">--common-name</span> apfelfon@m10k.jp</code></pre></figure>

<h2 id="configuring-strongswan-on-the-server">Configuring strongswan on the server</h2>

<p>Now that we have the CA and certificates for our server in place, we can set up the
rest of the VPN server. So first of all, let’s have a look at the logical topology of the
network we’re trying to build.</p>

<p><img src="/assets/topology.png" alt="topology" /></p>

<p>On the left side, we have our internal network, <code class="language-plaintext highlighter-rouge">10.1.0.0/24</code>. On the right side, we have the
IPsec network, <code class="language-plaintext highlighter-rouge">10.2.0.0/24</code>, and we want the server that is running strongswan (the gateway)
to assign addresses to the machines in the right network and to route between the two
networks. Strongswan can be configured for this scenario with relatively few configuration
changes. The following is strongswan’s configuration file, <strong>/etc/ipsec.conf</strong>.</p>

<div class="language-plaintext highlighter-rouge"><div class="highlight"><pre class="highlight"><code>config setup
        # strictcrlpolicy=yes
        # uniqueids = no

conn %default
        dpdaction=clear
        dpddelay=300s
        fragmentation=yes
        mobike=yes
        compress=yes

conn m10k.jp-base
        keyexchange=ikev2
        left=%any
        leftauth=pubkey
        leftid=m10k.jp
        leftcert=m10k.jp.pem
        leftsendcert=always
        leftsubnet=10.1.0.0/24
        leftfirewall=yes
        right=%any
        rightsourceip=10.2.0.0/24
        rightdns=10.1.0.1

conn m10k.jp-eaptls
        also=m10k.jp-base
        rightauth=eap-tls
        rightid=%any
        eap_identity=%any
        auto=add
        reauth=no
</code></pre></div></div>

<p>What’s of particular interest here are the last two <code class="language-plaintext highlighter-rouge">conn</code> sections. The first one defines
the basic settings for all connections. Because iOS clients do not support EAP-TLS for
mutual authentication, we have to use public-key authentication for the left side (that is,
the mechanism the client uses to authenticate the server). The <code class="language-plaintext highlighter-rouge">leftauth</code>, <code class="language-plaintext highlighter-rouge">leftid</code>, and
<code class="language-plaintext highlighter-rouge">leftcert</code> directives are what’s used for this. Further, iOS clients expect the server to
send their certificate without having to ask them first, so we need to set <code class="language-plaintext highlighter-rouge">leftsendcert</code> to
<code class="language-plaintext highlighter-rouge">always</code>, otherwise iPhones won’t be able to connect. Finally, the <code class="language-plaintext highlighter-rouge">leftsubnet</code> directive
tells strongswan that <code class="language-plaintext highlighter-rouge">10.1.0.0/24</code> is the network that VPN clients should be able to access,
and <code class="language-plaintext highlighter-rouge">leftfirewall</code> instructs strongswan to insert rules for the clients to the gateway’s
iptables. Directives starting with <code class="language-plaintext highlighter-rouge">right</code> configure the right logical subnet (the client’s
network). <code class="language-plaintext highlighter-rouge">right=%any</code> means that clients with any IP address or host name may connect.
<code class="language-plaintext highlighter-rouge">rightsourceip=10.2.0.0/24</code> tells strongswan to assign addresses from <code class="language-plaintext highlighter-rouge">10.2.0.0/24</code> to VPN
clients, and <code class="language-plaintext highlighter-rouge">rightdns=10.1.0.1</code> means that VPN clients should resolve names using the DNS
server <code class="language-plaintext highlighter-rouge">10.1.0.1</code>.
The last <code class="language-plaintext highlighter-rouge">conn</code> section configures EAP-TLS authentication. First, the <code class="language-plaintext highlighter-rouge">also=m10k.jp-base</code>
statement tells strongswan that this connection should inherit the settings from
<code class="language-plaintext highlighter-rouge">m10k.jp-base</code>. <code class="language-plaintext highlighter-rouge">rightauth=eap-tls</code> means that clients must use EAP-TLS to authenticate
themselves with the server. Since authentication uses EAP-TLS, the <code class="language-plaintext highlighter-rouge">rightid=%any</code> and
<code class="language-plaintext highlighter-rouge">eap_identity=%any</code> effectively mean that all clients with a valid certificate from our
CA may connect to this server. Finally, the <code class="language-plaintext highlighter-rouge">reauth=no</code> option tells the server not to
initiate reauthentications. This is necessary for iOS clients since they don’t expect the
server to do that, and would disconnect when that happens.</p>

<p>Now that we’ve got strongswan configured, all that’s left to do is tell it the password for
the server’s private key. Because <code class="language-plaintext highlighter-rouge">mkcert</code> stored the private key unencrypted (that is,
without a password), it’s enough to add the following line to <strong>/etc/ipsec.secrets</strong>.</p>

<div class="language-plaintext highlighter-rouge"><div class="highlight"><pre class="highlight"><code> : RSA m10k.jp.pem
</code></pre></div></div>

<p>By the way, all of the above can also be achieved with <code class="language-plaintext highlighter-rouge">exportcert</code> from mkpki. Assuming that
we generated certificates as shown above, we can generate a configuration script for the VPN
server with the following command.</p>

<figure class="highlight"><pre><code class="language-bash" data-lang="bash">exportcert <span class="nt">--root</span> /etc/ipsec.d   <span class="se">\</span>
           <span class="nt">--common-name</span> m10k.jp <span class="se">\</span>
           <span class="nt">--server</span> m10k.jp <span class="o">&gt;</span> setup.sh
<span class="nb">chmod </span>u+x setup.sh
./setup.sh</code></pre></figure>

<p>Either way, now we can restart strongswan and the fun begins.</p>

<figure class="highlight"><pre><code class="language-bash" data-lang="bash">/etc/init.d/ipsec restart</code></pre></figure>

<p>Well, not quite. Because our iptables policy is to drop everything by default, we need to add
the following rules to allow IPsec traffic. <code class="language-plaintext highlighter-rouge">eth0</code> is the interface that connects the gateway
to the Internet.</p>

<figure class="highlight"><pre><code class="language-bash" data-lang="bash">iptables <span class="nt">-A</span> INPUT   <span class="nt">-j</span> ACCEPT <span class="nt">-i</span> eth0 <span class="nt">-p</span> esp
iptables <span class="nt">-A</span> INPUT   <span class="nt">-j</span> ACCEPT <span class="nt">-i</span> eth0 <span class="nt">-p</span> ah
iptables <span class="nt">-A</span> INPUT   <span class="nt">-j</span> ACCEPT <span class="nt">-i</span> eth0 <span class="nt">-p</span> udp <span class="nt">--dport</span> isakmp
iptables <span class="nt">-A</span> INPUT   <span class="nt">-j</span> ACCEPT <span class="nt">-i</span> eth0 <span class="nt">-p</span> udp <span class="nt">--dport</span> ipsec-nat-t
iptables <span class="nt">-A</span> OUTPUT  <span class="nt">-j</span> ACCEPT <span class="nt">-o</span> eth0 <span class="nt">-p</span> esp
iptables <span class="nt">-A</span> OUTPUT  <span class="nt">-j</span> ACCEPT <span class="nt">-o</span> eth0 <span class="nt">-p</span> ah
iptables <span class="nt">-A</span> OUTPUT  <span class="nt">-j</span> ACCEPT <span class="nt">-o</span> eth0 <span class="nt">-p</span> udp <span class="nt">--sport</span> isakmp
iptables <span class="nt">-A</span> OUTPUT  <span class="nt">-j</span> ACCEPT <span class="nt">-o</span> eth0 <span class="nt">-p</span> udp <span class="nt">--sport</span> ipsec-nat-t

iptables <span class="nt">-A</span> INPUT   <span class="nt">-j</span> ACCEPT <span class="nt">-s</span> 10.2.0.0/24 <span class="nt">-d</span> 10.1.0.1
iptables <span class="nt">-A</span> OUTPUT  <span class="nt">-j</span> ACCEPT <span class="nt">-s</span> 10.1.0.1    <span class="nt">-d</span> 10.2.0.0/24

iptables <span class="nt">-A</span> FORWARD <span class="nt">-j</span> ACCEPT <span class="nt">-s</span> 10.2.0.0/24 <span class="nt">-d</span> 10.1.0.0/24 <span class="se">\</span>
         <span class="nt">-i</span> eth0 <span class="nt">-m</span> policy <span class="nt">--dir</span> <span class="k">in</span> <span class="nt">--pol</span> ipsec <span class="nt">--reqid</span> 1 <span class="nt">--proto</span> esp
iptables <span class="nt">-A</span> FORWARD <span class="nt">-j</span> ACCEPT <span class="nt">-s</span> 10.1.0.0/24 <span class="nt">-d</span> 10.2.0.0/24 <span class="se">\</span>
         <span class="nt">-o</span> eth0 <span class="nt">-m</span> policy <span class="nt">--dir</span> out <span class="nt">--pol</span> ipsec <span class="nt">--reqid</span> 1 <span class="nt">--proto</span> esp</code></pre></figure>

<h2 id="configuring-strongswan-on-the-client">Configuring strongswan on the client</h2>

<p>The steps that are needed to configure strongswan on the client side aren’t much different
from the server side. First, we generate a key and a certificate for the client using mkpki.</p>

<figure class="highlight"><pre><code class="language-bash" data-lang="bash">mkcert <span class="nt">--root</span> /etc/ipsec.d          <span class="se">\</span>
       <span class="nt">--client</span>                     <span class="se">\</span>
       <span class="nt">--country</span> JP                 <span class="se">\</span>
       <span class="nt">--organization</span> m10k          <span class="se">\</span>
       <span class="nt">--common-name</span> client@m10k.jp</code></pre></figure>

<p>Now we need to copy these files to the client’s <strong>/etc/ipsec.d</strong> directory (I’ll skip this
step here) and add the password for the key to <strong>/etc/ipsec.secrets</strong>. Again, since the
client key is not password-protected, this is trivial.</p>

<figure class="highlight"><pre><code class="language-bash" data-lang="bash"><span class="nb">echo</span> <span class="s2">" : RSA client@m10k.jp.pem"</span> <span class="o">&gt;&gt;</span> /etc/ipsec.secrets</code></pre></figure>

<p>Finally, we need to configure strongswan by editing <strong>/etc/ipsec.conf</strong> to look like the
following.</p>

<div class="language-plaintext highlighter-rouge"><div class="highlight"><pre class="highlight"><code>config setup
        # strictcrlpolicy=yes
        # uniqueids = no

conn %default
        ikelifetime=60m
        keylife=20m
        rekeymargin=3m
        keyingtries=1
        keyexchange=ikev2

conn m10k
        leftauth=eap-tls
        left=%defaultroute
        leftid=client@m10k.jp
        leftsubnet=0.0.0.0/0
        leftcert=client@m10k.jp.pem
        leftsourceip=%config
        leftfirewall=yes
        right=m10k.jp
        rightsubnet=10.1.0.0/24
        rightauth=any
        rightid=@m10k.jp
        auto=start
        eap_identity=%identity
</code></pre></div></div>

<p>This is mostly similar to the configuration on the server-side, except that here <code class="language-plaintext highlighter-rouge">left</code> is
the local interface we use to connect to the server and <code class="language-plaintext highlighter-rouge">right</code> is the server. What’s
different from the server configuration is the <code class="language-plaintext highlighter-rouge">leftsourceip=%config</code> directive, which tells
strongswan to obtain an IP address from the server. Other differences are that the id of the
server in <code class="language-plaintext highlighter-rouge">rightid</code> needs to be prefixed with an <em>@</em>, and that we need to set <code class="language-plaintext highlighter-rouge">eap_identity</code>
to <code class="language-plaintext highlighter-rouge">%identity</code> so that strongswan uses the common name from the client certificate as our
identity. Finally, <code class="language-plaintext highlighter-rouge">auto=start</code> instructs strongswan to automatically connect to the server
upon startup.
And again, <code class="language-plaintext highlighter-rouge">exportcert</code> could have been used to generate a configuration script for the
client, as shown below.</p>

<figure class="highlight"><pre><code class="language-bash" data-lang="bash">exportcert <span class="nt">--root</span> /etc/ipsec.d          <span class="se">\</span>
           <span class="nt">--common-name</span> client@m10k.jp <span class="se">\</span>
           <span class="nt">--server</span> m10k.jp <span class="o">&gt;</span> setup-client.sh</code></pre></figure>

<p>Whether we chose to manually configure the client or leave it to a script, we need to restart
strongswan for the changes to take effect.</p>

<figure class="highlight"><pre><code class="language-bash" data-lang="bash">/etc/init.d/ipsec restart</code></pre></figure>

<p>If everything went well, we should be able to connect to the server at 10.1.0.1. The status
of the VPN connection can be seen by executing <code class="language-plaintext highlighter-rouge">ipsec statusall</code> as root.</p>

<h2 id="configuring-ios">Configuring iOS</h2>

<p>The iPhone is a wonderful device for non-techie people. That is to say, anyone trying to do
something that is slightly more advanced or unusual will quickly perceive the user-friendly
interface to be an obstacle rather than a guide. In the case of VPNs using IKEv2 and EAP-TLS,
it’s even worse, because the settings app <em>looks</em> like it can be used to configure the VPN
but it really can’t. <strong>It is not possible to configure IPsec IKEv2 with EAP-TLS on iPhones
through the settings app.</strong> The only way to configure iPhones is to generate a MobileConfig
file and open it with the settings app.
The strongswan documentation has a
<a href="https://docs.strongswan.org/docs/5.9/interop/appleIkev2Profile.html">page</a> that explains
how to create a MobileConfig file, but it is nevertheless an annoying process because a
pkcs12 container with the certificates and key need to be created and embedded into the
configuration file.
This is where <code class="language-plaintext highlighter-rouge">exportcert</code> comes in handy again. Using the <code class="language-plaintext highlighter-rouge">--iphone</code> option, we can instruct
it to generate a MobileConfig profile for iOS clients:</p>

<figure class="highlight"><pre><code class="language-bash" data-lang="bash">exportcert <span class="nt">--root</span> /etc/ipsec.d <span class="se">\</span>
           <span class="nt">--common-name</span> apfelfon@m10k.jp <span class="se">\</span>
           <span class="nt">--server</span> m10k.jp <span class="o">&gt;</span> apfelfon.mobileconfig</code></pre></figure>

<p>The password that needs to be entered during the export is used to encrypt the pkcs12
container that is embedded in the profile. Since we’ll have to use iCloud or Google Drive or
something similar to transfer the file to the iPhone, encryption is generally a good idea.</p>

<p>Once we’ve transfered the profile to our iPhone, we tap it in the File app, which will cause
a dialog to be shown that tells us to check the settings app.</p>

<p><img src="/assets/mobileconfig-install1.png" alt="A dialog telling us to check the settings app" /></p>

<p>In the settings app, there will be an entry, telling us that there are new profiles that can
be installed.</p>

<p><img src="/assets/mobileconfig-install2.png" alt="Settings app showing new profile entry" /></p>

<p>Tapping <em>Install</em> in the top right corner of the dialog will install the profile. When asked
for a password, we need to enter the password that we defined when we exported the profile.</p>

<p><img src="/assets/mobileconfig-install3.png" alt="Installing the MobileConfig profile" /></p>

<p>By toggling the VPN switch in the settings app, we can now connect to the VPN server. If the
connection was successfully established, a VPN icon will appear in the quick settings.</p>

<p><img src="/assets/mobileconfig-install4.png" alt="VPN icon showing we are connected" /></p>

<h2 id="parting-words">Parting words</h2>

<p>Certificate management is usually the most annoying aspect of operating a VPN (no matter the
flavor), since – unlike the initial setup – it doesn’t go away. But investing a few hours
to write scripts that automate the boring parts pays off very quickly. Of course, that doesn’t
mean the initial setup is easy either. This article may not convey it very well but it actually
took me several weekends to figure out the correct way to set up the strongswan server and iOS
client so it would work at least somewhat decently. That being said, my iPhone still disconnects
from the VPN every hour or so, no matter what re-authentication and re-keying settings I use. On
the other hand I’ve never had a more stable VPN connection between my Linux boxes.</p>]]></content><author><name></name></author><category term="security" /><category term="ipsec" /><summary type="html"><![CDATA[I have a VPS that is hosting a mail server, CalDAV/CardDAV for calendar and contacts, and some other daily necessities. Because I like to keep my attack surface small (and having temporal wiggle space for deploying security updates), most of the services on this VPS are only accessible from inside a VPN. Because the VPS is one of those semi-virtualized ones where all VPSes share the host kernel, I can’t just go ahead and load kernel modules as I see fit. Or in other words, I cannot use a VPN that needs more than a TUN/TAP interface from the kernel, such as IPsec VPNs. So for a lack of other options, I have been using OpenVPN for the past several years, and it has been working okay-ish, except I never got it to work on my iPhone. Like on Android, there is no native OpenVPN support on iOS, meaning you have to use an app for it, and I couldn’t for the life of me figure out how to get it to connect to my server. Luckily, I got another VPS in the meanwhile, and it allows me to load kernel modules, which means the IPsec VPN option is back on the table – so I decided to have a closer look at strongswan one more time. In the end, it took me several evenings to figure out a configuration that uses certificates for mutual authentication and works reasonably well on Linux as well as iOS clients. This post explains how I got it all to work.]]></summary></entry><entry><title type="html">Making the shell get in line</title><link href="https://m10k.eu/2022/01/19/making-the-shell-get-in-line.html" rel="alternate" type="text/html" title="Making the shell get in line" /><published>2022-01-19T16:16:18+01:00</published><updated>2022-01-19T16:16:18+01:00</updated><id>https://m10k.eu/2022/01/19/making-the-shell-get-in-line</id><content type="html" xml:base="https://m10k.eu/2022/01/19/making-the-shell-get-in-line.html"><![CDATA[<p>I promised that we’re going to build a distributed system in bash, but the
mutex that we’ve written in the last part is still pretty far way from that
goal. This time, let’s build something more tangible: a queue!</p>

<h2 id="queues-conveyor-belts-for-data">Queues: Conveyor belts for data</h2>

<p>A queue is a data structure for storing data in a first-in-first-out fashion.
That means, when you take items from the queue, you get them in the same order
that you put them into the queue. Exactly what we need for a message exchange.
And the mutex from the last time will help us make the queues thread-safe<sup id="fnref:1" role="doc-noteref"><a href="#fn:1" class="footnote" rel="footnote">1</a></sup>,
so that multiple processes may put data into and take data from the queue at
the same time without race conditions.</p>

<p>Let’s start with an naive approach. The queue has a list to store data items
(one per line) and a counter that counts the data items in the queue. For
thread-safety, both are protected by the same mutex. A producer will append
data to the queue in four steps:</p>

<ol>
  <li>Lock the mutex</li>
  <li>Append data to the list</li>
  <li>Increment the counter</li>
  <li>Unlock the mutex</li>
</ol>

<p>Similarly, consumers will take data from the queue in these four steps:</p>

<ol>
  <li>Lock the mutex</li>
  <li>If the counter is larger than 0
    <ul>
      <li>take the first data item from the list, and</li>
      <li>decrement the counter</li>
    </ul>
  </li>
  <li>Unlock the mutex</li>
  <li>If the counter was zero, go to step 1</li>
</ol>

<p>This works, but there is a big problem (as you probably guessed, since I called
this the naive approach). Imagine there is one consumer and no producer, and the
function used to take a data item looks something like the following.</p>

<figure class="highlight"><pre><code class="language-bash" data-lang="bash">queue_get<span class="o">()</span> <span class="o">{</span>
	<span class="nb">local </span><span class="nv">queue</span><span class="o">=</span><span class="s2">"</span><span class="nv">$1</span><span class="s2">"</span>

	<span class="nb">local </span>data
	<span class="nb">local</span> <span class="nt">-i</span> count

	<span class="k">for</span> <span class="o">((</span> count <span class="o">=</span> 0<span class="p">;</span> count <span class="o">==</span> 0<span class="p">;</span> <span class="o">))</span><span class="p">;</span> <span class="k">do
		</span>queue_lock <span class="s2">"</span><span class="nv">$queue</span><span class="s2">"</span>

		<span class="nv">count</span><span class="o">=</span><span class="si">$(</span>queue_get_counter <span class="s2">"</span><span class="nv">$queue</span><span class="s2">"</span><span class="si">)</span>

		<span class="k">if</span> <span class="o">((</span> count <span class="o">&gt;</span> 0 <span class="o">))</span><span class="p">;</span> <span class="k">then
			</span>queue_dec_counter <span class="s2">"</span><span class="nv">$queue</span><span class="s2">"</span>
			<span class="nv">data</span><span class="o">=</span><span class="si">$(</span>queue_take_head <span class="s2">"</span><span class="nv">$queue</span><span class="s2">"</span><span class="si">)</span>
		<span class="k">fi

		</span>queue_unlock <span class="s2">"</span><span class="nv">$queue</span><span class="s2">"</span>
	<span class="k">done

	</span><span class="nb">echo</span> <span class="s2">"</span><span class="nv">$data</span><span class="s2">"</span>
	<span class="k">return </span>0
<span class="o">}</span></code></pre></figure>

<p>Because there is nobody else locking the queue, the consumer will never wait
in <code class="language-plaintext highlighter-rouge">queue_lock()</code> and the loop becomes a tight loop, leaving one of your CPU
cores running at 100%. But this problem doesn’t just occur with only one
consumer. Even if you have more than one consumer. One consumer will always be
executing the loop (it may not always be the same one though), and you will
always have one CPU core running at full blast. Instead of wasting energy like
it’s 1970, let’s find a way to put consumers to sleep when there is nothing for
them to read.</p>

<h2 id="an-awful-analogy-the-semaphore">An awful analogy: the semaphore</h2>

<p>This is where another synchronization primitive enters the stage: the semaphore.
In real life, a semaphore is a signal for trains. The kind that has an arm that
moves up and down to signal whether the train may pass to the next track segment.
The only thing that railroad semaphores and computing semaphores have in common
is the name, so don’t make too much of it. While a normal mutex allows only one
process at a time to proceed, a semaphore may allow multiple processes to proceed.
Railroad semaphores don’t do that, at least not without making the evening news.</p>

<p>Instead, think of a semaphore as a thread-safe counter with two atomic operations:</p>

<ul>
  <li><em>post</em>: Increase the counter</li>
  <li><em>wait</em>: Wait until the counter is greater than 0, then decrease it</li>
</ul>

<p>This is what the petri net for a semaphore looks like:</p>

<p><img src="/assets/semaphore-petri.png" alt="petri net of a semaphore" /></p>

<p>The consumer, starting at the top left, will not be able to proceed until
a token has been added to the semaphore. Tokens are added by the producer
using <code class="language-plaintext highlighter-rouge">sem_post()</code> (the reason I drew the producer upside-down is that the
petri net for the queue is symmetrical if you draw it this way).</p>

<h2 id="putting-things-together">Putting things together</h2>

<p>How does that help us with our queue? Instead of storing the number of data
items in a counter, we will use a semaphore as counter.</p>

<p>The entire queue ends up looking something like the following.</p>

<p><img src="/assets/queue-petri.png" alt="petri net of a queue" /></p>

<p>Places prefixed with <em>C</em> belong to the consumer (i.e.<code class="language-plaintext highlighter-rouge">queue_get()</code>), places
prefixed with <em>P</em> belong to the producer (i.e.<code class="language-plaintext highlighter-rouge">queue_put()</code>). I have left the
two places between the semaphore and the mutex unlabelled because neither the
consumer nor the producer will execute anything in those places. Nevertheless,
they might be interrupted between the semaphore and mutex operations, so the
state is necessary (also, it’s not allowed to directly connect two transitions).</p>

<h3 id="getting-data-from-the-queue-queue_get">Getting data from the queue: <code class="language-plaintext highlighter-rouge">queue_get()</code></h3>

<p>Thanks to the semaphore, we can write <code class="language-plaintext highlighter-rouge">queue_get()</code> without of any loops! Okay,
you might argue that’s because the looping happens in <code class="language-plaintext highlighter-rouge">sem_wait()</code> now, but let’s
not split hairs<sup id="fnref:2" role="doc-noteref"><a href="#fn:2" class="footnote" rel="footnote">2</a></sup>. I also added some error checking, because no code is
complete without error checking.</p>

<figure class="highlight"><pre><code class="language-bash" data-lang="bash">queue_get<span class="o">()</span> <span class="o">{</span>
	<span class="nb">local </span><span class="nv">queue</span><span class="o">=</span><span class="s2">"</span><span class="nv">$1</span><span class="s2">"</span>

	<span class="nb">local </span>sem
	<span class="nb">local </span>mutex
	<span class="nb">local </span>data
	<span class="nb">local </span>err

	<span class="nv">err</span><span class="o">=</span>0
	<span class="nv">sem</span><span class="o">=</span><span class="si">$(</span>queue_get_semaphore <span class="s2">"</span><span class="nv">$queue</span><span class="s2">"</span><span class="si">)</span>
	<span class="nv">mutex</span><span class="o">=</span><span class="si">$(</span>queue_get_mutex <span class="s2">"</span><span class="nv">$queue</span><span class="s2">"</span><span class="si">)</span>

	sem_wait <span class="s2">"</span><span class="nv">$sem</span><span class="s2">"</span>
	mutex_lock <span class="s2">"</span><span class="nv">$mutex</span><span class="s2">"</span>

	<span class="k">if</span> <span class="o">!</span> <span class="nv">data</span><span class="o">=</span><span class="si">$(</span>queue_take_head <span class="s2">"</span><span class="nv">$queue</span><span class="s2">"</span><span class="si">)</span><span class="p">;</span> <span class="k">then
		</span><span class="nv">err</span><span class="o">=</span>1
	<span class="k">fi

	</span>mutex_unlock <span class="s2">"</span><span class="nv">$mutex</span><span class="s2">"</span>

	<span class="k">if</span> <span class="o">((</span> err <span class="o">==</span> 0 <span class="o">))</span><span class="p">;</span> <span class="k">then
		</span><span class="nb">echo</span> <span class="s2">"</span><span class="nv">$data</span><span class="s2">"</span>
	<span class="k">fi

	return</span> <span class="s2">"</span><span class="nv">$err</span><span class="s2">"</span>
<span class="o">}</span></code></pre></figure>

<p>Because <code class="language-plaintext highlighter-rouge">sem_wait()</code> suspends the caller until the counter is larger than 0, and
because it will let only as many processes proceed as there are data items in the
queue, we don’t have to check any counters. All we have to do is lock the mutex to
make sure we don’t read from the queue at the same time as any of the other processes
that were let through the semaphore.</p>

<h3 id="putting-data-in-the-queue-queue_put">Putting data in the queue: <code class="language-plaintext highlighter-rouge">queue_put()</code></h3>

<p>Earlier, I pointed out the symmetry of the queue’s petri net. That was not just for
aesthetic purposes (that’s not to say aesthetics aren’t important), but it tells us
something important about the two functions. First, neither of them have any loops
or branches (but we know that already). Second, we can tell that <code class="language-plaintext highlighter-rouge">queue_put()</code> has
to call <code class="language-plaintext highlighter-rouge">mutex_lock()</code>, <code class="language-plaintext highlighter-rouge">mutex_unlock()</code>, and <code class="language-plaintext highlighter-rouge">sem_post()</code>, in this order. This is
what it looks like:</p>

<figure class="highlight"><pre><code class="language-bash" data-lang="bash">queue_put<span class="o">()</span> <span class="o">{</span>
	<span class="nb">local </span><span class="nv">queue</span><span class="o">=</span><span class="s2">"</span><span class="nv">$1</span><span class="s2">"</span>
	<span class="nb">local </span><span class="nv">data</span><span class="o">=</span><span class="s2">"</span><span class="nv">$2</span><span class="s2">"</span>

	<span class="nb">local </span>sem
	<span class="nb">local </span>mutex
	<span class="nb">local </span>err

	<span class="nv">err</span><span class="o">=</span>0
	<span class="nv">sem</span><span class="o">=</span><span class="si">$(</span>queue_get_semaphore <span class="s2">"</span><span class="nv">$queue</span><span class="s2">"</span><span class="si">)</span>
	<span class="nv">mutex</span><span class="o">=</span><span class="si">$(</span>queue_get_mutex <span class="s2">"</span><span class="nv">$queue</span><span class="s2">"</span><span class="si">)</span>

	mutex_lock <span class="s2">"</span><span class="nv">$mutex</span><span class="s2">"</span>

	<span class="k">if</span> <span class="o">!</span> queue_append <span class="s2">"</span><span class="nv">$queue</span><span class="s2">"</span> <span class="s2">"</span><span class="nv">$data</span><span class="s2">"</span><span class="p">;</span> <span class="k">then
		</span><span class="nv">err</span><span class="o">=</span>1
	<span class="k">fi

	</span>mutex_unlock <span class="s2">"</span><span class="nv">$mutex</span><span class="s2">"</span>
	sem_post <span class="s2">"</span><span class="nv">$sem</span><span class="s2">"</span>

	<span class="k">return</span> <span class="s2">"</span><span class="nv">$err</span><span class="s2">"</span>
<span class="o">}</span></code></pre></figure>

<h3 id="fun-fact-the-shell-has-structs">Fun fact: The shell has structs</h3>

<p>At this point you are hopefully wondering about the value of the <code class="language-plaintext highlighter-rouge">queue</code> argument that
is passed to the functions. If this were C, the <code class="language-plaintext highlighter-rouge">queue</code> argument would be something
like <code class="language-plaintext highlighter-rouge">struct queue *queue</code>, but since the shell does not have a notion of structs, and
because shell variables can’t be shared between processes, we have to use something that
we can share with other processes: file system objects.</p>

<p>A struct in C is a type that contains other types; a file system object that can contain
other file system objects is a directory. Therefore, the <code class="language-plaintext highlighter-rouge">queue</code> argument contains the
shell equivalent of a pointer to a struct: the path to a directory.</p>

<h4 id="queue_get_semaphore-and-queue_get_mutex"><code class="language-plaintext highlighter-rouge">queue_get_semaphore()</code> and <code class="language-plaintext highlighter-rouge">queue_get_mutex()</code></h4>

<p>This also answers the question, what exactly the <code class="language-plaintext highlighter-rouge">queue_get_semaphore()</code> and
<code class="language-plaintext highlighter-rouge">queue_get_mutex()</code> functions do. They return the path of the semaphore and mutex
that is contained within <code class="language-plaintext highlighter-rouge">$queue</code>. Depending on your coding style they could be
one-liners or you could omit them completely, but I encourage you to write them
something like the following because it’s more readable and less work if you
decide you want to change the name of any of the queue’s members.</p>

<figure class="highlight"><pre><code class="language-bash" data-lang="bash">queue_get_semaphore<span class="o">()</span> <span class="o">{</span>
	<span class="nb">local </span><span class="nv">queue</span><span class="o">=</span><span class="s2">"</span><span class="nv">$1</span><span class="s2">"</span>

	<span class="nb">echo</span> <span class="s2">"</span><span class="nv">$queue</span><span class="s2">/sem"</span>
	<span class="k">return </span>0
<span class="o">}</span>

queue_get_mutex<span class="o">()</span> <span class="o">{</span>
	<span class="nb">local </span><span class="nv">queue</span><span class="o">=</span><span class="s2">"</span><span class="nv">$1</span><span class="s2">"</span>

	<span class="nb">echo</span> <span class="s2">"</span><span class="nv">$queue</span><span class="s2">/mutex"</span>
	<span class="k">return </span>0
<span class="o">}</span></code></pre></figure>

<h4 id="queue_init-and-queue_destroy"><code class="language-plaintext highlighter-rouge">queue_init()</code> and <code class="language-plaintext highlighter-rouge">queue_destroy()</code></h4>

<p>Now that we know what’s behind these two functions, we can also write functions
that initialize and clean up a queue. The initialization function, <code class="language-plaintext highlighter-rouge">queue_init()</code>
simply attempts to create a new directory with a semaphore inside.</p>

<figure class="highlight"><pre><code class="language-bash" data-lang="bash">queue_init<span class="o">()</span> <span class="o">{</span>
	<span class="nb">local </span><span class="nv">queue</span><span class="o">=</span><span class="s2">"</span><span class="nv">$1</span><span class="s2">"</span>

	<span class="nb">local </span>sem

	<span class="nv">sem</span><span class="o">=</span><span class="si">$(</span>queue_get_semaphore <span class="s2">"</span><span class="nv">$queue</span><span class="s2">"</span><span class="si">)</span>

	<span class="k">if</span> <span class="o">!</span> <span class="nb">mkdir</span> <span class="s2">"</span><span class="nv">$queue</span><span class="s2">"</span><span class="p">;</span> <span class="k">then</span>
		<span class="c"># queue exists</span>
		<span class="k">return </span>1
	<span class="k">fi

	if</span> <span class="o">!</span> sem_init <span class="s2">"</span><span class="nv">$sem</span><span class="s2">"</span><span class="p">;</span> <span class="k">then
		if</span> <span class="o">!</span> <span class="nb">rmdir</span> <span class="s2">"</span><span class="nv">$queue</span><span class="s2">"</span><span class="p">;</span> <span class="k">then
			</span><span class="nb">echo</span> <span class="s2">"Could not clean up </span><span class="nv">$queue</span><span class="s2">"</span> 1&gt;&amp;2
		<span class="k">fi

		return </span>1
	<span class="k">fi

	return </span>0
<span class="o">}</span></code></pre></figure>

<p>Likewise, the destructor <code class="language-plaintext highlighter-rouge">queue_destroy()</code> attempts to free the queue’s semaphore
and then removes the entire queue.</p>

<figure class="highlight"><pre><code class="language-bash" data-lang="bash">queue_destroy<span class="o">()</span> <span class="o">{</span>
	<span class="nb">local </span><span class="nv">queue</span><span class="o">=</span><span class="s2">"</span><span class="nv">$1</span><span class="s2">"</span>

	<span class="nb">local </span>sem

	<span class="nv">sem</span><span class="o">=</span><span class="si">$(</span>queue_get_semaphore <span class="s2">"</span><span class="nv">$queue</span><span class="s2">"</span><span class="si">)</span>

	<span class="k">if</span> <span class="o">!</span> sem_destroy <span class="s2">"</span><span class="nv">$sem</span><span class="s2">"</span><span class="p">;</span> <span class="k">then
		return </span>1
	<span class="k">fi

	if</span> <span class="o">!</span> <span class="nb">rm</span> <span class="nt">-rf</span> <span class="s2">"</span><span class="nv">$queue</span><span class="s2">"</span><span class="p">;</span> <span class="k">then
		return </span>1
	<span class="k">fi

	return </span>0
<span class="o">}</span></code></pre></figure>

<p>You might argue that the <code class="language-plaintext highlighter-rouge">sem_destroy()</code> call is not necessary since the semaphore
would be removed by <code class="language-plaintext highlighter-rouge">rm -rf</code> anyways, but the call serves another purpose: to make
sure that <code class="language-plaintext highlighter-rouge">$queue</code> actually points to a valid queue (or a directory that contains
a semaphore anyways).
It’s not perfect, but it will protect you from havoc in case you accidentally pass
your home directory or some other location you probably don’t intend to part with
just yet.</p>

<h4 id="queue_append-and-queue_take_head"><code class="language-plaintext highlighter-rouge">queue_append()</code> and <code class="language-plaintext highlighter-rouge">queue_take_head()</code></h4>

<p>The last missing piece in our queue implementation are the two functions that add
data to and remove data from the queue. In our implementation, we will create a
file called <code class="language-plaintext highlighter-rouge">data</code> inside the queue directory and add the data items to this file,
one item per line. This way, we can easily access the first item using <code class="language-plaintext highlighter-rouge">head</code> and
append items to the file using the <code class="language-plaintext highlighter-rouge">&gt;&gt;</code> operator.</p>

<figure class="highlight"><pre><code class="language-bash" data-lang="bash">queue_get_data<span class="o">()</span> <span class="o">{</span>
	<span class="nb">local </span><span class="nv">queue</span><span class="o">=</span><span class="s2">"</span><span class="nv">$1</span><span class="s2">"</span>

	<span class="nb">echo</span> <span class="s2">"</span><span class="nv">$queue</span><span class="s2">/data"</span>
	<span class="k">return </span>0
<span class="o">}</span>

queue_take_head<span class="o">()</span> <span class="o">{</span>
	<span class="nb">local </span><span class="nv">queue</span><span class="o">=</span><span class="s2">"</span><span class="nv">$1</span><span class="s2">"</span>

	<span class="nb">local </span>data
	<span class="nb">local </span>first

	<span class="nv">data</span><span class="o">=</span><span class="si">$(</span>queue_get_data <span class="s2">"</span><span class="nv">$queue</span><span class="s2">"</span><span class="si">)</span>

	<span class="k">if</span> <span class="o">!</span> <span class="nv">first</span><span class="o">=</span><span class="si">$(</span><span class="nb">head</span> <span class="nt">-n</span> 1 <span class="s2">"</span><span class="nv">$data</span><span class="s2">"</span><span class="si">)</span><span class="p">;</span> <span class="k">then
		return </span>1
	<span class="k">elif</span> <span class="o">!</span> <span class="nb">sed</span> <span class="nt">-i</span> <span class="s1">'1d'</span> <span class="s2">"</span><span class="nv">$data</span><span class="s2">"</span><span class="p">;</span> <span class="k">then
		return </span>1
	<span class="k">fi

	</span><span class="nb">echo</span> <span class="s2">"</span><span class="nv">$first</span><span class="s2">"</span>
	<span class="k">return </span>0
<span class="o">}</span></code></pre></figure>

<p>The <code class="language-plaintext highlighter-rouge">queue_take_head()</code> function attempts to read the first item from the queue file
and, if successful, removes the first line from the queue file. The <code class="language-plaintext highlighter-rouge">queue_append()</code>
function is even more simple, doing nothing but appending a line.</p>

<figure class="highlight"><pre><code class="language-bash" data-lang="bash">queue_append<span class="o">()</span> <span class="o">{</span>
	<span class="nb">local </span><span class="nv">queue</span><span class="o">=</span><span class="s2">"</span><span class="nv">$1</span><span class="s2">"</span>
	<span class="nb">local </span><span class="nv">item</span><span class="o">=</span><span class="s2">"</span><span class="nv">$2</span><span class="s2">"</span>

	<span class="nb">local </span>data

	<span class="nv">data</span><span class="o">=</span><span class="si">$(</span>queue_get_data <span class="s2">"</span><span class="nv">$queue</span><span class="s2">"</span><span class="si">)</span>

	<span class="k">if</span> <span class="o">!</span> <span class="nb">echo</span> <span class="s2">"</span><span class="nv">$item</span><span class="s2">"</span> <span class="o">&gt;&gt;</span> <span class="s2">"</span><span class="nv">$data</span><span class="s2">"</span><span class="p">;</span> <span class="k">then
		return </span>1
	<span class="k">fi

	return </span>0
<span class="o">}</span></code></pre></figure>

<p>There is one problem with the above two functions though. Like many things in the shell
world, they can’t handle line breaks, so we have to do what we always to when we want to
prevent the shell from mangling our data: encode it in base64<sup id="fnref:3" role="doc-noteref"><a href="#fn:3" class="footnote" rel="footnote">3</a></sup>. The functions need to
be tweaked only slightly:</p>

<figure class="highlight"><pre><code class="language-bash" data-lang="bash">queue_append<span class="o">()</span> <span class="o">{</span>
	<span class="nb">local </span><span class="nv">queue</span><span class="o">=</span><span class="s2">"</span><span class="nv">$1</span><span class="s2">"</span>
	<span class="nb">local </span><span class="nv">item</span><span class="o">=</span><span class="s2">"</span><span class="nv">$2</span><span class="s2">"</span>

	<span class="nb">local </span>data
	<span class="nb">local </span>encoded

	<span class="nv">data</span><span class="o">=</span><span class="si">$(</span>queue_get_data <span class="s2">"</span><span class="nv">$queue</span><span class="s2">"</span><span class="si">)</span>

	<span class="k">if</span> <span class="o">!</span> <span class="nv">encoded</span><span class="o">=</span><span class="si">$(</span><span class="nb">base64</span> <span class="nt">-w</span> 0 <span class="o">&lt;&lt;&lt;</span> <span class="s2">"</span><span class="nv">$item</span><span class="s2">"</span><span class="si">)</span><span class="p">;</span> <span class="k">then
		return </span>1
	<span class="k">fi

	if</span> <span class="o">!</span> <span class="nb">echo</span> <span class="s2">"</span><span class="nv">$encoded</span><span class="s2">"</span> <span class="o">&gt;&gt;</span> <span class="s2">"</span><span class="nv">$data</span><span class="s2">"</span><span class="p">;</span> <span class="k">then
		return </span>1
	<span class="k">fi

	return </span>0
<span class="o">}</span></code></pre></figure>

<p>Note the <code class="language-plaintext highlighter-rouge">-w 0</code> argument passed to <code class="language-plaintext highlighter-rouge">base64</code>. If you forget this (like I did when I first
wrote this function), <code class="language-plaintext highlighter-rouge">base64</code> will insert newlines every 76 bytes of output. D’oh!</p>

<figure class="highlight"><pre><code class="language-bash" data-lang="bash">queue_take_head<span class="o">()</span> <span class="o">{</span>
	<span class="nb">local </span><span class="nv">queue</span><span class="o">=</span><span class="s2">"</span><span class="nv">$1</span><span class="s2">"</span>

	<span class="nb">local </span>data
	<span class="nb">local </span>first

	<span class="nv">data</span><span class="o">=</span><span class="si">$(</span>queue_get_data <span class="s2">"</span><span class="nv">$queue</span><span class="s2">"</span><span class="si">)</span>

	<span class="k">if</span> <span class="o">!</span> <span class="nv">first</span><span class="o">=</span><span class="si">$(</span><span class="nb">head</span> <span class="nt">-n</span> 1 <span class="s2">"</span><span class="nv">$data</span><span class="s2">"</span><span class="si">)</span><span class="p">;</span> <span class="k">then
		return </span>1
	<span class="k">elif</span> <span class="o">!</span> <span class="nb">sed</span> <span class="nt">-i</span> <span class="s1">'1d'</span> <span class="s2">"</span><span class="nv">$data</span><span class="s2">"</span><span class="p">;</span> <span class="k">then
		return </span>1
	<span class="k">elif</span> <span class="o">!</span> <span class="nb">base64</span> <span class="nt">-d</span> <span class="o">&lt;&lt;&lt;</span> <span class="s2">"</span><span class="nv">$first</span><span class="s2">"</span><span class="p">;</span> <span class="k">then
		return </span>1
	<span class="k">fi

	return </span>0
<span class="o">}</span></code></pre></figure>

<p>The improved <code class="language-plaintext highlighter-rouge">queue_take_head()</code> function is even simpler: only the last <code class="language-plaintext highlighter-rouge">echo</code>
needs to be replaced with <code class="language-plaintext highlighter-rouge">base64</code>. However, since <code class="language-plaintext highlighter-rouge">base64</code> may return an error,
we need to make sure to handle that.</p>

<h2 id="the-complete-picture">The complete picture</h2>

<p>The complete queue implementation looks like this.</p>

<figure class="highlight"><pre><code class="language-bash" data-lang="bash">queue_init<span class="o">()</span> <span class="o">{</span>
	<span class="nb">local </span><span class="nv">queue</span><span class="o">=</span><span class="s2">"</span><span class="nv">$1</span><span class="s2">"</span>

	<span class="nb">local </span>sem

	<span class="nv">sem</span><span class="o">=</span><span class="si">$(</span>queue_get_semaphore <span class="s2">"</span><span class="nv">$queue</span><span class="s2">"</span><span class="si">)</span>

	<span class="k">if</span> <span class="o">!</span> <span class="nb">mkdir</span> <span class="s2">"</span><span class="nv">$queue</span><span class="s2">"</span><span class="p">;</span> <span class="k">then</span>
		<span class="c"># queue exists</span>
		<span class="k">return </span>1
	<span class="k">fi

	if</span> <span class="o">!</span> sem_init <span class="s2">"</span><span class="nv">$sem</span><span class="s2">"</span><span class="p">;</span> <span class="k">then
		if</span> <span class="o">!</span> <span class="nb">rmdir</span> <span class="s2">"</span><span class="nv">$queue</span><span class="s2">"</span><span class="p">;</span> <span class="k">then
			</span><span class="nb">echo</span> <span class="s2">"Could not clean up </span><span class="nv">$queue</span><span class="s2">"</span> 1&gt;&amp;2
		<span class="k">fi

		return </span>1
	<span class="k">fi

	return </span>0
<span class="o">}</span>

queue_destroy<span class="o">()</span> <span class="o">{</span>
	<span class="nb">local </span><span class="nv">queue</span><span class="o">=</span><span class="s2">"</span><span class="nv">$1</span><span class="s2">"</span>

	<span class="nb">local </span>sem

	<span class="nv">sem</span><span class="o">=</span><span class="si">$(</span>queue_get_semaphore <span class="s2">"</span><span class="nv">$queue</span><span class="s2">"</span><span class="si">)</span>

	<span class="k">if</span> <span class="o">!</span> sem_destroy <span class="s2">"</span><span class="nv">$sem</span><span class="s2">"</span><span class="p">;</span> <span class="k">then
		return </span>1
	<span class="k">fi

	if</span> <span class="o">!</span> <span class="nb">rm</span> <span class="nt">-rf</span> <span class="s2">"</span><span class="nv">$queue</span><span class="s2">"</span><span class="p">;</span> <span class="k">then
		return </span>1
	<span class="k">fi

	return </span>0
<span class="o">}</span>

queue_get<span class="o">()</span> <span class="o">{</span>
	<span class="nb">local </span><span class="nv">queue</span><span class="o">=</span><span class="s2">"</span><span class="nv">$1</span><span class="s2">"</span>

	<span class="nb">local </span>sem
	<span class="nb">local </span>mutex
	<span class="nb">local </span>data
	<span class="nb">local </span>err

	<span class="nv">err</span><span class="o">=</span>0
	<span class="nv">sem</span><span class="o">=</span><span class="si">$(</span>queue_get_semaphore <span class="s2">"</span><span class="nv">$queue</span><span class="s2">"</span><span class="si">)</span>
	<span class="nv">mutex</span><span class="o">=</span><span class="si">$(</span>queue_get_mutex <span class="s2">"</span><span class="nv">$queue</span><span class="s2">"</span><span class="si">)</span>

	sem_wait <span class="s2">"</span><span class="nv">$sem</span><span class="s2">"</span>
	mutex_lock <span class="s2">"</span><span class="nv">$mutex</span><span class="s2">"</span>

	<span class="k">if</span> <span class="o">!</span> <span class="nv">data</span><span class="o">=</span><span class="si">$(</span>queue_take_head <span class="s2">"</span><span class="nv">$queue</span><span class="s2">"</span><span class="si">)</span><span class="p">;</span> <span class="k">then
		</span><span class="nv">err</span><span class="o">=</span>1
	<span class="k">fi

	</span>mutex_unlock <span class="s2">"</span><span class="nv">$mutex</span><span class="s2">"</span>

	<span class="k">if</span> <span class="o">((</span> err <span class="o">==</span> 0 <span class="o">))</span><span class="p">;</span> <span class="k">then
		</span><span class="nb">echo</span> <span class="s2">"</span><span class="nv">$data</span><span class="s2">"</span>
	<span class="k">fi
	return</span> <span class="s2">"</span><span class="nv">$err</span><span class="s2">"</span>
<span class="o">}</span>

queue_put<span class="o">()</span> <span class="o">{</span>
	<span class="nb">local </span><span class="nv">queue</span><span class="o">=</span><span class="s2">"</span><span class="nv">$1</span><span class="s2">"</span>
	<span class="nb">local </span><span class="nv">data</span><span class="o">=</span><span class="s2">"</span><span class="nv">$2</span><span class="s2">"</span>

	<span class="nb">local </span>sem
	<span class="nb">local </span>mutex
	<span class="nb">local </span>err

	<span class="nv">err</span><span class="o">=</span>0
	<span class="nv">sem</span><span class="o">=</span><span class="si">$(</span>queue_get_semaphore <span class="s2">"</span><span class="nv">$queue</span><span class="s2">"</span><span class="si">)</span>
	<span class="nv">mutex</span><span class="o">=</span><span class="si">$(</span>queue_get_mutex <span class="s2">"</span><span class="nv">$queue</span><span class="s2">"</span><span class="si">)</span>

	mutex_lock <span class="s2">"</span><span class="nv">$mutex</span><span class="s2">"</span>

	<span class="k">if</span> <span class="o">!</span> queue_append <span class="s2">"</span><span class="nv">$queue</span><span class="s2">"</span> <span class="s2">"</span><span class="nv">$data</span><span class="s2">"</span><span class="p">;</span> <span class="k">then
		</span><span class="nv">err</span><span class="o">=</span>1
	<span class="k">fi

	</span>mutex_unlock <span class="s2">"</span><span class="nv">$mutex</span><span class="s2">"</span>
	sem_post <span class="s2">"</span><span class="nv">$sem</span><span class="s2">"</span>

	<span class="k">return</span> <span class="s2">"</span><span class="nv">$err</span><span class="s2">"</span>
<span class="o">}</span>

queue_get_semaphore<span class="o">()</span> <span class="o">{</span>
	<span class="nb">local </span><span class="nv">queue</span><span class="o">=</span><span class="s2">"</span><span class="nv">$1</span><span class="s2">"</span>

	<span class="nb">echo</span> <span class="s2">"</span><span class="nv">$queue</span><span class="s2">/sem"</span>
	<span class="k">return </span>0
<span class="o">}</span>

queue_get_mutex<span class="o">()</span> <span class="o">{</span>
	<span class="nb">local </span><span class="nv">queue</span><span class="o">=</span><span class="s2">"</span><span class="nv">$1</span><span class="s2">"</span>

	<span class="nb">echo</span> <span class="s2">"</span><span class="nv">$queue</span><span class="s2">/mutex"</span>
	<span class="k">return </span>0
<span class="o">}</span>

queue_get_data<span class="o">()</span> <span class="o">{</span>
	<span class="nb">local </span><span class="nv">queue</span><span class="o">=</span><span class="s2">"</span><span class="nv">$1</span><span class="s2">"</span>

	<span class="nb">echo</span> <span class="s2">"</span><span class="nv">$queue</span><span class="s2">/data"</span>
	<span class="k">return </span>0
<span class="o">}</span>

queue_take_head<span class="o">()</span> <span class="o">{</span>
	<span class="nb">local </span><span class="nv">queue</span><span class="o">=</span><span class="s2">"</span><span class="nv">$1</span><span class="s2">"</span>

	<span class="nb">local </span>data
	<span class="nb">local </span>first

	<span class="nv">data</span><span class="o">=</span><span class="si">$(</span>queue_get_data <span class="s2">"</span><span class="nv">$queue</span><span class="s2">"</span><span class="si">)</span>

	<span class="k">if</span> <span class="o">!</span> <span class="nv">first</span><span class="o">=</span><span class="si">$(</span><span class="nb">head</span> <span class="nt">-n</span> 1 <span class="s2">"</span><span class="nv">$data</span><span class="s2">"</span><span class="si">)</span><span class="p">;</span> <span class="k">then
		return </span>1
	<span class="k">elif</span> <span class="o">!</span> <span class="nb">sed</span> <span class="nt">-i</span> <span class="s1">'1d'</span> <span class="s2">"</span><span class="nv">$data</span><span class="s2">"</span><span class="p">;</span> <span class="k">then
		return </span>1
	<span class="k">elif</span> <span class="o">!</span> <span class="nb">base64</span> <span class="nt">-d</span> <span class="o">&lt;&lt;&lt;</span> <span class="s2">"</span><span class="nv">$first</span><span class="s2">"</span><span class="p">;</span> <span class="k">then
		return </span>1
	<span class="k">fi

	return </span>0
<span class="o">}</span>

queue_append<span class="o">()</span> <span class="o">{</span>
	<span class="nb">local </span><span class="nv">queue</span><span class="o">=</span><span class="s2">"</span><span class="nv">$1</span><span class="s2">"</span>
	<span class="nb">local </span><span class="nv">item</span><span class="o">=</span><span class="s2">"</span><span class="nv">$2</span><span class="s2">"</span>

	<span class="nb">local </span>data
	<span class="nb">local </span>encoded

	<span class="nv">data</span><span class="o">=</span><span class="si">$(</span>queue_get_data <span class="s2">"</span><span class="nv">$queue</span><span class="s2">"</span><span class="si">)</span>

	<span class="k">if</span> <span class="o">!</span> <span class="nv">encoded</span><span class="o">=</span><span class="si">$(</span><span class="nb">base64</span> <span class="nt">-w</span> 0 <span class="o">&lt;&lt;&lt;</span> <span class="s2">"</span><span class="nv">$item</span><span class="s2">"</span><span class="si">)</span><span class="p">;</span> <span class="k">then
		return </span>1
	<span class="k">fi

	if</span> <span class="o">!</span> <span class="nb">echo</span> <span class="s2">"</span><span class="nv">$encoded</span><span class="s2">"</span> <span class="o">&gt;&gt;</span> <span class="s2">"</span><span class="nv">$data</span><span class="s2">"</span><span class="p">;</span> <span class="k">then
		return </span>1
	<span class="k">fi

	return </span>0
<span class="o">}</span></code></pre></figure>

<h2 id="but-what-about-">But what about …?</h2>

<p>“That’s nice,” you might think, “but it doesn’t really work without the semaphore
functions.” You’re completely right. I meant to explain about semaphores in this
post, but it turned out to be a bit longer than I expected, so I’ll leave that
for the next time. :-)</p>

<h2 id="footnotes">Footnotes</h2>

<div class="footnotes" role="doc-endnotes">
  <ol>
    <li id="fn:1" role="doc-endnote">
      <p>I should be using the term <em>process-safe</em>, since we the shell doesn’t have threads, but I feel that would cause confusion. Please ignore the inaccuracy. <a href="#fnref:1" class="reversefootnote" role="doc-backlink">&#8617;</a></p>
    </li>
    <li id="fn:2" role="doc-endnote">
      <p>Actually, moving loops into separate functions is a very easy way to make your code more readable. <a href="#fnref:2" class="reversefootnote" role="doc-backlink">&#8617;</a></p>
    </li>
    <li id="fn:3" role="doc-endnote">
      <p>This way you can also store binary data in shell variables. <a href="#fnref:3" class="reversefootnote" role="doc-backlink">&#8617;</a></p>
    </li>
  </ol>
</div>]]></content><author><name></name></author><category term="bash" /><summary type="html"><![CDATA[I promised that we’re going to build a distributed system in bash, but the mutex that we’ve written in the last part is still pretty far way from that goal. This time, let’s build something more tangible: a queue!]]></summary></entry></feed>