I have a VPS that is hosting a mail server, CalDAV/CardDAV for calendar and contacts, and some other daily necessities. Because I like to keep my attack surface small (and having temporal wiggle space for deploying security updates), most of the services on this VPS are only accessible from inside a VPN. Because the VPS is one of those semi-virtualized ones where all VPSes share the host kernel, I can’t just go ahead and load kernel modules as I see fit. Or in other words, I cannot use a VPN that needs more than a TUN/TAP interface from the kernel, such as IPsec VPNs. So for a lack of other options, I have been using OpenVPN for the past several years, and it has been working okay-ish, except I never got it to work on my iPhone. Like on Android, there is no native OpenVPN support on iOS, meaning you have to use an app for it, and I couldn’t for the life of me figure out how to get it to connect to my server. Luckily, I got another VPS in the meanwhile, and it allows me to load kernel modules, which means the IPsec VPN option is back on the table – so I decided to have a closer look at strongswan one more time. In the end, it took me several evenings to figure out a configuration that uses certificates for mutual authentication and works reasonably well on Linux as well as iOS clients. This post explains how I got it all to work.
It starts with the PKI
The main reason why it’s annoying to set up a VPN is that you need to set up a PKI (short
for public key infrastructure) and distribute keys and certificates to clients. In this
regard, IPsec isn’t any better or more convenient than OpenVPN, but I found pki, the
tool that comes with strongswan much easier to use than OpenVPN’s easy-rsa or openssl.
Also, it turns out that it is immensely helpful to take notes that allow you to recover
your memory when you need it. And to write scripts that reduce the amount of information
you need to remember in the first place. So first of all, we will create a few small
scripts for setting up a new CA, generating client and server certificates, and exporting
client certificates either as MobileConfig for iOS clients, or as a shell script that
configures strongswan on Debian-flavored Linux boxes.
Trusting strangers
But before we jump into the nitty-gritty, we need to talk about trust. Imagine someone knocks at your door. You open it, and on the other side is a person you have never met in your entire life. They say they are a police officer. You believe them, even though they are a complete stranger. Why? They are in a police uniform, so they have to be a police officer, right? Then you remember your friend – who is certainly not a police officer – showing up to your Halloween party in a uniform just like that. You decide to ask the person at the door for their ID. It looks legitimate – not that you would know what a legitimate ID looks like without asking Google – so you choose to put your doubts aside. Of course, the ID might be fake or stolen, too, and to completely establish the authenticity of the officer, you would have to go to or call the police and ask them to verify the information on the ID. Luckily, there is usually no need to be paranoid like this.
In the analog world, we have a lot of implicit, circumstantial trust. When we buy groceries, we assume that the person at the register is a legitimate store clerk because they are at the register. When we go to a restaurant, we assume that the person that just served us food is a legitimate waiter because we’re at a restaurant and they served us food (maybe even the same food that we ordered). But even if they served us food that we didn’t order, we wouldn’t assume that it was a malicious waiter trying to poison us. We would assume they simply got our order wrong. Why? The risk of getting caught is fairly high, while there is very little for them to gain. It seems very unlikely that the waiter is plotting to harm us, so we implicitly trust them.
On the Internet, the odds are different. The way computers talk to each other is essentially a world-wide game of Chinese whispers. The routers that are relaying messages between us and Amazon might modify the content of our communication (by accident or on purpose), or the person we think we’re communicating with might not be Amazon at all. Because it is relatively easy to operate anonymously, attribution of crime is in most cases impossible (it usually only becomes possible if a criminal reveals information that can be used to identify them, for example when they try to convert their Bitcoin to traditional coins). Unlike in the analog world, there is no voice or face that we can use to guess at the identity of our peer. This is why on the Internet, everyone is a stranger and the trust-by-default mode that we operate in in the analog world does not work. We have to distrust by default.
So how is it that we can shop on the Internet without worrying about all this? When we connect to Amazon, our browser does not blindly believe the peer that they are Amazon, but verifies it by checking their TLS certificate – the digital equivalent of an ID card (except it’s not issued by a government). To establish the authenticity of the TLS certificate, the browser checks whether it was issued by a trusted certificate authority – browsers ship with a set of certificates of CAs that the browser’s developers deem trustworthy. Certificates are generated and verified using mathematical operations that are very hard to reverse (that is, break), making it safe to assume that websites with valid certificates are authentic.
Setting up a certificate authority
Coming back to the question why we need all of this, we need to issue certificates to the server and the clients of the VPN so the clients can make sure they are talking to an authentic server and the server can ensure that the clients are authentic clients. And to issue certificates, we need to set up a certificate authority. Public key infrastructure, or PKI, is the term that is used to refer to the CA and everything around it, such as certificate distribution and revocation mechanisms.
The hard(ish) way
A certificate authority may sound like something really fancy, but in its essence it’s
nothing more than a key pair and a certificate. That means, in order to set up a CA, all
we have to do is create a new key pair and a self-signed certificate. Using the handy pki
tool that comes with strongswan (apt-get install strongswan-pki), this can be done with
two commands.
pki --gen                            \
    --type rsa                       \
    --size 4096                      \
    --outform pem > /etc/ipsec.d/private/cakey.pem

pki --self                           \
    --ca                             \
    --in cakey.pem                   \
    --type rsa                       \
    --lifetime 3650                  \
    --dn "C=DE,O=m10k,CN=ca.m10k.de" \
    --outform pem > /etc/ipsec.d/cacerts/cacert.pem
Creating a certificate for a server is somewhat similar, except that we need to use
the CA’s key to sign the new certificate. Using pki, the process can be done in
two steps:
pki --gen              \
    --type rsa         \
    --size 4096        \
    --outform pem      \
    > serverkey.pem

pki --pub              \
    --outform pem      \
    --in serverkey.pem | pki --issue                                  \
                             --lifetime 3650                          \
                             --cacert /etc/ipsec.d/cacerts/cacert.pem \
                             --cakey /etc/ipsec.d/private/cakey.pem   \
                             --dn "C=DE,O=m10k,CN=m10k.jp"            \
                             --san "m10k.jp"                          \
                             --flag serverAuth                        \
                             --flag ikeIntermediate                   \
                             --outform pem > servercert.pem
We generate client certificates in the exact same way, except that we don’t need to
pass --flag serverAuth and --flag ikeIntermediate to pki.
pki --gen              \
    --type rsa         \
    --size 4096        \
    --outform pem      \
    > clientkey.pem

pki --pub              \
    --outform pem      \
    --in clientkey.pem | pki --issue                                  \
                             --lifetime 3650                          \
                             --cacert /etc/ipsec.d/cacerts/cacert.pem \
                             --cakey /etc/ipsec.d/private/cakey.pem   \
                             --dn "C=JP,O=m10k,CN=apfelfon@m10k.jp"   \
                             --san "apfelfon@m10k.jp"                 \
                             --outform pem > clientcert.pem
The easy way
Executing pki and copying the generated keys/certificates manually isn’t terribly
complicated, but like all boring procedures there’s a good chance that we’ll make
mistakes - or forget the procedure if we have to repeat it a year from now. This is
why I wrote a few scripts that streamline the entire
process.
The script mkca can be used to set up a new certificate authority.
mkca --root /etc/ipsec.d      \
     --country DE             \
     --organization m10k      \
     --common-name ca.m10k.de
To generate a key and certificate for a server, we’d use mkcert.
mkcert --root /etc/ipsec.d          \
       --country DE                 \
       --organization m10k          \
       --common-name m10k.jp
If we pass the --client option to mkcert, we generate a key and certificate for
a VPN client.
mkcert --root /etc/ipsec.d          \
       --client                     \
       --country JP                 \
       --organization m10k          \
       --common-name apfelfon@m10k.jp
Configuring strongswan on the server
Now that we have the CA and certificates for our server in place, we can set up the rest of the VPN server. So first of all, let’s have a look at the logical topology of the network we’re trying to build.
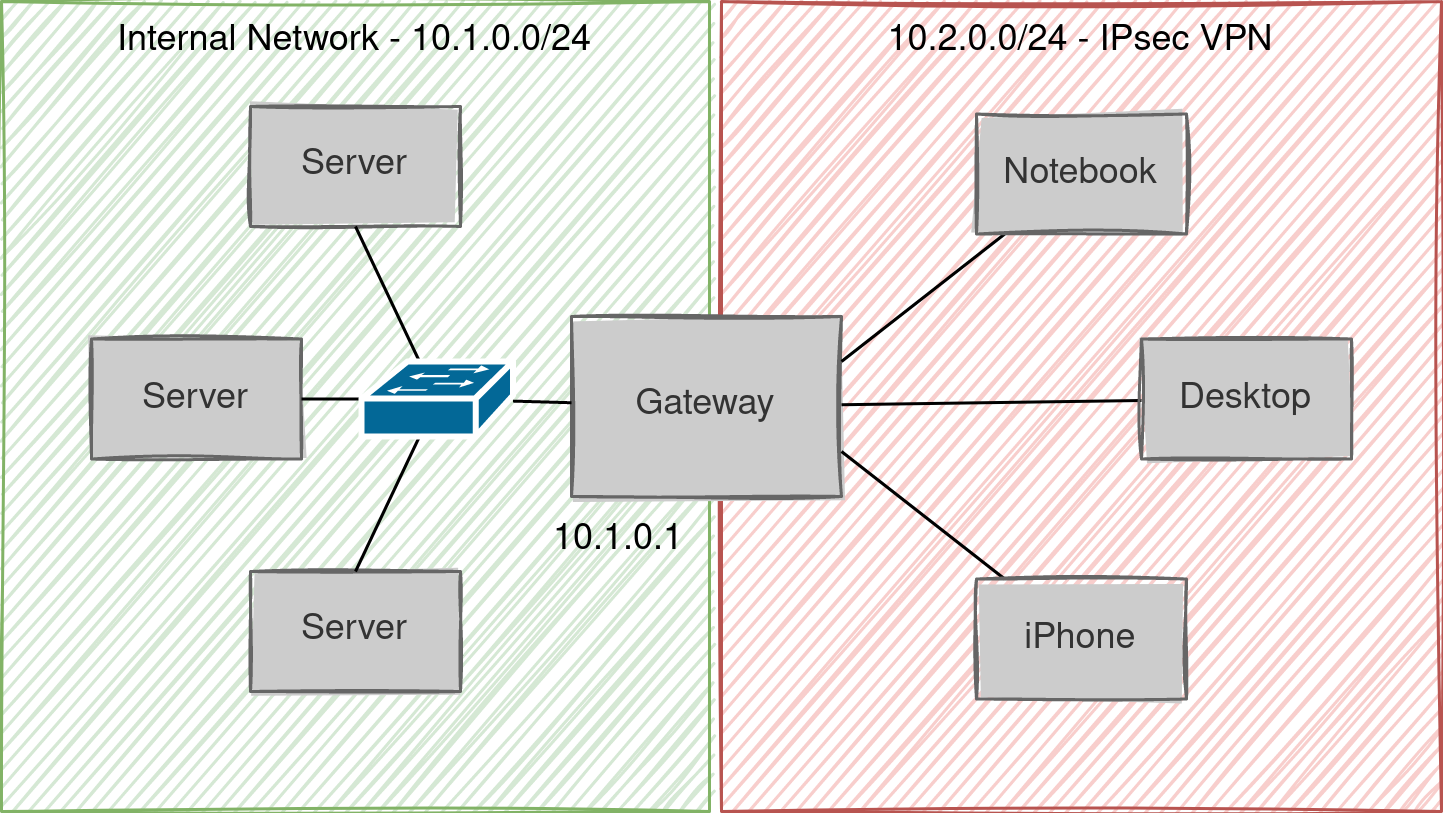
On the left side, we have our internal network, 10.1.0.0/24. On the right side, we have the
IPsec network, 10.2.0.0/24, and we want the server that is running strongswan (the gateway)
to assign addresses to the machines in the right network and to route between the two
networks. Strongswan can be configured for this scenario with relatively few configuration
changes. The following is strongswan’s configuration file, /etc/ipsec.conf.
config setup
        # strictcrlpolicy=yes
        # uniqueids = no

conn %default
        dpdaction=clear
        dpddelay=300s
        fragmentation=yes
        mobike=yes
        compress=yes

conn m10k.jp-base
        keyexchange=ikev2
        left=%any
        leftauth=pubkey
        leftid=m10k.jp
        leftcert=m10k.jp.pem
        leftsendcert=always
        leftsubnet=10.1.0.0/24
        leftfirewall=yes
        right=%any
        rightsourceip=10.2.0.0/24
        rightdns=10.1.0.1

conn m10k.jp-eaptls
        also=m10k.jp-base
        rightauth=eap-tls
        rightid=%any
        eap_identity=%any
        auto=add
        reauth=no
What’s of particular interest here are the last two conn sections. The first one defines
the basic settings for all connections. Because iOS clients do not support EAP-TLS for
mutual authentication, we have to use public-key authentication for the left side (that is,
the mechanism the client uses to authenticate the server). The leftauth, leftid, and
leftcert directives are what’s used for this. Further, iOS clients expect the server to
send their certificate without having to ask them first, so we need to set leftsendcert to
always, otherwise iPhones won’t be able to connect. Finally, the leftsubnet directive
tells strongswan that 10.1.0.0/24 is the network that VPN clients should be able to access,
and leftfirewall instructs strongswan to insert rules for the clients to the gateway’s
iptables. Directives starting with right configure the right logical subnet (the client’s
network). right=%any means that clients with any IP address or host name may connect.
rightsourceip=10.2.0.0/24 tells strongswan to assign addresses from 10.2.0.0/24 to VPN
clients, and rightdns=10.1.0.1 means that VPN clients should resolve names using the DNS
server 10.1.0.1.
The last conn section configures EAP-TLS authentication. First, the also=m10k.jp-base
statement tells strongswan that this connection should inherit the settings from
m10k.jp-base. rightauth=eap-tls means that clients must use EAP-TLS to authenticate
themselves with the server. Since authentication uses EAP-TLS, the rightid=%any and
eap_identity=%any effectively mean that all clients with a valid certificate from our
CA may connect to this server. Finally, the reauth=no option tells the server not to
initiate reauthentications. This is necessary for iOS clients since they don’t expect the
server to do that, and would disconnect when that happens.
Now that we’ve got strongswan configured, all that’s left to do is tell it the password for
the server’s private key. Because mkcert stored the private key unencrypted (that is,
without a password), it’s enough to add the following line to /etc/ipsec.secrets.
: RSA m10k.jp.pem
By the way, all of the above can also be achieved with exportcert from mkpki. Assuming that
we generated certificates as shown above, we can generate a configuration script for the VPN
server with the following command.
exportcert --root /etc/ipsec.d   \
           --common-name m10k.jp \
           --server m10k.jp > setup.sh
chmod u+x setup.sh
./setup.sh
Either way, now we can restart strongswan and the fun begins.
/etc/init.d/ipsec restartWell, not quite. Because our iptables policy is to drop everything by default, we need to add
the following rules to allow IPsec traffic. eth0 is the interface that connects the gateway
to the Internet.
iptables -A INPUT   -j ACCEPT -i eth0 -p esp
iptables -A INPUT   -j ACCEPT -i eth0 -p ah
iptables -A INPUT   -j ACCEPT -i eth0 -p udp --dport isakmp
iptables -A INPUT   -j ACCEPT -i eth0 -p udp --dport ipsec-nat-t
iptables -A OUTPUT  -j ACCEPT -o eth0 -p esp
iptables -A OUTPUT  -j ACCEPT -o eth0 -p ah
iptables -A OUTPUT  -j ACCEPT -o eth0 -p udp --sport isakmp
iptables -A OUTPUT  -j ACCEPT -o eth0 -p udp --sport ipsec-nat-t

iptables -A INPUT   -j ACCEPT -s 10.2.0.0/24 -d 10.1.0.1
iptables -A OUTPUT  -j ACCEPT -s 10.1.0.1    -d 10.2.0.0/24

iptables -A FORWARD -j ACCEPT -s 10.2.0.0/24 -d 10.1.0.0/24 \
         -i eth0 -m policy --dir in --pol ipsec --reqid 1 --proto esp
iptables -A FORWARD -j ACCEPT -s 10.1.0.0/24 -d 10.2.0.0/24 \
         -o eth0 -m policy --dir out --pol ipsec --reqid 1 --proto esp
Configuring strongswan on the client
The steps that are needed to configure strongswan on the client side aren’t much different from the server side. First, we generate a key and a certificate for the client using mkpki.
mkcert --root /etc/ipsec.d          \
       --client                     \
       --country JP                 \
       --organization m10k          \
       --common-name client@m10k.jp
Now we need to copy these files to the client’s /etc/ipsec.d directory (I’ll skip this step here) and add the password for the key to /etc/ipsec.secrets. Again, since the client key is not password-protected, this is trivial.
echo " : RSA client@m10k.jp.pem" >> /etc/ipsec.secretsFinally, we need to configure strongswan by editing /etc/ipsec.conf to look like the following.
config setup
        # strictcrlpolicy=yes
        # uniqueids = no

conn %default
        ikelifetime=60m
        keylife=20m
        rekeymargin=3m
        keyingtries=1
        keyexchange=ikev2

conn m10k
        leftauth=eap-tls
        left=%defaultroute
        leftid=client@m10k.jp
        leftsubnet=0.0.0.0/0
        leftcert=client@m10k.jp.pem
        leftsourceip=%config
        leftfirewall=yes
        right=m10k.jp
        rightsubnet=10.1.0.0/24
        rightauth=any
        rightid=@m10k.jp
        auto=start
        eap_identity=%identity
This is mostly similar to the configuration on the server-side, except that here left is
the local interface we use to connect to the server and right is the server. What’s
different from the server configuration is the leftsourceip=%config directive, which tells
strongswan to obtain an IP address from the server. Other differences are that the id of the
server in rightid needs to be prefixed with an @, and that we need to set eap_identity
to %identity so that strongswan uses the common name from the client certificate as our
identity. Finally, auto=start instructs strongswan to automatically connect to the server
upon startup.
And again, exportcert could have been used to generate a configuration script for the
client, as shown below.
exportcert --root /etc/ipsec.d          \
           --common-name client@m10k.jp \
           --server m10k.jp > setup-client.sh
Whether we chose to manually configure the client or leave it to a script, we need to restart strongswan for the changes to take effect.
/etc/init.d/ipsec restartIf everything went well, we should be able to connect to the server at 10.1.0.1. The status
of the VPN connection can be seen by executing ipsec statusall as root.
Configuring iOS
The iPhone is a wonderful device for non-techie people. That is to say, anyone trying to do
something that is slightly more advanced or unusual will quickly perceive the user-friendly
interface to be an obstacle rather than a guide. In the case of VPNs using IKEv2 and EAP-TLS,
it’s even worse, because the settings app looks like it can be used to configure the VPN
but it really can’t. It is not possible to configure IPsec IKEv2 with EAP-TLS on iPhones
through the settings app. The only way to configure iPhones is to generate a MobileConfig
file and open it with the settings app.
The strongswan documentation has a
page that explains
how to create a MobileConfig file, but it is nevertheless an annoying process because a
pkcs12 container with the certificates and key need to be created and embedded into the
configuration file.
This is where exportcert comes in handy again. Using the --iphone option, we can instruct
it to generate a MobileConfig profile for iOS clients:
exportcert --root /etc/ipsec.d \
           --common-name apfelfon@m10k.jp \
           --server m10k.jp > apfelfon.mobileconfig
The password that needs to be entered during the export is used to encrypt the pkcs12 container that is embedded in the profile. Since we’ll have to use iCloud or Google Drive or something similar to transfer the file to the iPhone, encryption is generally a good idea.
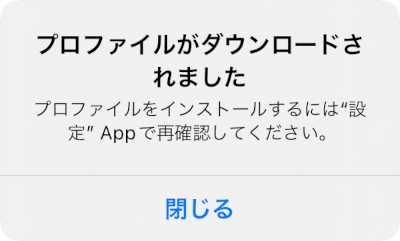
Once we’ve transfered the profile to our iPhone, we tap it in the File app, which will cause a dialog to be shown that tells us to check the settings app.
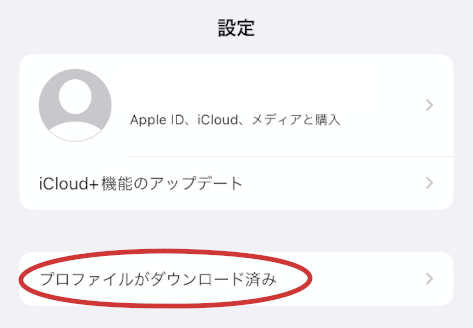
In the settings app, there will be an entry, telling us that there are new profiles that can be installed.
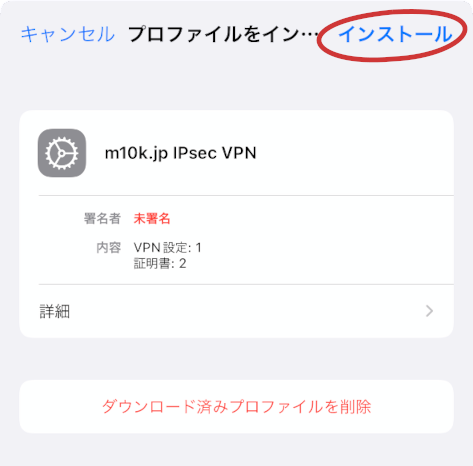
Tapping Install in the top right corner of the dialog will install the profile. When asked for a password, we need to enter the password that we defined when we exported the profile.
By toggling the VPN switch in the settings app, we can now connect to the VPN server. If the connection was successfully established, a VPN icon will appear in the quick settings.

Parting words
Certificate management is usually the most annoying aspect of operating a VPN (no matter the flavor), since – unlike the initial setup – it doesn’t go away. But investing a few hours to write scripts that automate the boring parts pays off very quickly. Of course, that doesn’t mean the initial setup is easy either. This article may not convey it very well but it actually took me several weekends to figure out the correct way to set up the strongswan server and iOS client so it would work at least somewhat decently. That being said, my iPhone still disconnects from the VPN every hour or so, no matter what re-authentication and re-keying settings I use. On the other hand I’ve never had a more stable VPN connection between my Linux boxes.