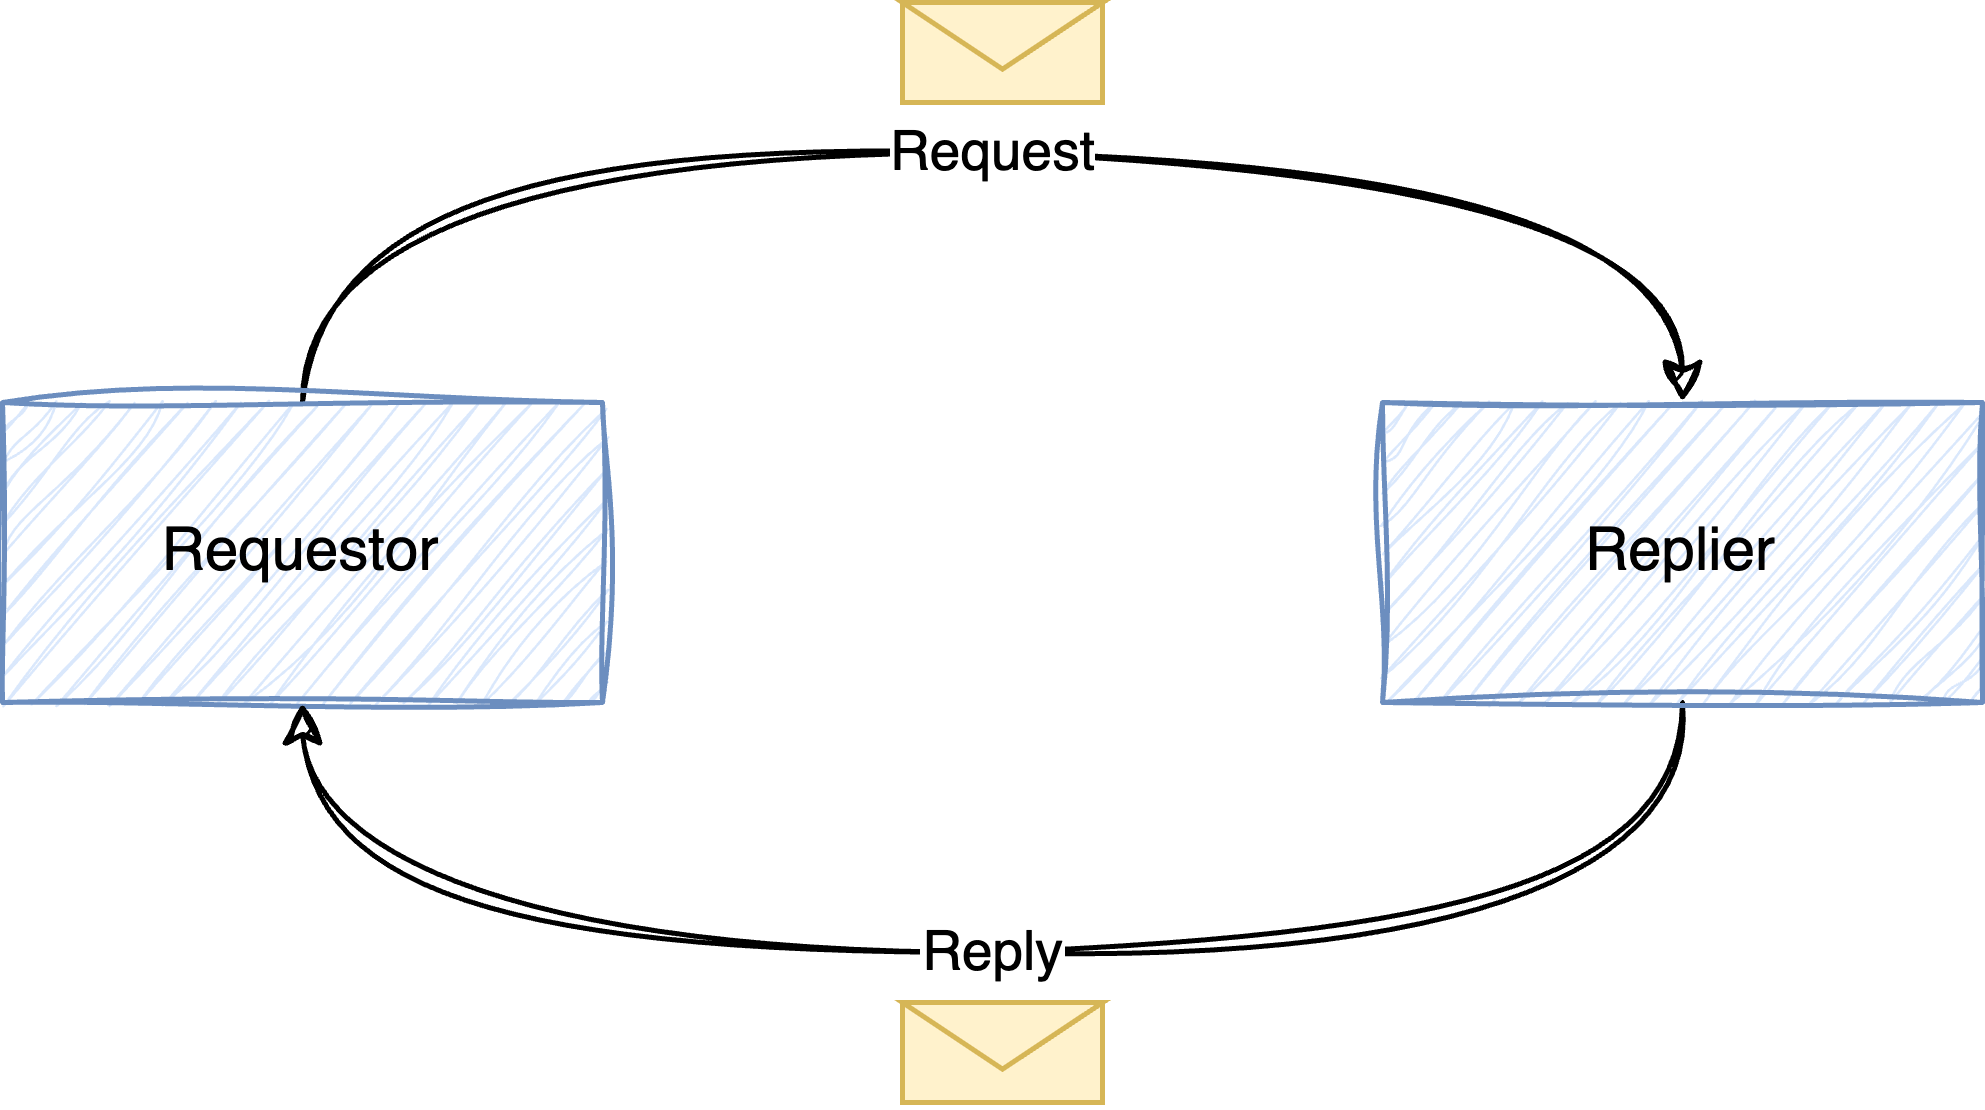
In the previous two articles, I explained how scripts can communicate with point-to-point and publish-subscribe messaging. There are different ways how the two mechanisms can be used, so this time we’re going to have a look at the Request-Reply Pattern. In this pattern, there are two parties. The first one, the requestor, sends a request to the replier, which sends a response back to the requestor, as shown in the following figure. If this reminds you of client-server communication, you got the idea.
The request-reply pattern can be implemented with point-to-point channels and publish-subscribe channels. Point-to-point channels make a lot of sense if there is only one replier (or multiple repliers that are competing consumers). Using the notation from the Enterprise Integration Patterns book, this simple communication looks something like below.

Let’s now use this pattern with point-to-point channels to implement a naive key-value store where the requestor uses messages to set and get data from the replier.
Message format
There are two operations that a requestor may perform: it can either set a value in the store, or retrieve a value from the store. When setting a value, it has to tell the replier the name and the value of the field. When retrieving a value, the name of the field is all that is needed.
In the first case, the requestor sends a SetRequest, which has the following format.
{
  "type": "SetRequest",
  "name": "name-of-the-field",
  "value": "value-of-the-field"
}
The second case, it uses a GetRequest, which is essentially the same, minus the
value field.
{
  "type": "GetRequest",
  "name": "name-of-the-field"
}
When the replier receives a GetRequest, it reads the value from the backing storage and sends a GetResponse to the requestor. The response has the following format.
{
  "type": "GetResponse",
  "name": "name-of-the-field",
  "status": return-code
  "value": "value-of-the-field"
}
The value of the field status will be set to 0 if the request was successful,
otherwise it will be set to some non-zero value. In the latter case, there is no
value that can be sent back to the requestor, and the replier may omit the value
field from the response.
When the replier receives a SetRequest, it sets the value in the backing storage and
returns a message like the following, indicating if the operation was successful. Again,
the status will be 0 upon success or non-zero otherwise.
{
  "type": "SetResponse",
  "name": "name-of-the-field",
  "status": return-code
}
The replier
To send requests to the key-value store, requestors need to know the address of the
replier. Thus, we decide that the replier must listen on the address pub/kvs. That
means that the replier must look something like the following.
#!/bin/bash

main() {
    local endpoint

    if ! endpoint=$(ipc_endpoint_open "pub/kvs"); then
        log_error "Could not open endpoint"
        return 1
    fi

    while true; do
        local msg

        if msg=$(ipc_endpoint_recv "$endpoint"); then
            handle_message "$endpoint" "$msg"
        fi
    done
}

{
    if ! . toolbox.sh ||
       ! include "log" "json" "conf" "uipc"; then
        exit 1
    fi

    main "$@"
    exit "$?"
}
The replier opens a public endpoint and immediately enters a loop, forever receiving
messages and passing them to handle_message(). The latter function reads the payload
and the sender’s address from the message. It then passes the payload to
handle_request(), which generates the response that is sent back to the sender with
ipc_endpoint_send().
handle_message() {
    local endpoint="$1"
    local msg="$2"

    local data
    local sender
    local response

    if ! data=$(ipc_msg_get_data "$msg") ||
       ! sender=$(ipc_msg_get_source "$msg"); then
        log_error "Could not read message"
        return 1
    fi

    if response=$(handle_request "$data"); then
        ipc_endpoint_send "$endpoint" "$sender" "$response"
    fi
}
The handle_request() function uses json_object_get() to read the request type from
the message data and then passes it on to the function that is responsible for the
request (so, either handle_get_request() or handle_set_request()).
handle_request() {
    local request="$1"

    local -A request_handler
    local request_type

    request_handler["GetRequest"]=handle_get_request
    request_handler["SetRequest"]=handle_set_request

    if request_type=$(json_object_get "$request" "type"); then
        local handler

        handler="${request_handler[$request_type]}"

        if [[ -n "$handler" ]]; then
            "$handler" "$request"
            return "$?"
        else
            log_warn "Received message with invalid type \"$request_type\""
        fi
    fi

    return 1
}
GetRequests are handled by handle_get_request(), which will retrieve the field name
from the request and attempt to query its value from the key-value store. To make the
code as simple as possible, we’ll use the conf module to simulate the key-value store.
The conf_get() function retrieves a value from the backing storage (in this case, a
plaintext configuration file). We use the return code and the data that we got from
conf_get() to create a GetResponse and write it to standard output.
handle_get_request() {
    local request="$1"

    local name
    local value
    local -i status

    if ! name=$(json_object_get "$request" "name"); then
        return 1
    fi

    value=$(conf_get "$name")
    status="$?"

    json_object "type"   "GetResponse" \
                "name"   "$name"       \
                "status" "$status"     \
                "value"  "$value"
}
Similarly, the handle_set_request() function fetches the field name and value from
the request message and calls conf_set() to store the value in the backing storage.
Like conf_get(), conf_set() returns zero upon success, and a non-zero value on
failure, so we can use it’s return value for the status field in the response
message.
handle_set_request() {
    local request="$1"

    local name
    local value
    local -i status

    if ! name=$(json_object_get "$request" "name") ||
       ! value=$(json_object_get "$request" "value"); then
        return 1
    fi

    conf_set "$name" "$value"
    status="$?"

    json_object "type"   "SetResponse" \
                "name"   "$name"       \
                "status" "$status"
}
This is all we need for the replier. We will save it as replier.sh and make it
executable with chmod u+x replier.sh. Admittedly, the error handling could be
improved (I will cover this in a different post) but there shouldn’t be any major
issues with this implementation.
The requestor
Let’s look at the client side now. The requestor sends either a GetRequest or a SetRequest with the necessary data to the replier. For the sake of simplicity, we will use synchronous communication, meaning that the requestor will wait until it receives a response from the replier.
The parameters of the request (get or set, field name, and field value) will be
passed to the requestor on the command line. The command line is parsed using the
opt module, but I will skip the explanation here.
#!/bin/bash

main() {
    local request
    local value
    local name

    opt_add_arg "R" "request" "v"  "get" "The request type"    '^(get|set)$'
    opt_add_arg "V" "value"   "v"  ""    "The value to be set"
    opt_add_arg "N" "name"    "rv" ""    "The field name"

    if ! opt_parse "$@"; then
        return 1
    fi

    request=$(opt_get "request")
    value=$(opt_get "value")
    name=$(opt_get "name")

    perform_request "$request" "$name" "$value"
}

{
    if ! . toolbox.sh ||
       ! include "log" "opt" "json" "uipc"; then
        exit 1
    fi

    main "$@"
    exit "$?"
}
The main() function is pretty much boilerplate code for reading the command line.
The perform_request() function is where things get interesting. We first open an
anonymous endpoint and then call a handler to perform the action that the user
requested.
perform_request() {
    local request="$1"
    local name="$2"
    local value="$3"

    local endpoint
    local -A handler
    local -i result

    handler["get"]=perform_get_request
    handler["set"]=perform_set_request

    if ! endpoint=$(ipc_endpoint_open); then
        log_error "Could not open IPC endpoint"
        return 1
    fi

    "${handler[$request]}" "$endpoint" "$name" "$value"
    result="$?"

    ipc_endpoint_close "$endpoint"
    return "$result"
}
The perform_get_request() function reads data from the key-value store. It uses
send_and_recv() to send a message to the key-value store and wait for the
response. If successful, it will check the status in the message, extract the value
that was read from the key-value store, and then print it to standard output. If any
of these steps fail, it will return an error.
perform_get_request() {
    local endpoint="$1"
    local name="$2"

    local request
    local response
    local data
    local -i status
    local value

    request=$(json_object "type" "GetRequest" \
                          "name" "$name")

    if ! response=$(send_and_recv "$endpoint" "$request") ||
       ! data=$(ipc_msg_get_data "$response") ||
       ! status=$(json_object_get "$data" "status") ||
       (( status != 0 )) ||
       ! value=$(json_object_get "$data" "value"); then
        return 1
    fi

    printf '%s\n' "$value"
}
The perform_set_request() function works similar. It will send a SetRequest to the
key value store and wait for its response. Once received, it will attempt to parse
the response and return the status to the caller.
perform_set_request() {
    local endpoint="$1"
    local name="$2"
    local value="$3"

    local request
    local response
    local data
    local -i status

    request=$(json_object "type"  "SetRequest" \
                          "name"  "$name"      \
                          "value" "$value")

    if ! response=$(send_and_recv "$endpoint" "$request") ||
       ! data=$(ipc_msg_get_data "$response") ||
       ! status=$(json_object_get "$data" "status"); then
        return 1
    fi

    return "$status"
}
Finally, the send_and_recv() function is exactly what it name says. A call to
ipc_endpoint_send(), followed by a call to ipc_endpoint_recv().
send_and_recv() {
    local endpoint="$1"
    local message="$2"

    if ! ipc_endpoint_send "$endpoint" "pub/kvs" "$message"; then
        return 1
    fi

    ipc_endpoint_recv "$endpoint"
}
That’s all we need for the requestor, so we save it as requestor.sh and make it executable.
Test flight
It’s now time to see if everything works, so we first start the replier with the following command.
$ ./replier.shThe key-value store will initially be empty, so querying it should result in an error. The default behavior of the requestor is to send a GetRequest, so we attempt to query a non-existent value and print the requestor’s return value.
$ ./requestor.sh -N foo; echo "$?"
1
The requestor didn’t write any data to standard output, and its return value is
1, indicating an error. The error case is handled correctly.
We want to test the successful case next, so we tell the requestor to set a value
in the store and make it read back the value from the store.
$ ./requestor.sh -R set -N foo -V "Hello world"; echo "$?"
0
$ ./requestor.sh -R get -N foo; echo "$?"
Hello world
0
The requestor signalled success in both cases, and printed the expected data to standard output. Our key-value store works! Admittedly, it is kind of slow, but you didn’t expect a high-performance shell script, did you?
Parallelizing the replier
Let’s pretend that we integrated our key-value store with another system and the poor thing needs to handle thousands of requests per minute now. Obviously, one bash process will not be able to keep up, and so we do what any indisputably sane person would do: throw processes at the problem until it goes away.
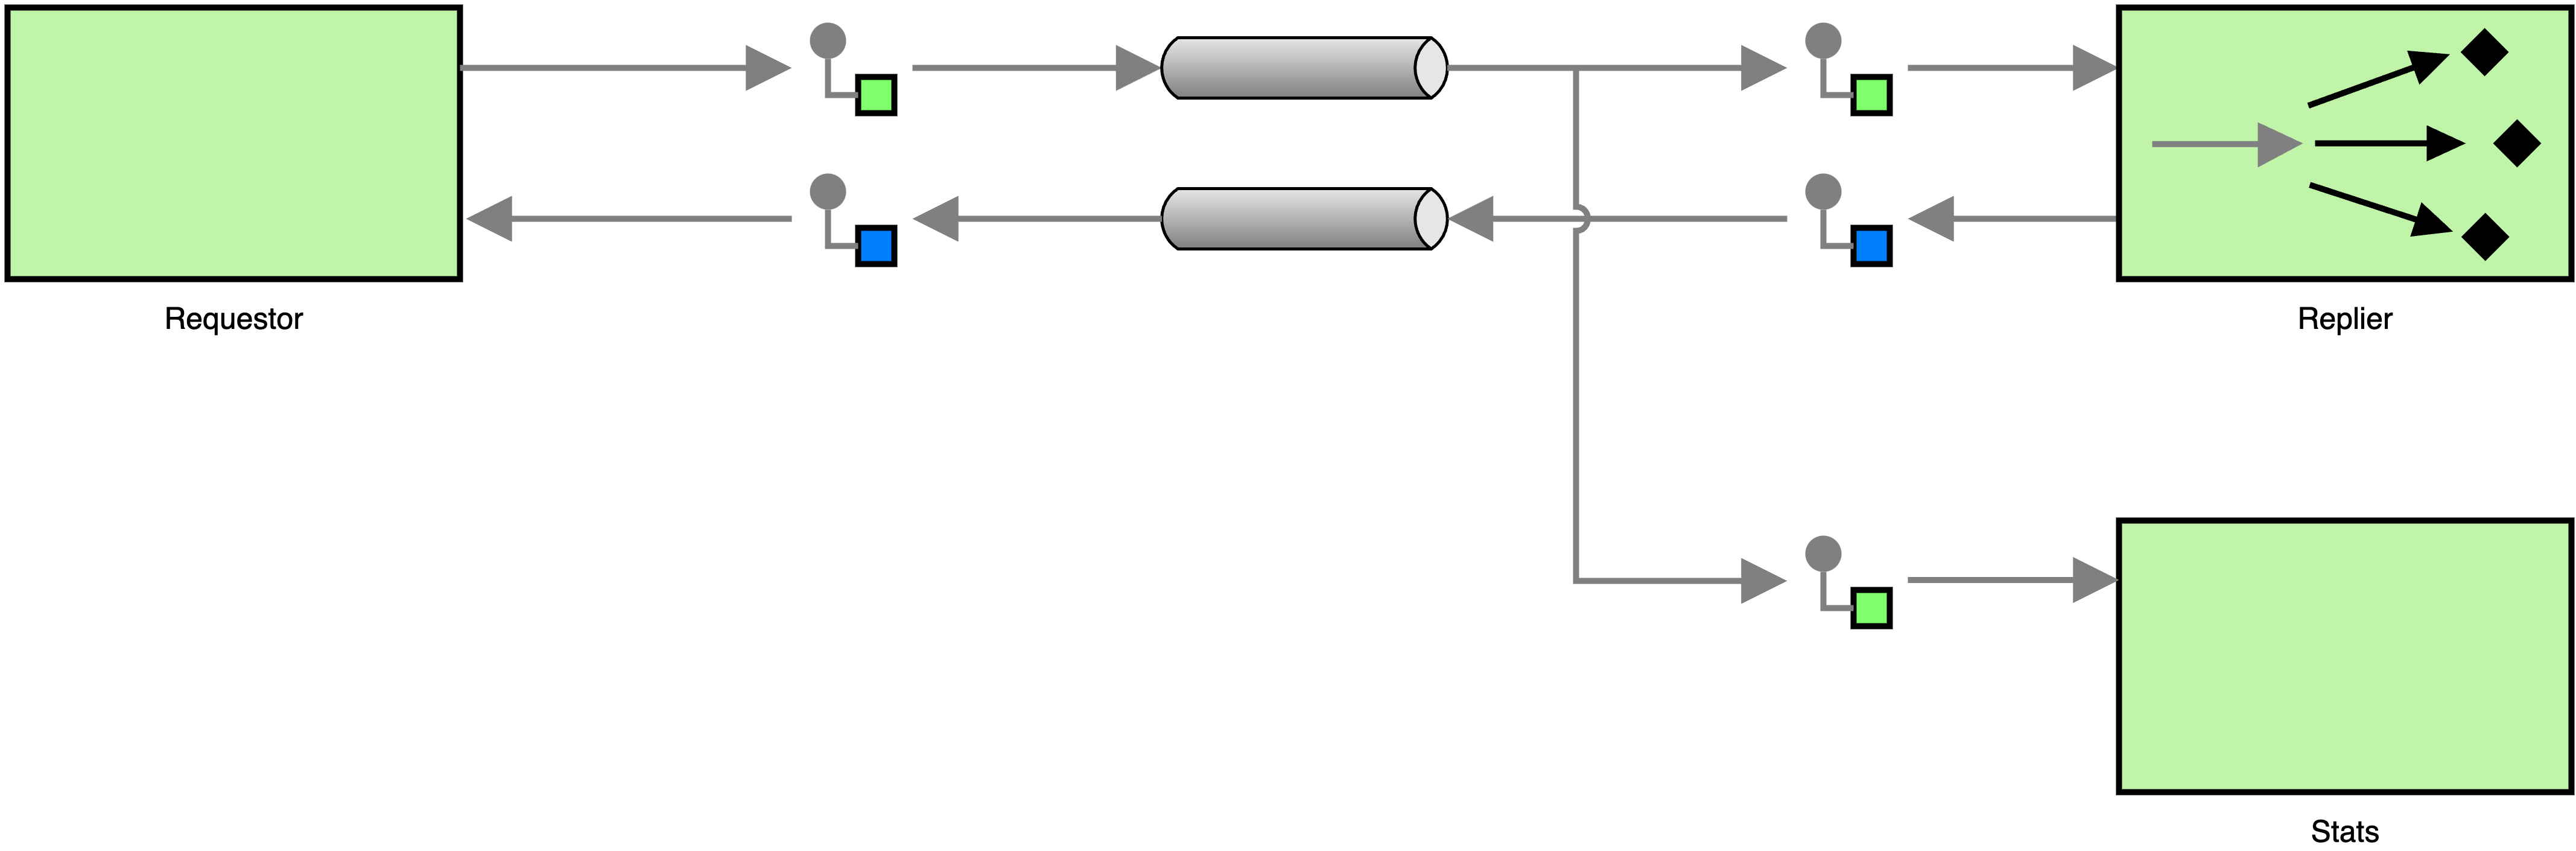
The easiest way to do that is to change the architecture so that there are multiple repliers that implement the Competing Consumers pattern. The EIP notation changes only very slightly.

The code, on the other hand, doesn’t change at all. Because the replier is using an endpoint with a public address, the same endpoint can be opened and used by multiple processes, and messages will be load-balanced over all running processes. What is problematic about the code, though, is that the conf module is not “thread safe”. Simultaneous accesses to the backing store might cause issues, but we will ignore that for now, because that is not really what this post is about. A thorough implementation should not take the same shortcut.
Request-Reply with Publish-Subscribe Messaging
There is nothing functionally wrong with the message architecture we created above, but it is somewhat inflexible. Let’s say we want to add a process to the architecture that collects statistics about requests. The process should log the request types, the field names in the requests, and the time of the requests. In our current architecture, each request message is received by only one replier process, so we would either have to modify the replier side to collect statistics directly or forward messages to a process that collects statistics. In other words, we cannot add functionality to the system without changing the existing architecture, existing components, or both. Let’s see what a better, more flexible architecture looks like.
The main problem with the above architecture is that messages are received by only one process and there is no easy way to make another process receive messages. This is the drawback of point-to-point communication, and thus sending requests via publish-subscribe instead of point-to-point is the easy way out. Of course, changing to publish-subscribe alone is not enough, because it would lead to the following situation.
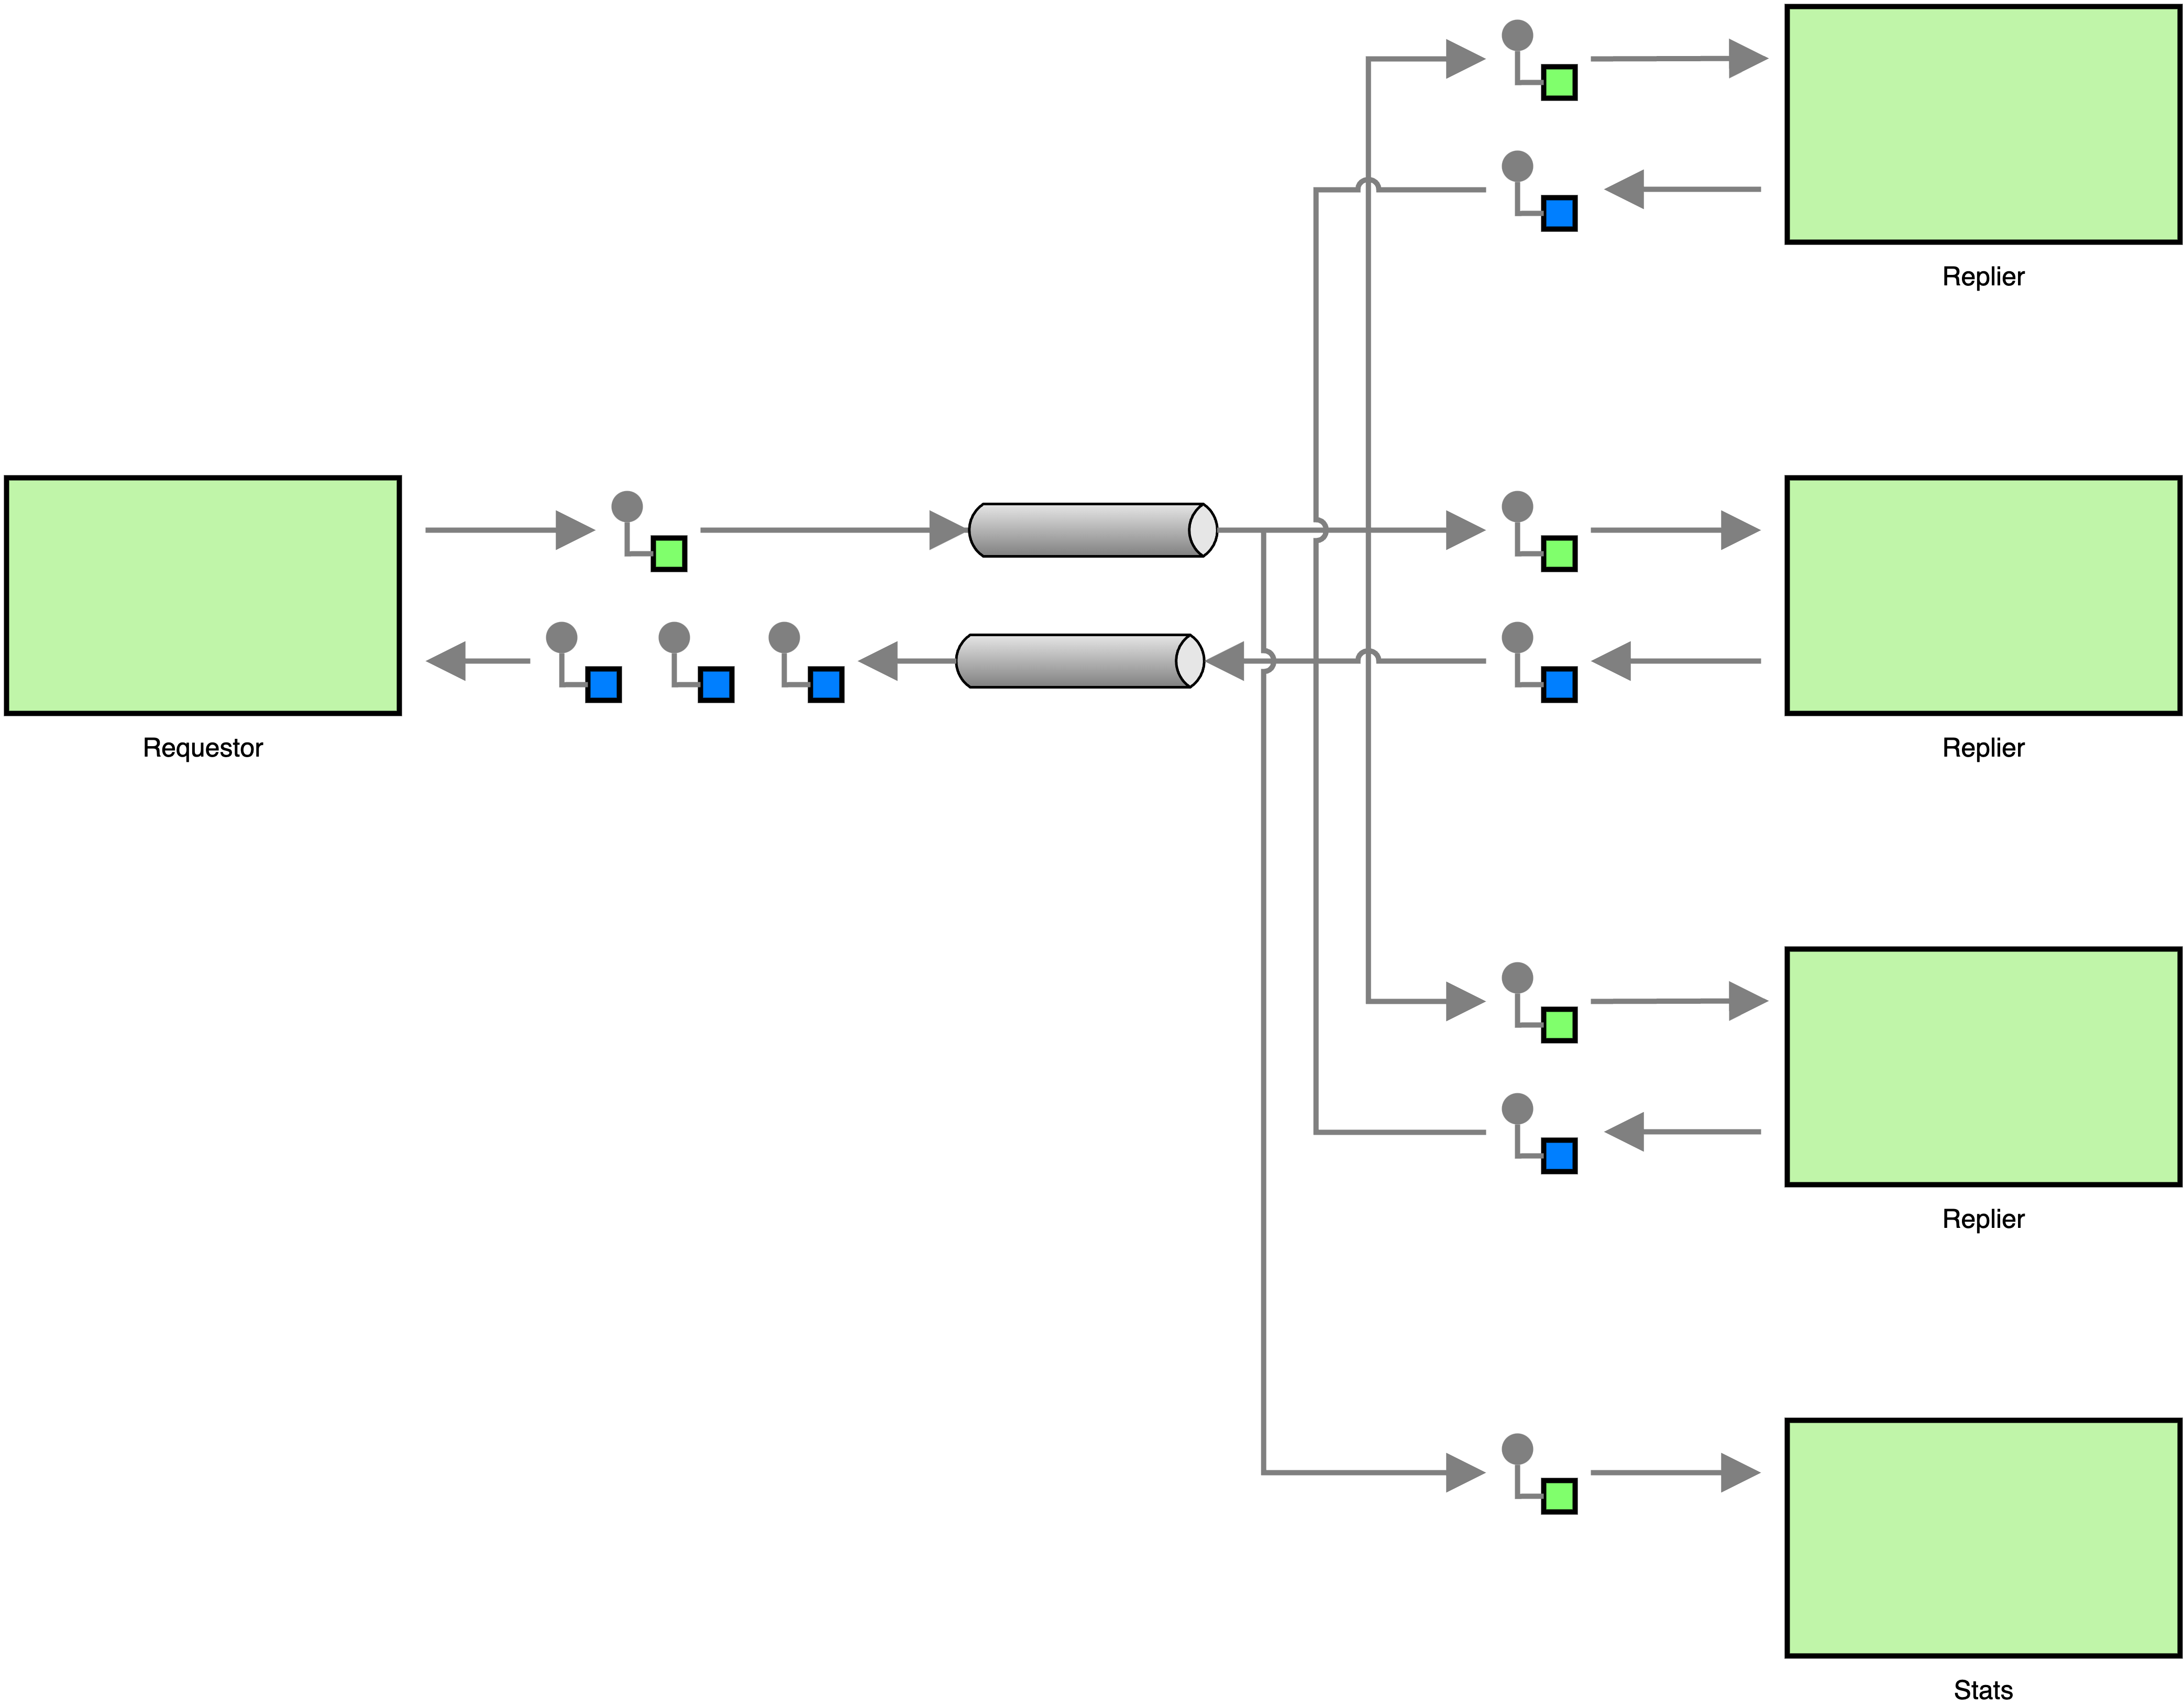
In the above architecture, the requestor sends its request to the pub-sub topic that the repliers are subscribed to. Because each of the repliers will receive a request, each replier will respond to the request, and the requestor will receive multiple responses for a single request. To avoid duplicate responses, all repliers need to share a single endpoint that is subscribed to the topic. This way we can ensure that each request is received by only one replier. The statistics component will use a separate endpoint to subscribe to the topic, making sure that it receives a copy of each request. This can be seen in the next diagram.
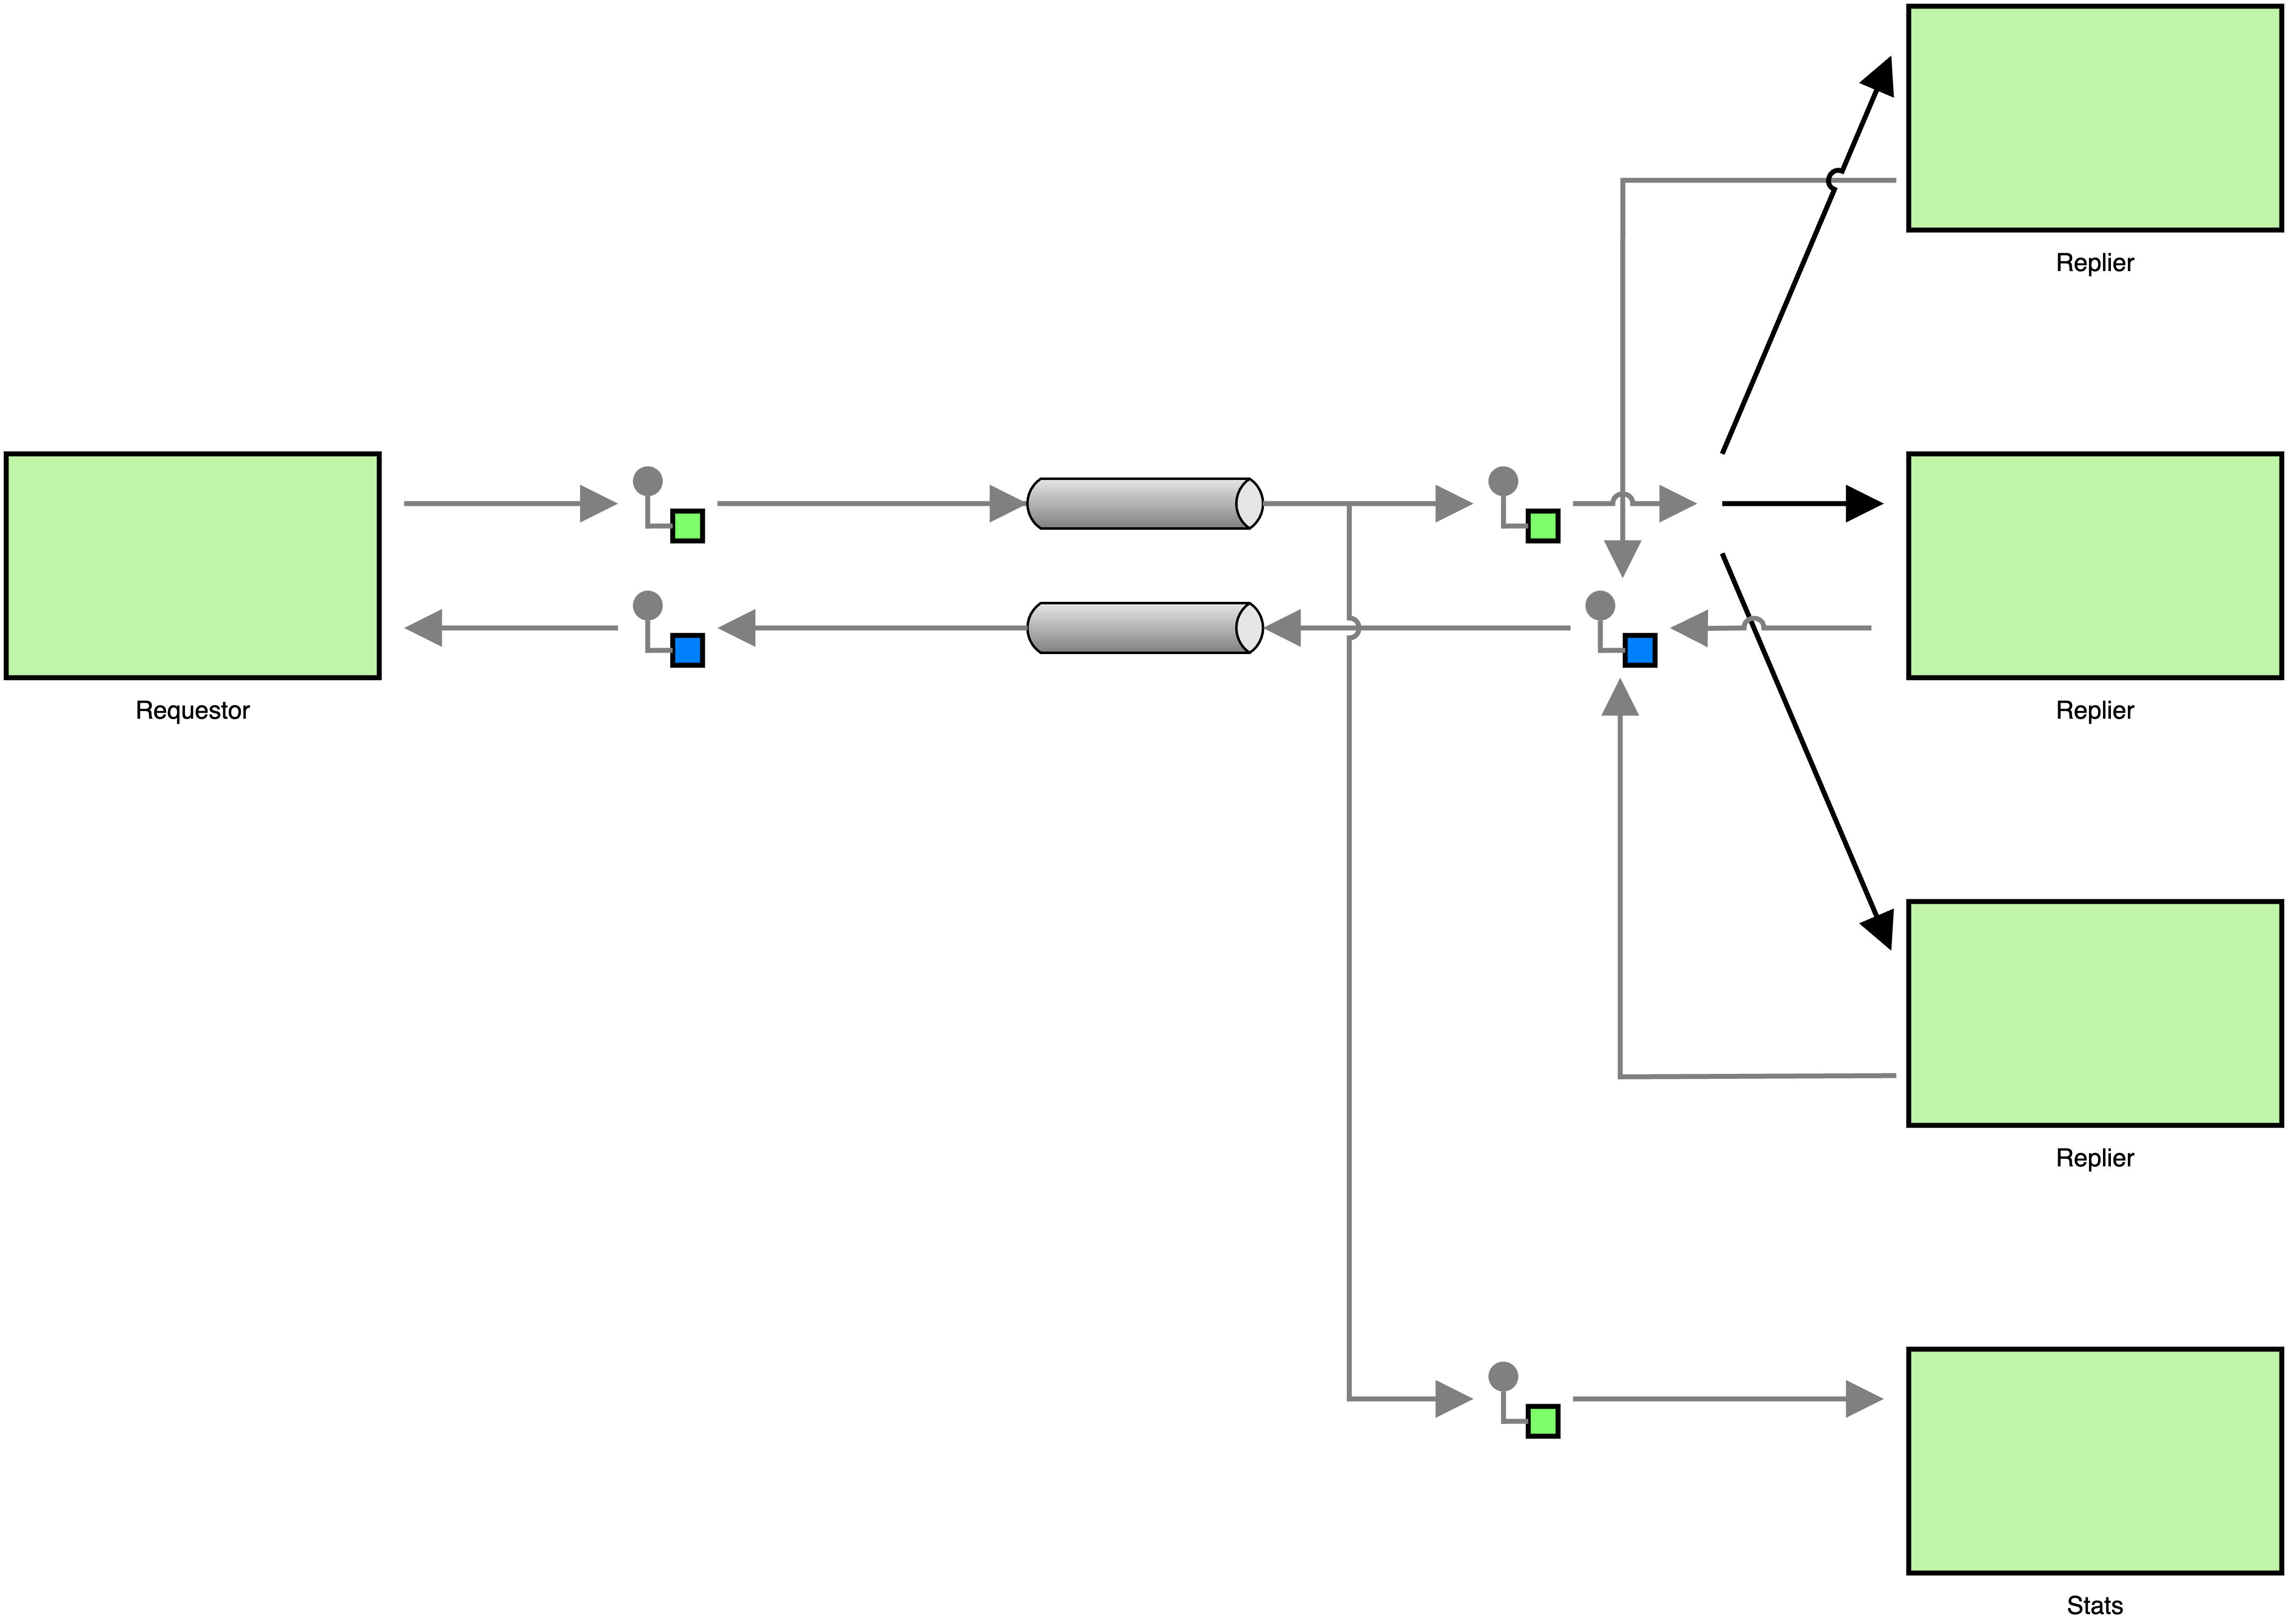
Or, if we use the proper notation for competing consumers, we get the following, simpler diagram.
The migration to publish-subscribe messaging may seem like a big change, but
because most functions handle both kinds of messages, we barely have to change
the code at all. On the replier side, all we have to do is subscribe the endpoint
to the requests topic with a call to ipc_endpoint_subscribe().
main() {
    local endpoint

    if ! endpoint=$(ipc_endpoint_open "pub/kvs"); then
        log_error "Could not open endpoint"
        return 1
    fi

    if ! ipc_endpoint_subscribe "$endpoint" "requests"; then
        log_error "Could not subscribe to topic \"requests\""
        return 1
    fi

    while true; do
        local msg

        if msg=$(ipc_endpoint_recv "$endpoint"); then
            handle_message "$endpoint" "$msg"
        fi
    done
}
We do not remove the address from the call to ipc_endpoint_open() because we need
to make sure that all repliers use the same endpoint, making them competing consumers.
This has the nice side-effect that the new replier will be able to handle requests that
were sent via pub-sub as well as those from point-to-point messages. Hence, old
requestors will not stop working all of a sudden.
The change that is necessary to make requestors send requests with pub-sub messaging
is even smaller than the change we needed on the replier-side. All we have to do is
change the send_and_recv() function to use ipc_endpoint_publish() instead of
ipc_endpoint_send(), and that is it.
send_and_recv() {
    local endpoint="$1"
    local message="$2"

    if ! ipc_endpoint_publish "$endpoint" "requests" "$message"; then
        return 1
    fi

    ipc_endpoint_recv "$endpoint"
}
Meanwhile, the new statistics component does nothing but subscribe to the requests
topic, process received messages, and write the results to standard output. I will
skip the explanation of the code since it doesn’t do anything that wasn’t already in
the requestor and replier implementations. But you can see it below.
#!/bin/bash

collect_stats() {
	local msg="$1"

	local data
	local request_type
	local name
	local timestamp

	timestamp=$(ipc_msg_get_timestamp "$msg")
	data=$(ipc_msg_get_data "$msg")
	request_type=$(json_object_get "$data" "type")
	name=$(json_object_get "$data" "name")

	printf '%s %s %s\n' "$timestamp" "$request_type" "$name"
}

process_requests() {
	local endpoint="$1"

	while true; do
		local msg
		local data

		if msg=$(ipc_endpoint_recv "$endpoint"); then
			collect_stats "$msg"
		fi
	done
}

main() {
	local endpoint

	if ! opt_parse "$@"; then
		return 1
	fi

	if ! endpoint=$(ipc_endpoint_open); then
		log_error "Could not open IPC endpoint"
		return 1
	fi

	if ipc_endpoint_subscribe "$endpoint" "requests"; then
		process_requests "$endpoint"
	fi

	ipc_endpoint_close "$endpoint"
	return 0
}

{
	if ! . toolbox.sh ||
	   ! include "log" "opt" "uipc" "json"; then
		exit 1
	fi

	main "$@"
	exit "$?"
}
Thanks to the new architecture we can add new components into the system
without having to modify or reconfigure the existing system. Aside from
making the architecture more flexible, it also makes our lives a great
deal easier when it comes to debugging, because all we have to do is
create an endpoint and subscribe it to the relevant topics (or the
wildcard topic *) to see what’s going on inside the system.
A word about synchronicity
The Request-Reply pattern can be used with point-to-point messages and publish-subscribe messages, and it can even be used to combine the two. In the above example, we implemented a requestor that synchronously waits for a response from the replier, which might easily turn into a bottleneck in larger systems. This pattern can also be used in an asynchronous fashion, but because this is more effort to do in a Bash script, I will leave it for another time.